Build a secure app in no-code
In this article, we're going to explain how to build a secure web app with no-code tools.
This is important because, if you launch an app that leaks personal information or allows unauthorized personnel to modify your database, nobody will want to use what you built.
Many no-coders fail because they're not aware of these leaks or haven't taken the time to learn about these web development best practices.
There are a number of steps you need to take to secure your web apps:
- filter sensitive data in the backend
- restrict user access
- add access control checks
- prevent escalation of privileges
Don't worry if this sounds a bit technical. By the end of this article, you'll understand what each step means and know exactly what to do.
But first, let's have a look at what happens when a user visits your web app. This will help us understand how private information might be leaked.
You're loading more data than you think
When a user accesses a web page, their browser downloads a bunch of files and data, i.e. HTML, CSS styles, Javascript, images, etc.
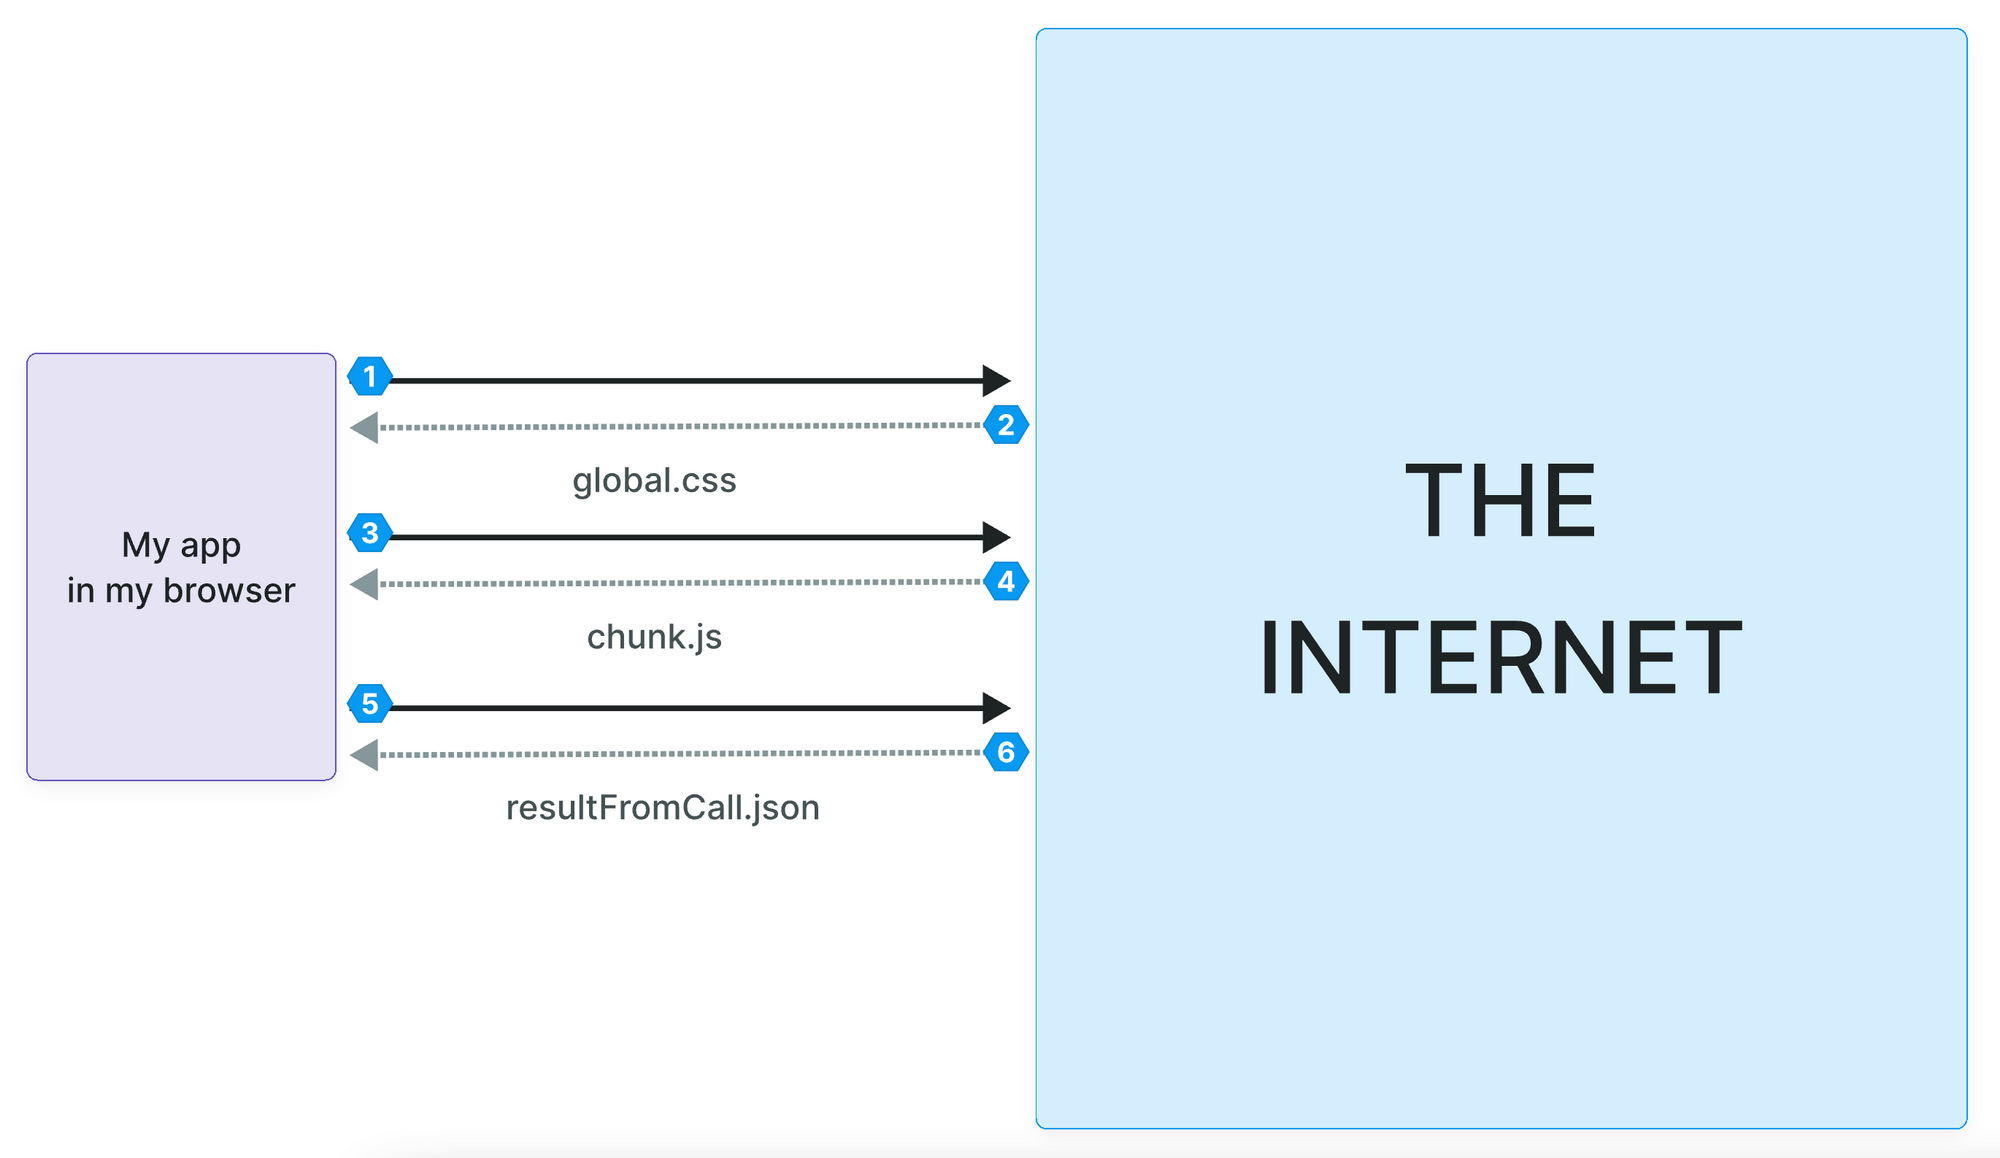
When a user interacts with the page, their browser reacts. For example, the browser may execute some Javascript to change the color of a button or make an API call to a backend to get a user's personal information.
All of this information is accessible even if you can't see it on the page.
And, as we'll demonstrate with clear examples below, if the information is there, hackers will find it eventually.
It is therefore crucial that you control what kind of information you're making available in your users' browsers, whether that information is displayed on a page or not.
Step 1 - Filter sensitive data in the backend
The first step to keep personal data private, is to avoid ever loading it in the frontend.
Remember, all of the information that filters through to the frontend is accessible in the user's browser. Even if they can't see it on the page, they can access it through their browser inspector.
In the example below, we got all the job applications from our application table in Xano into the Weweb. Then, we filtered that data based on the current user id:
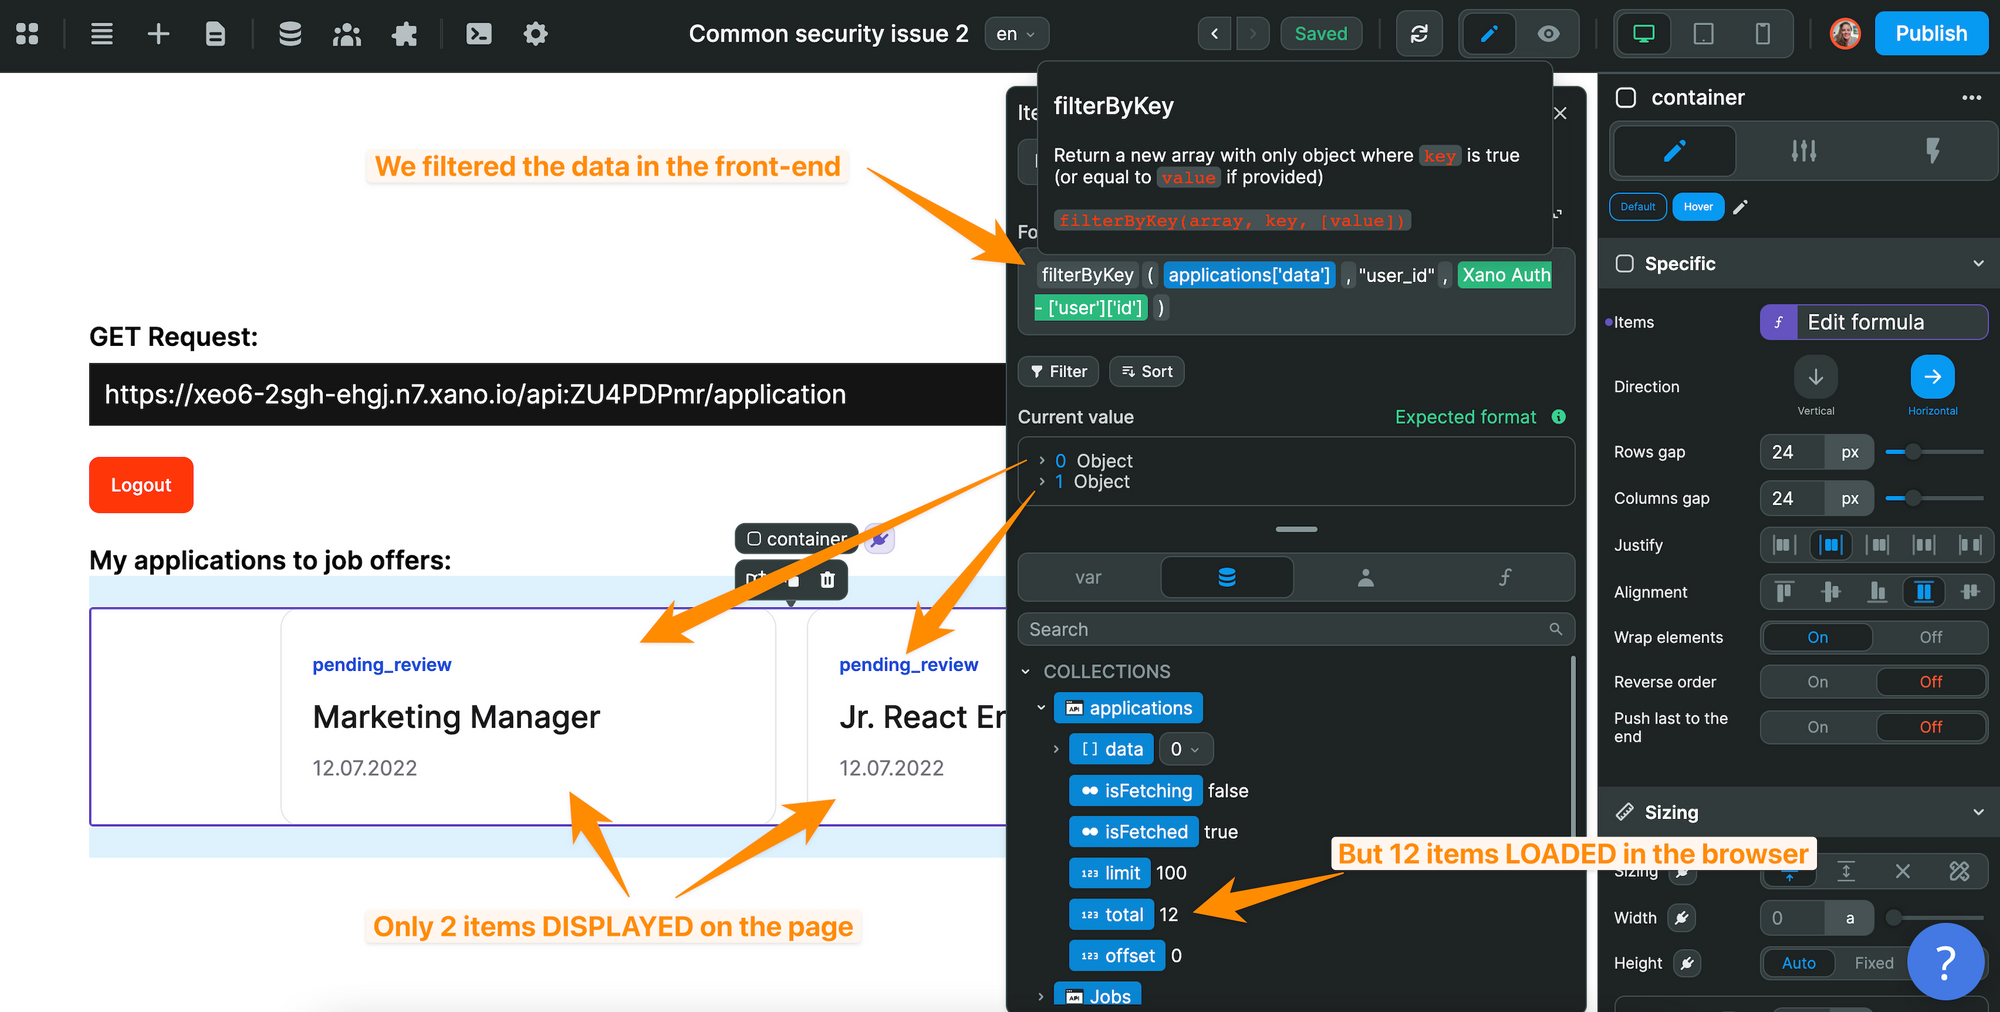
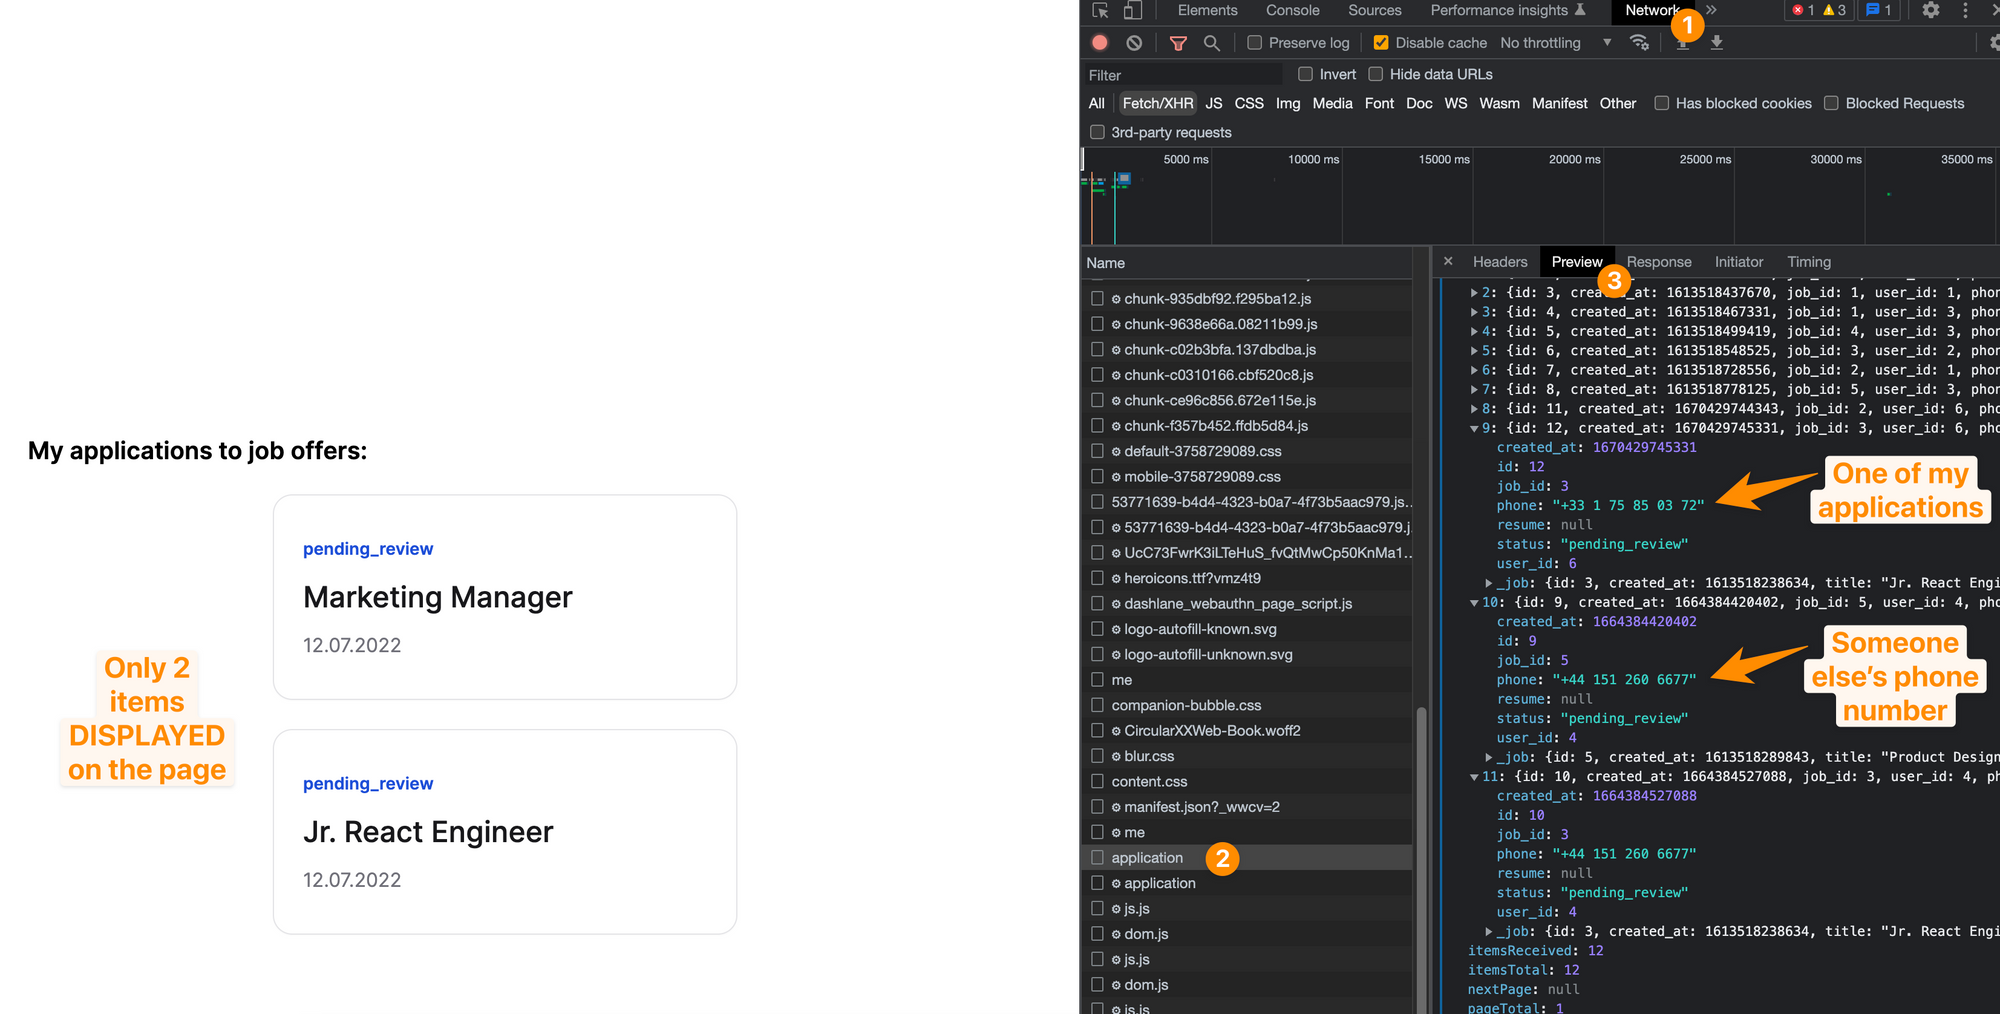
On the published app, the web page on the left only shows the jobs that the user applied to. However, in the inspector on the right, we can see the phone numbers of other users' who applied to a job:
The solution
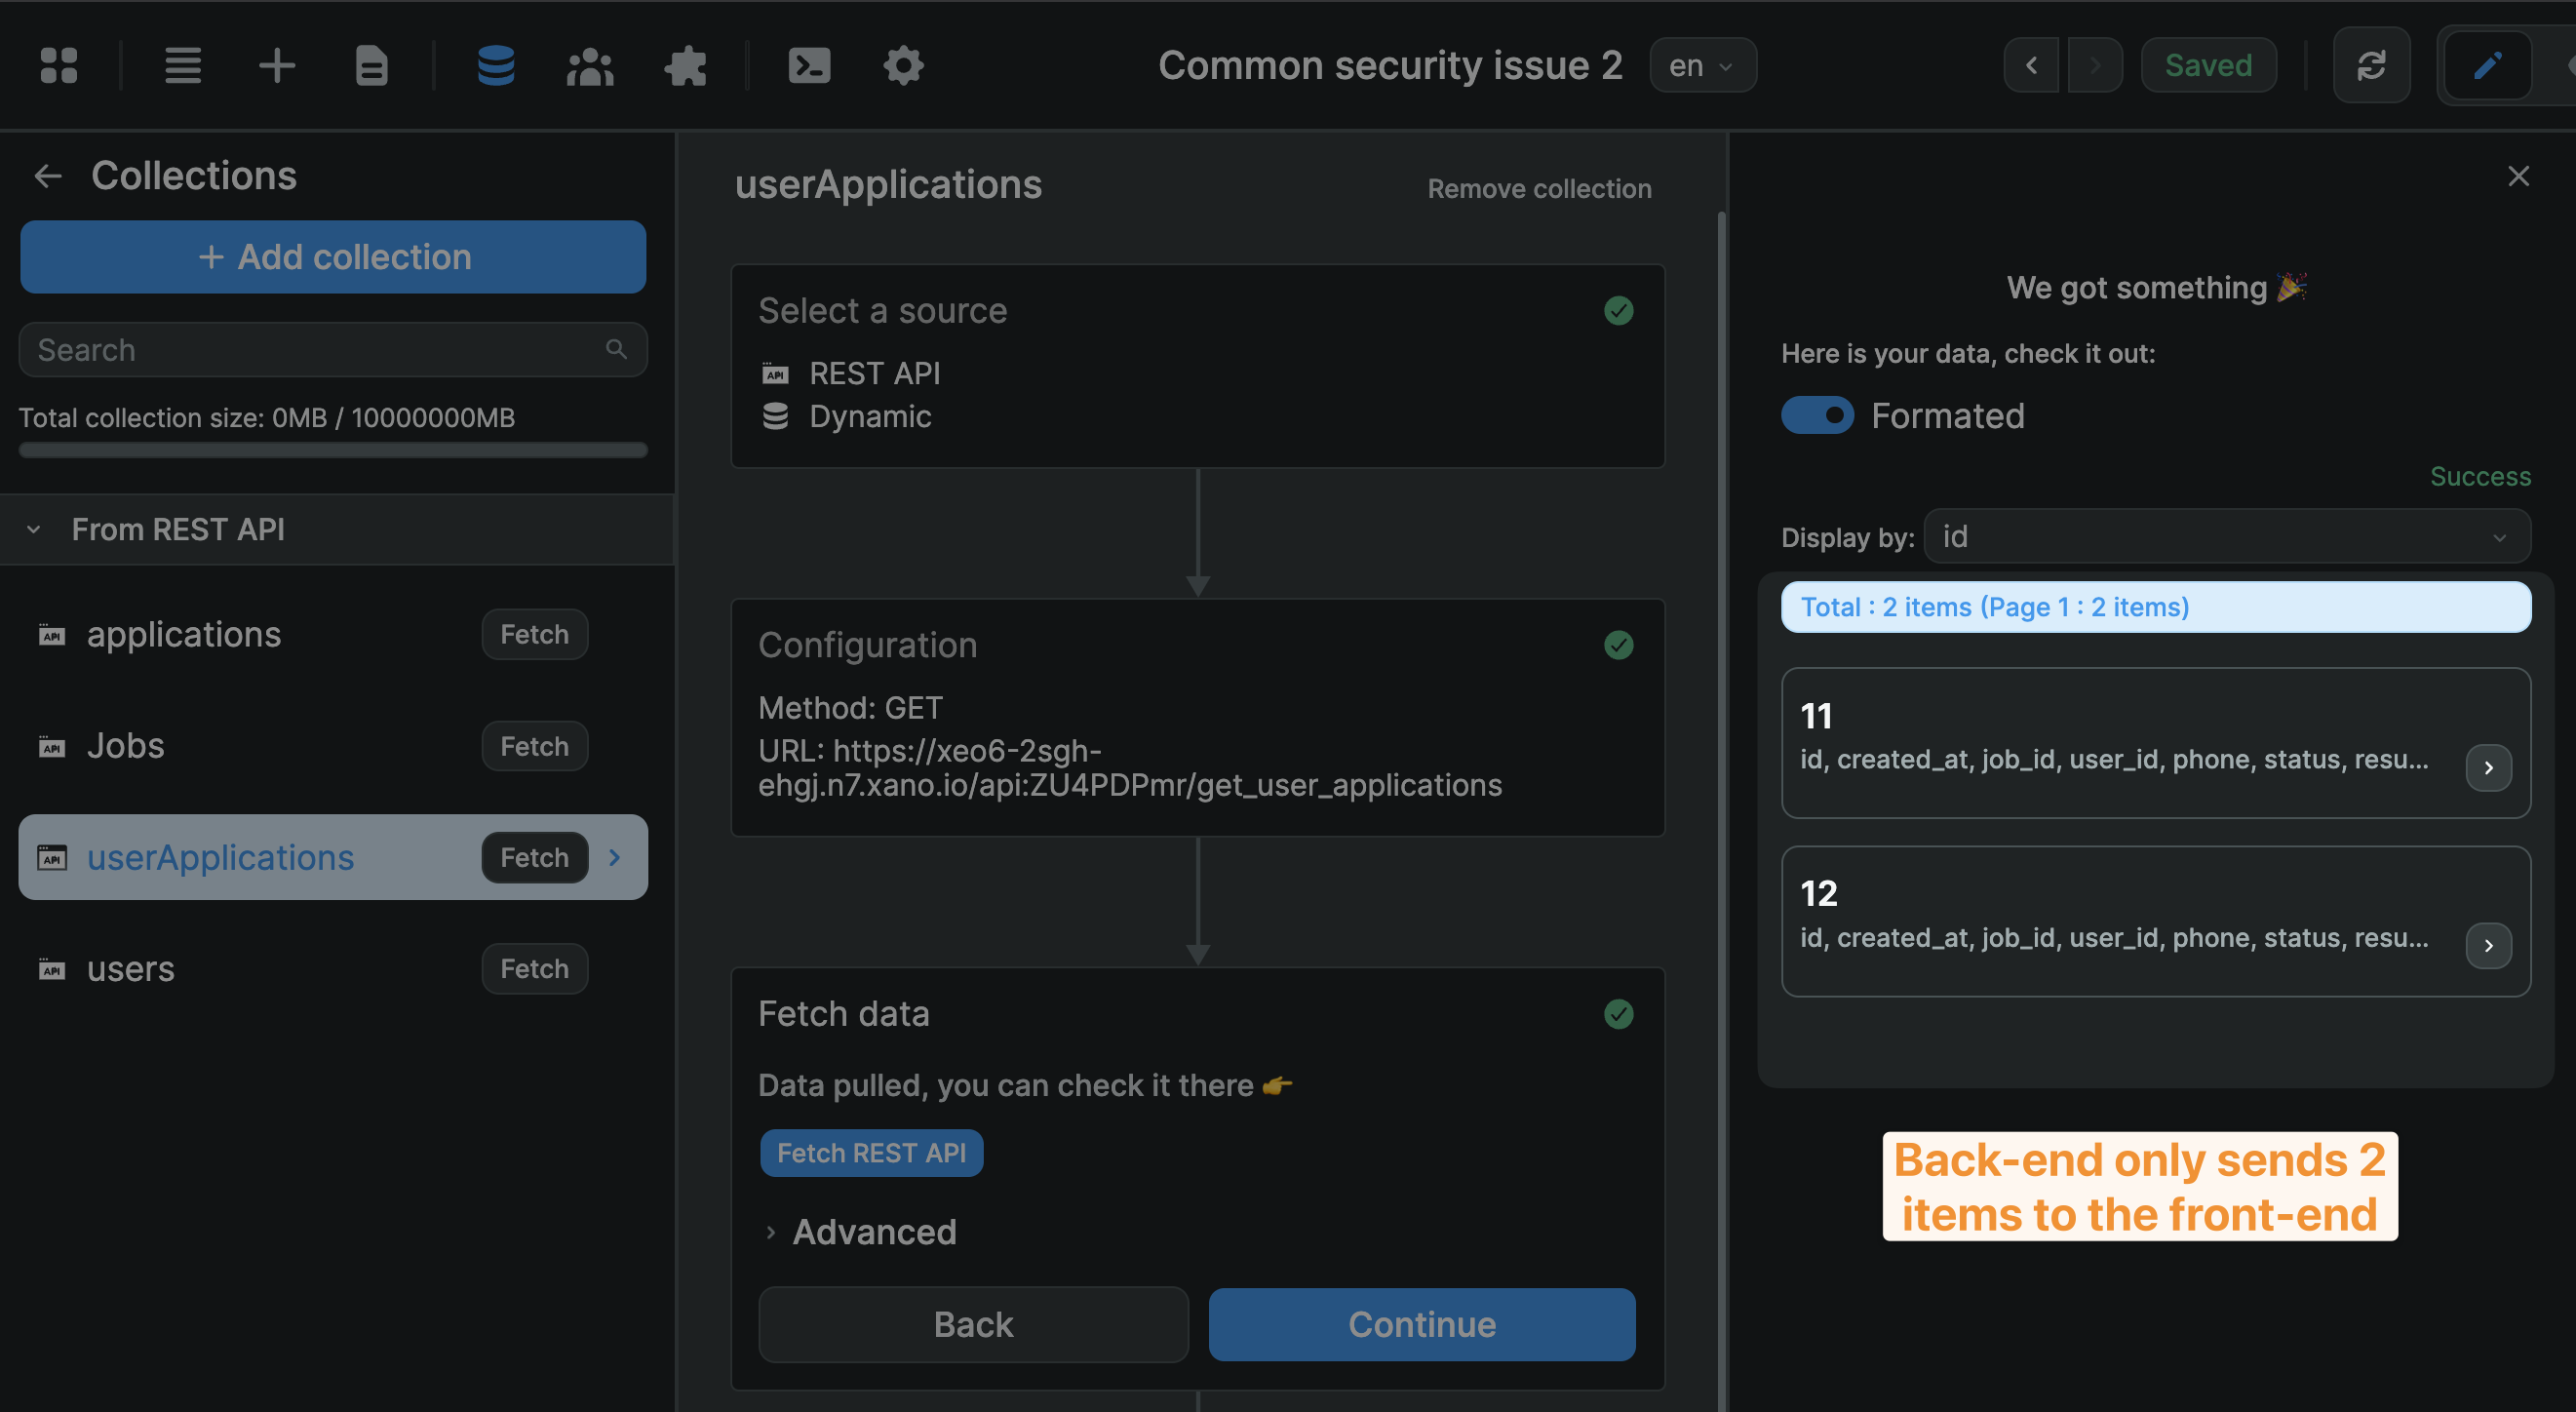
Set up backend filters so only relevant data is sent to the user's browser.
In the example below, we created a dedicated endpoint in Xano to only get the current user's applications. As a result, the API only loads 2 item in the frontend:
🔥 Pro tip: being mindful of the data you load in the frontend is a best practice that will also come in handy when you need to scale and improve the performances of your app.
Step 2 - Restrict user access
The second step to a secure web app is adding user authentication to restrict what a user can view or modify in your app.
If you don't, a hacker might see one of the API calls you make to view a collection of data and guess the call they need to make to edit that collection in your database.
In the example below, we can see the API call the browser made on the right to get the list of jobs that's displayed on the page on the left:
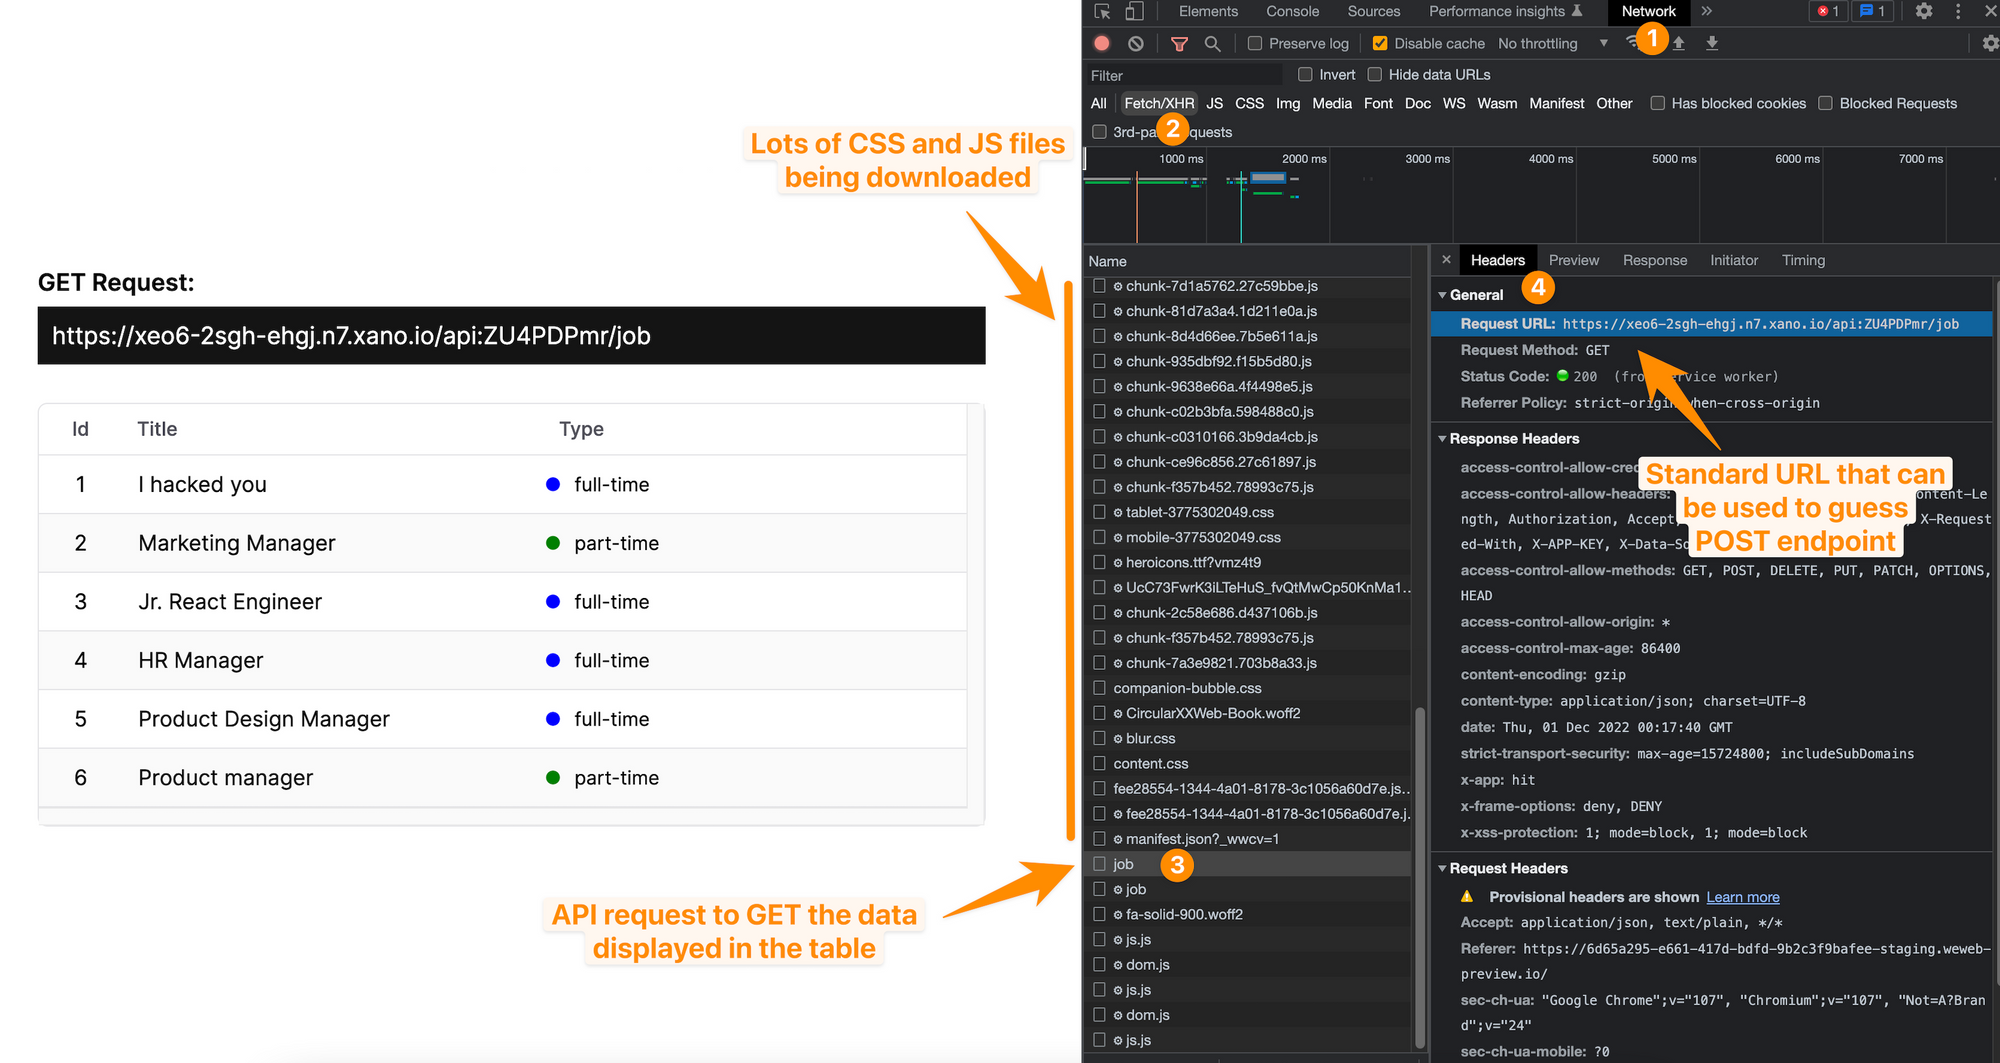
Since REST APIs are usually pretty structured and standardized, it's fairly easy for hackers to guess that, if they add a job id at the end of the endpoint and change the type of request to `POST`, they might be able to update the job listing.
The solution
You can prevent users from viewing or editing data by protecting API endpoints or entire database tables:
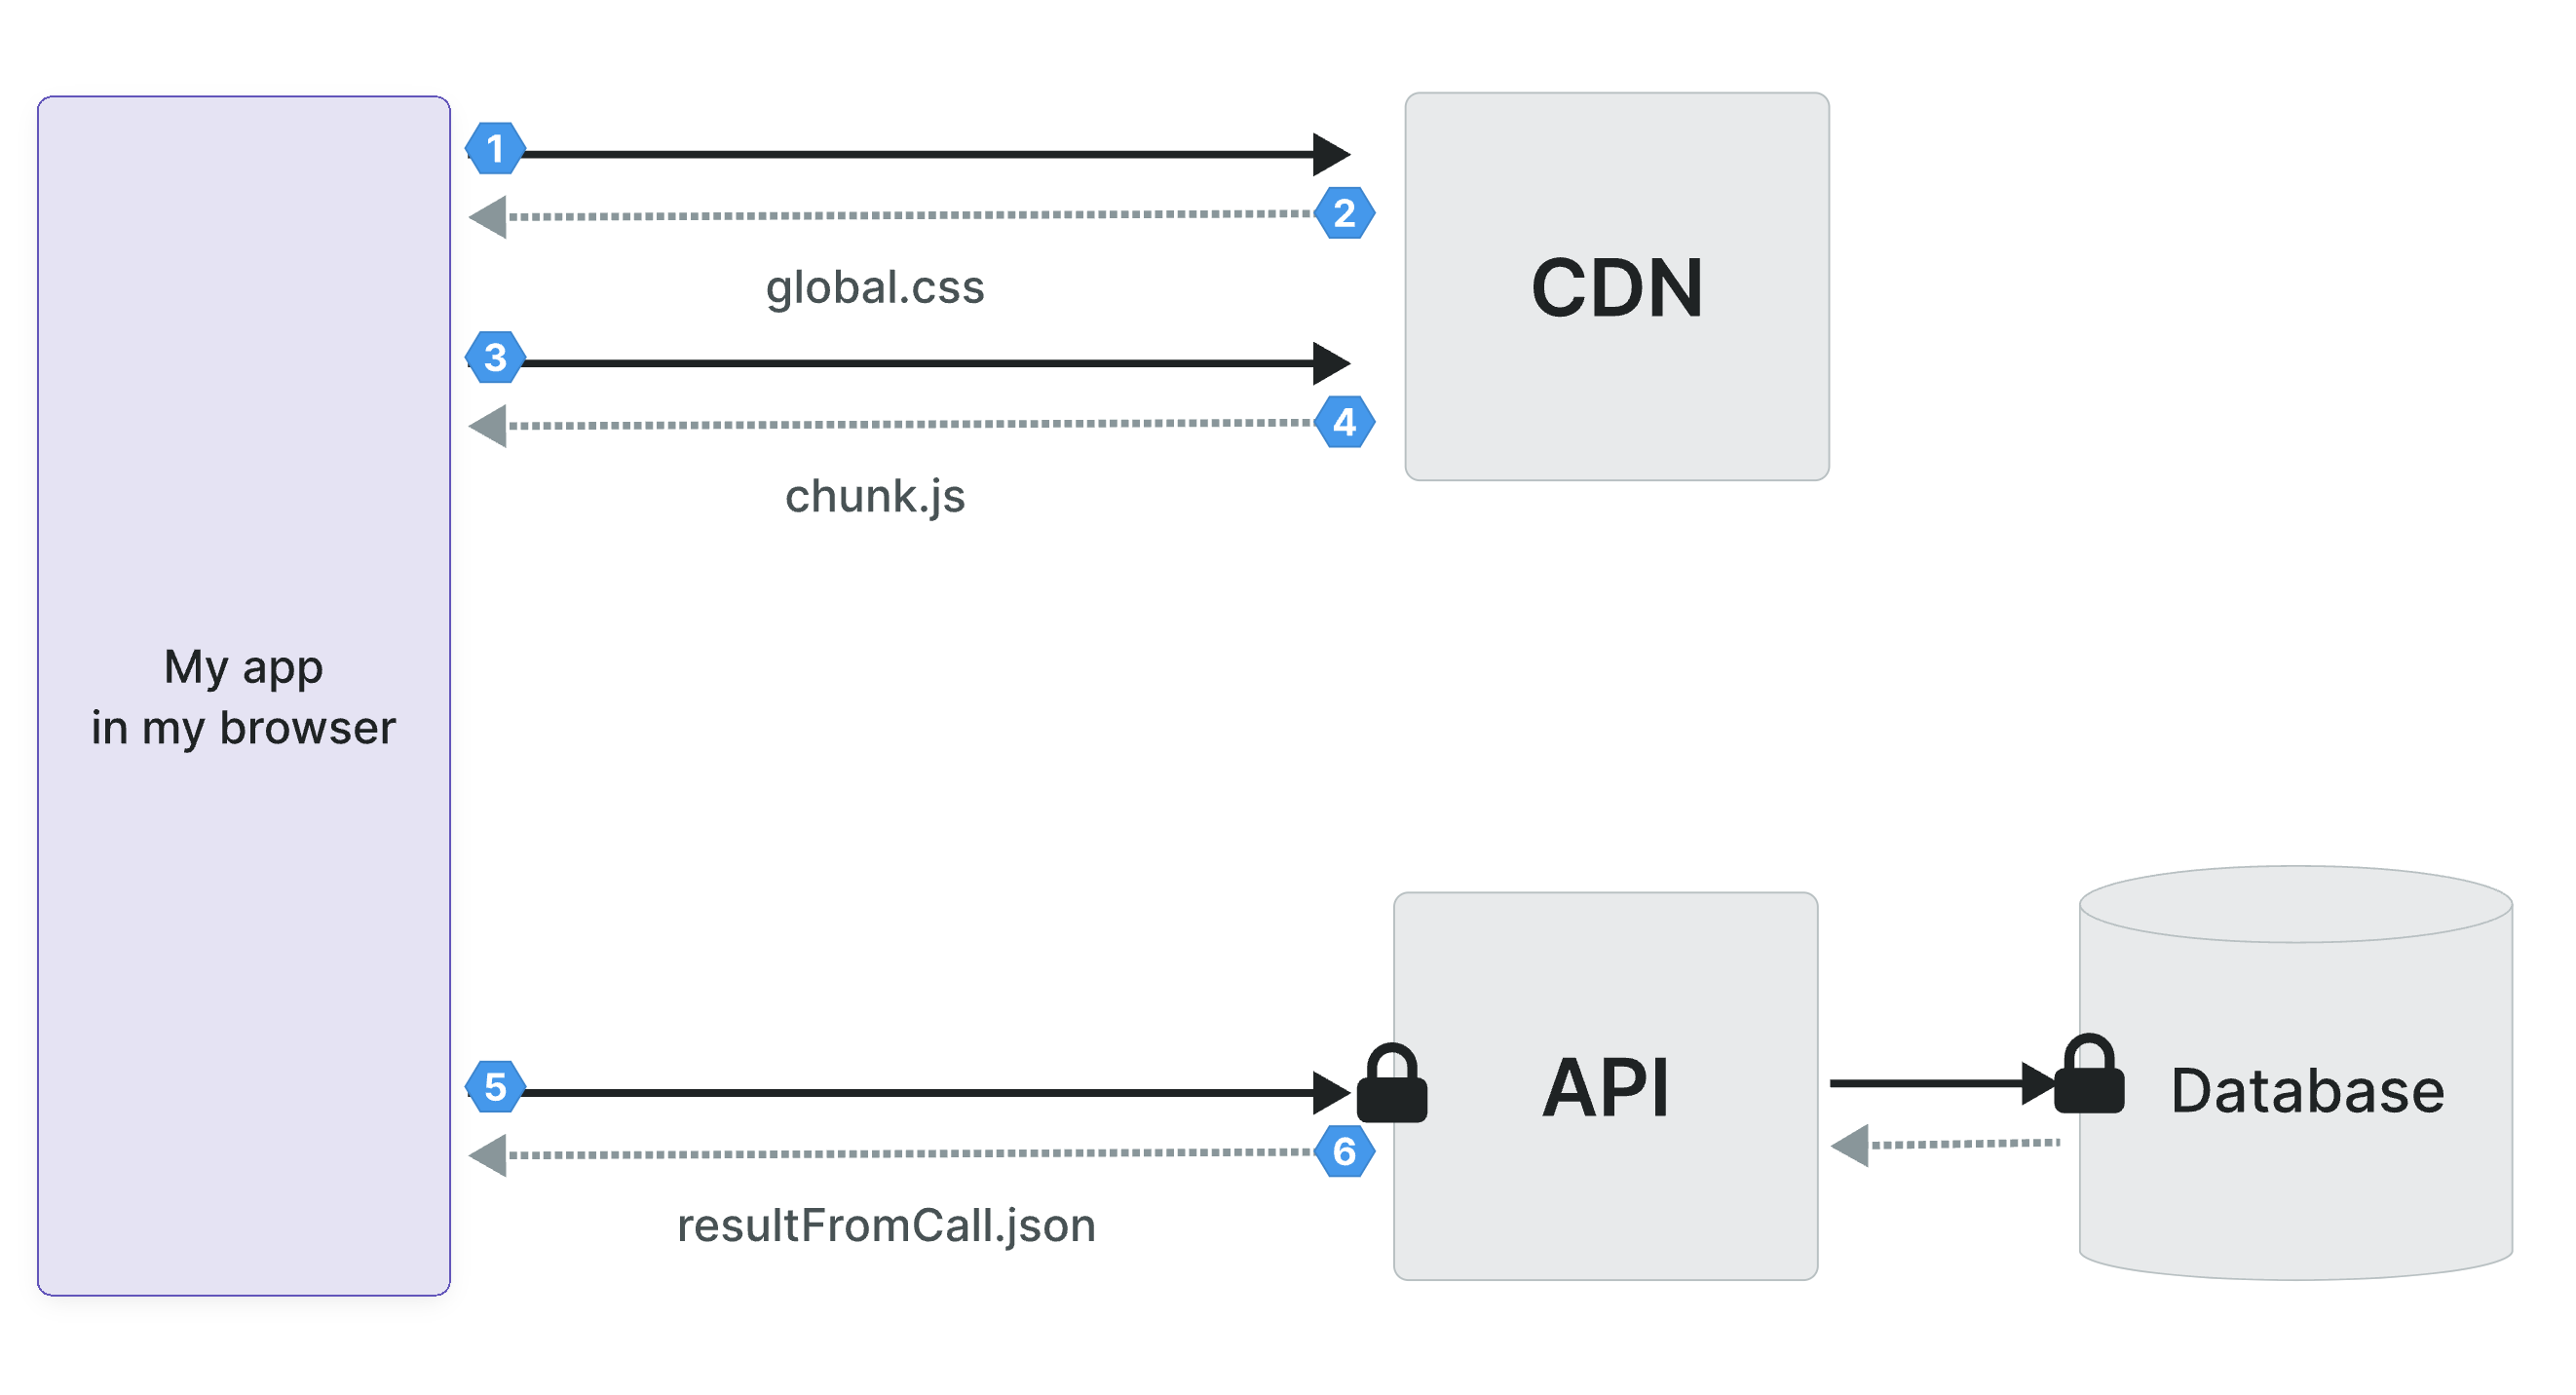
Protecting the table
In the Supabase example below, you can see we have RLS enabled on the vehicles table. This means we added "row-level security" to protect this particular table.
We have a policy in place to allow all users to view the data in the table but only authenticated users can update the table:

Protecting the endpoints
In this Xano example, you can see that we added user authentication to the /job/{job_id} endpoint:
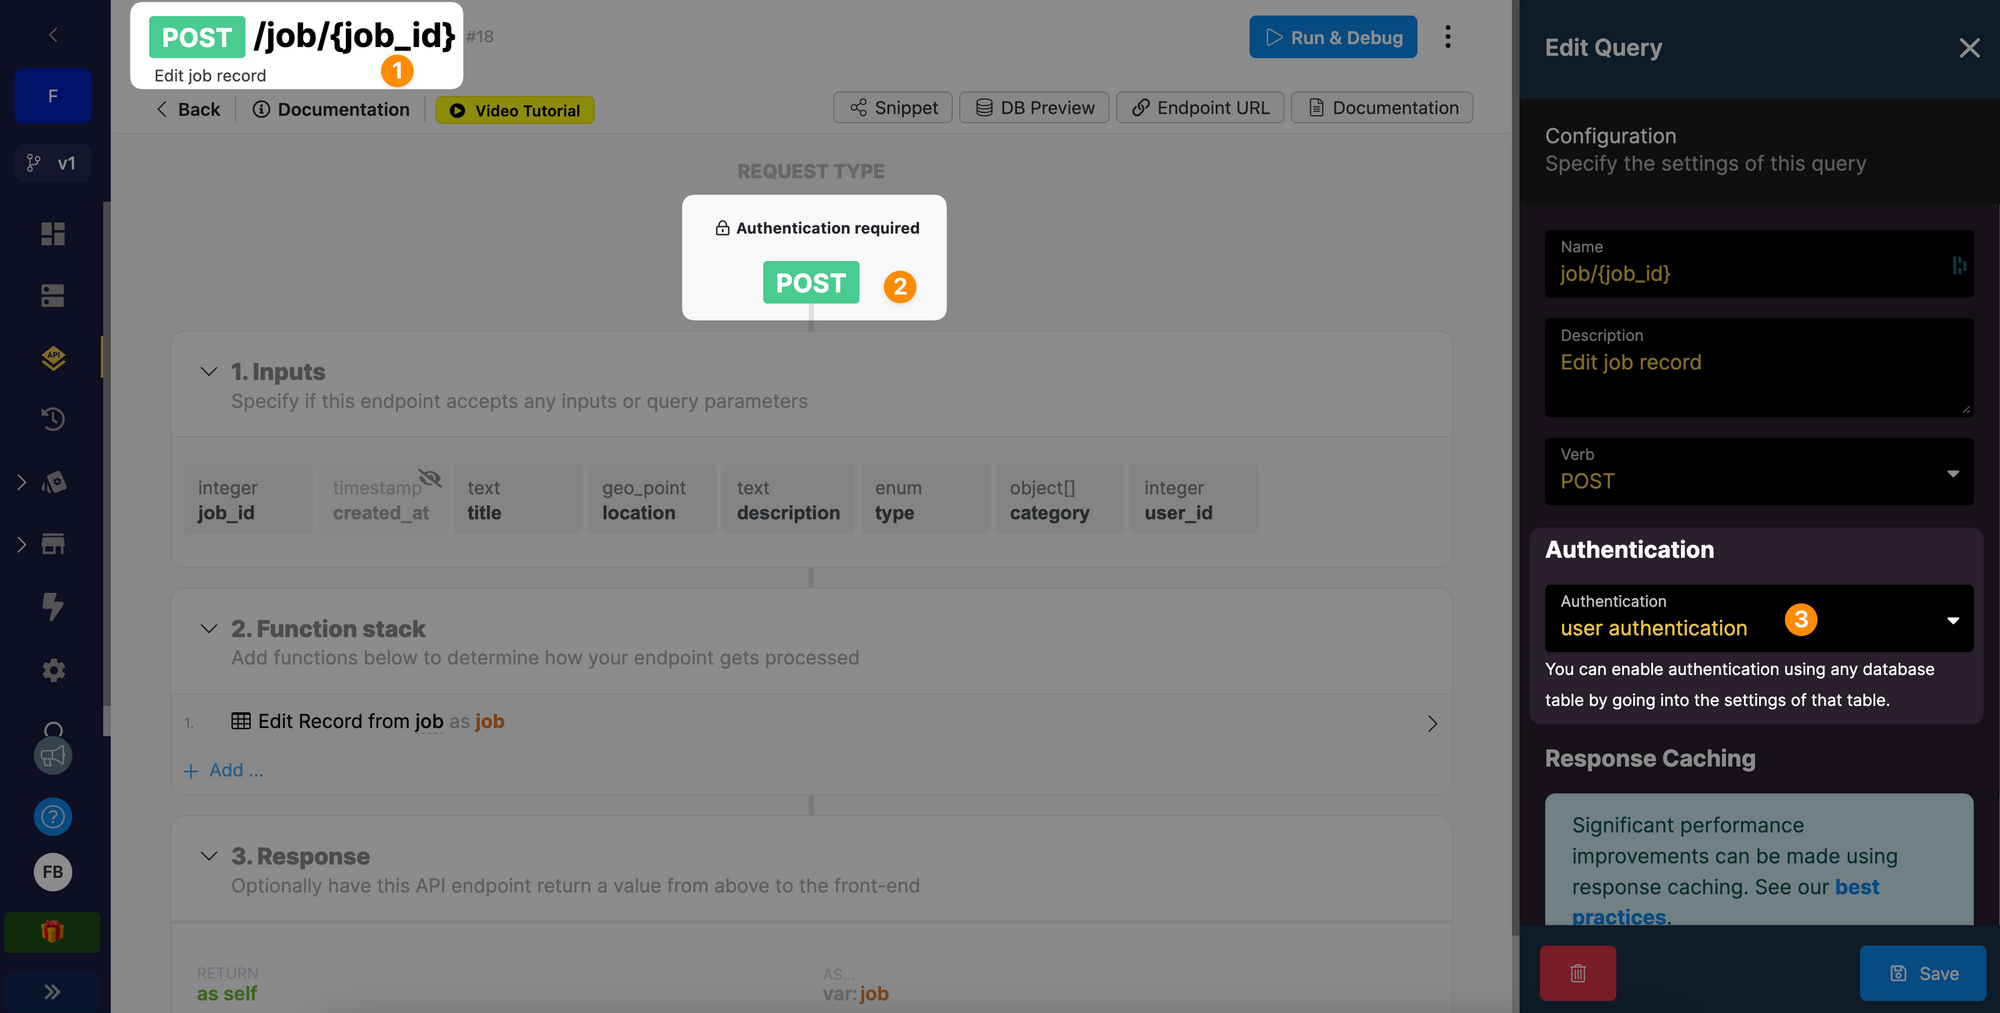
As a result, a user who is not authenticated will not be able to modify any of the job offers in the database.
That's a good start, but it's not enough.
Step 3 - Add access control checks
Remember when we said hackers can see the API calls you make in the browser?
Well, if the only protection you add is user authentication, there's nothing to stop a hacker from:
- creating an account,
- logging in,
- then trying to access someone else's data.
In the example below, we logged into the app to get an authentication token, then used that token to make an API call with someone else's userId, and got access to Jane's personal information:
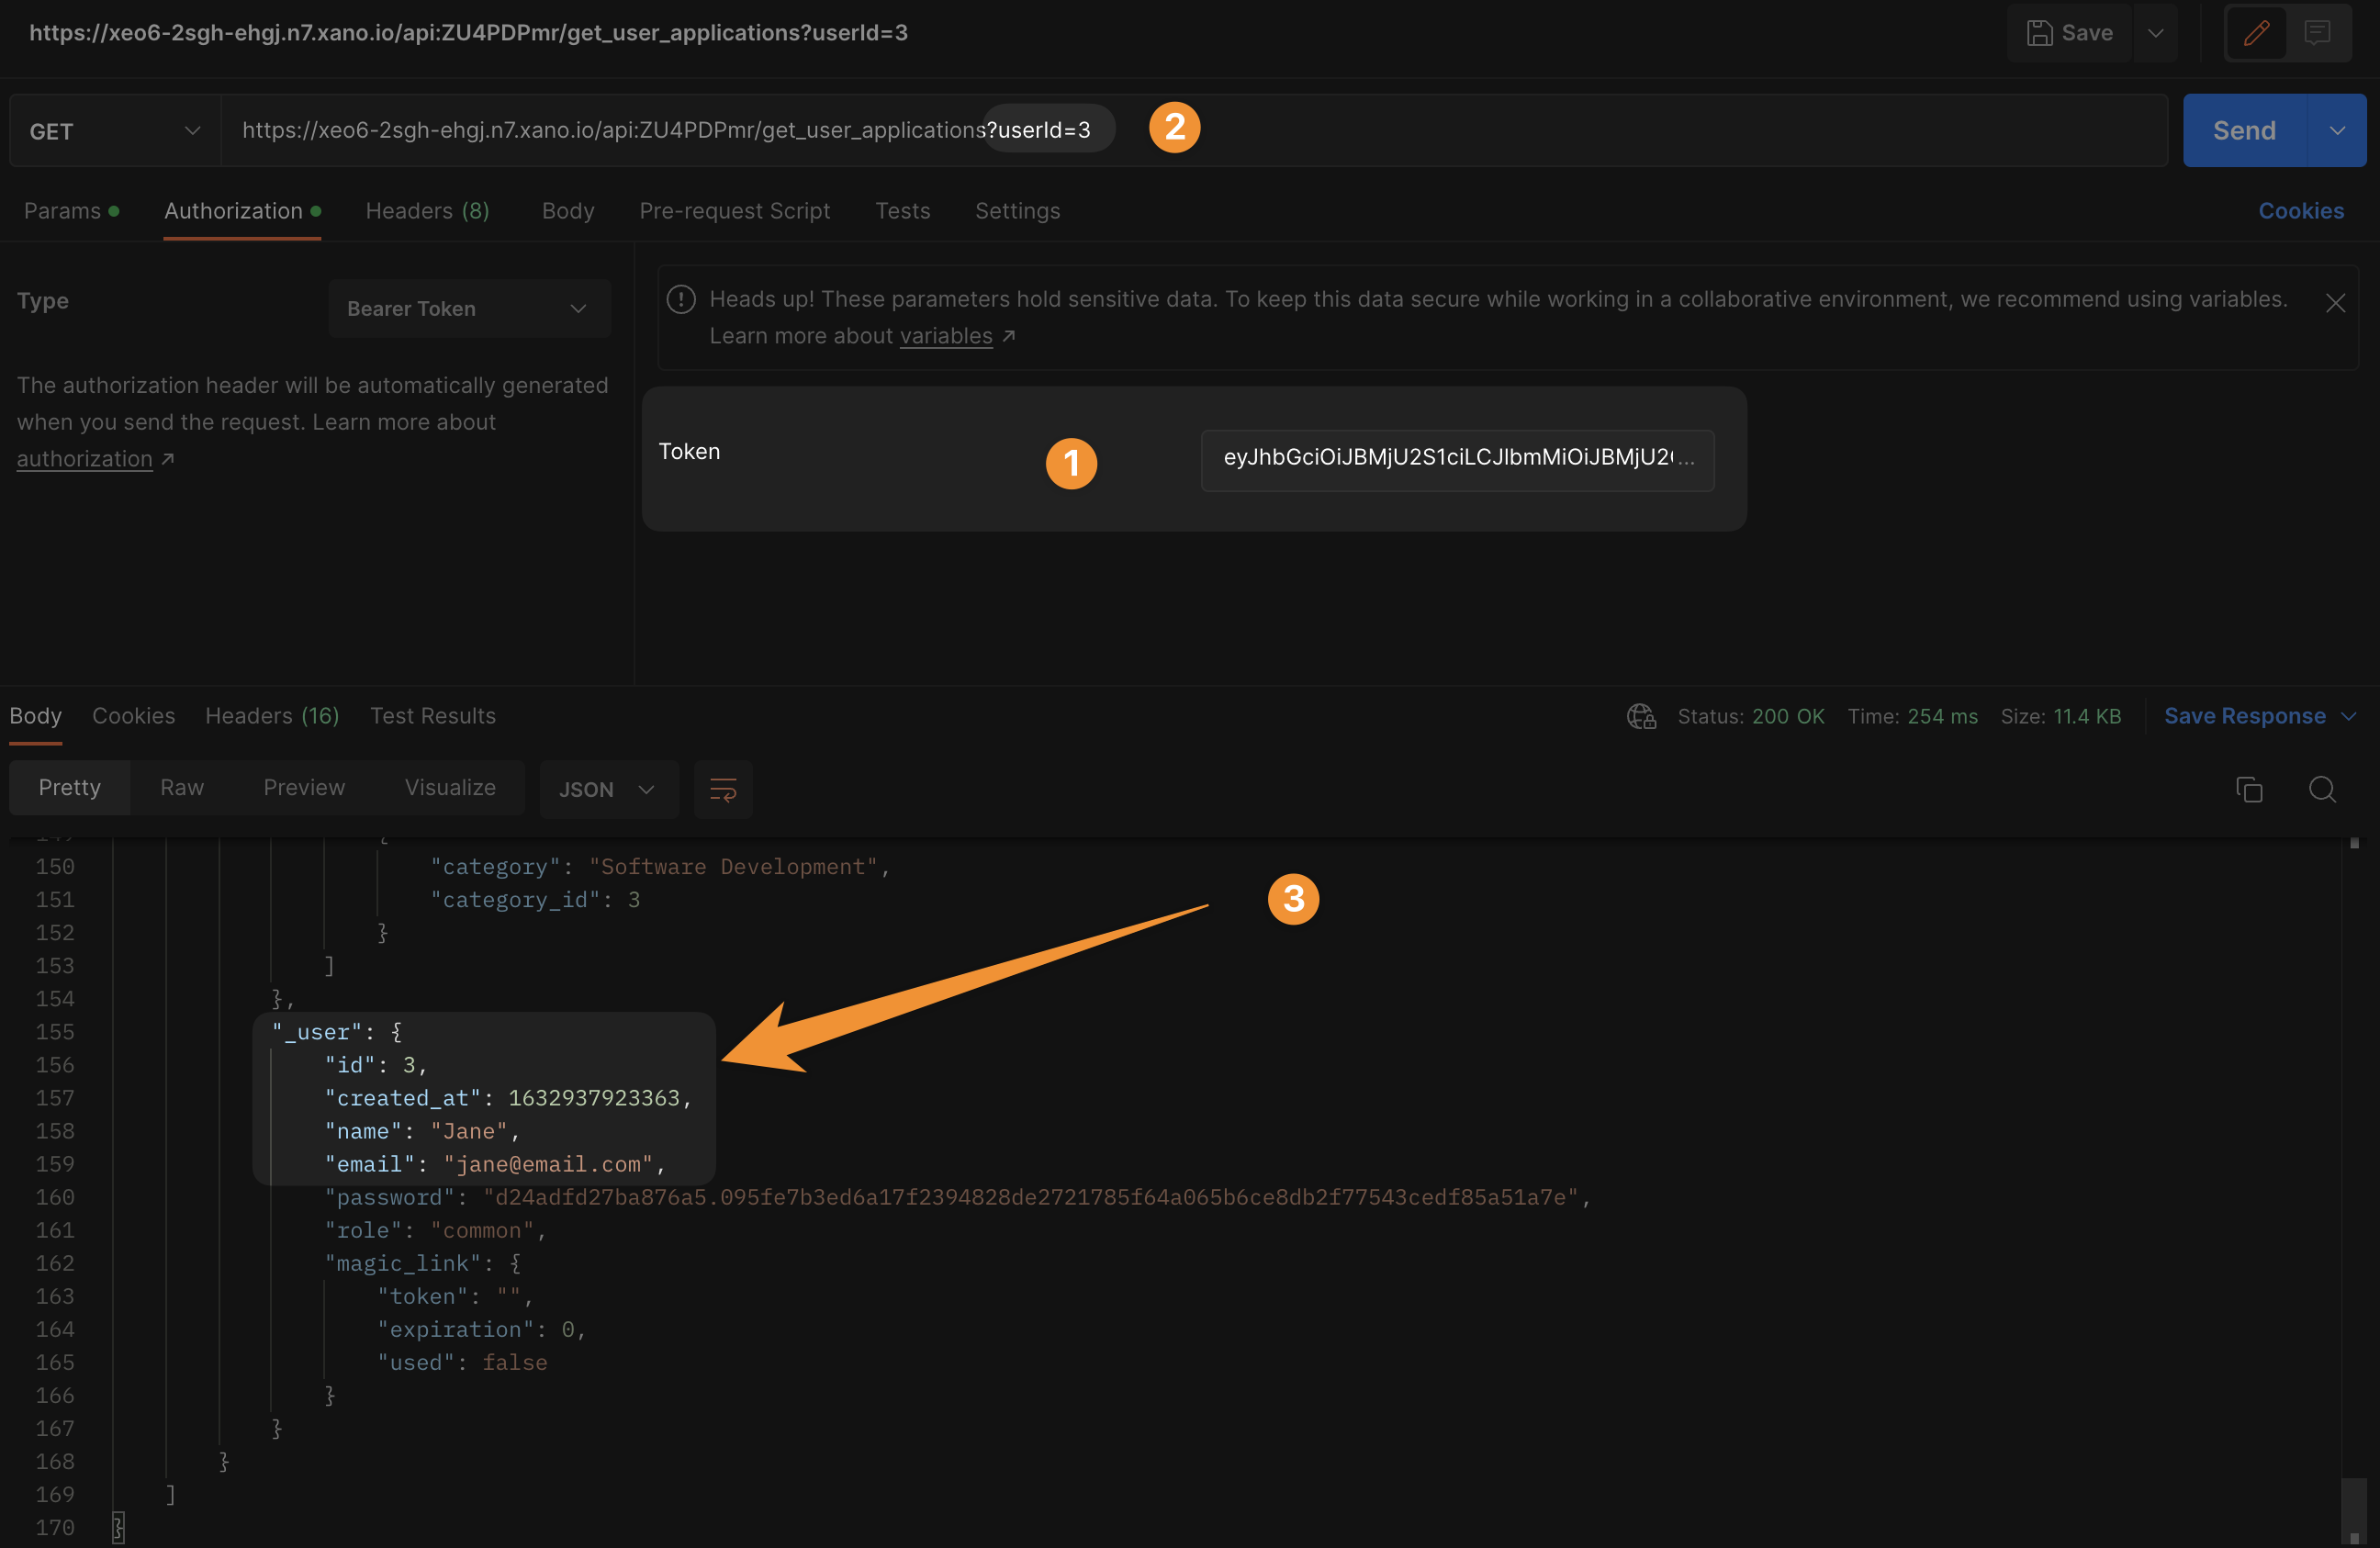
The solution
Make it harder to guess user ids by using UUIDs and ensure users can only view their own data.
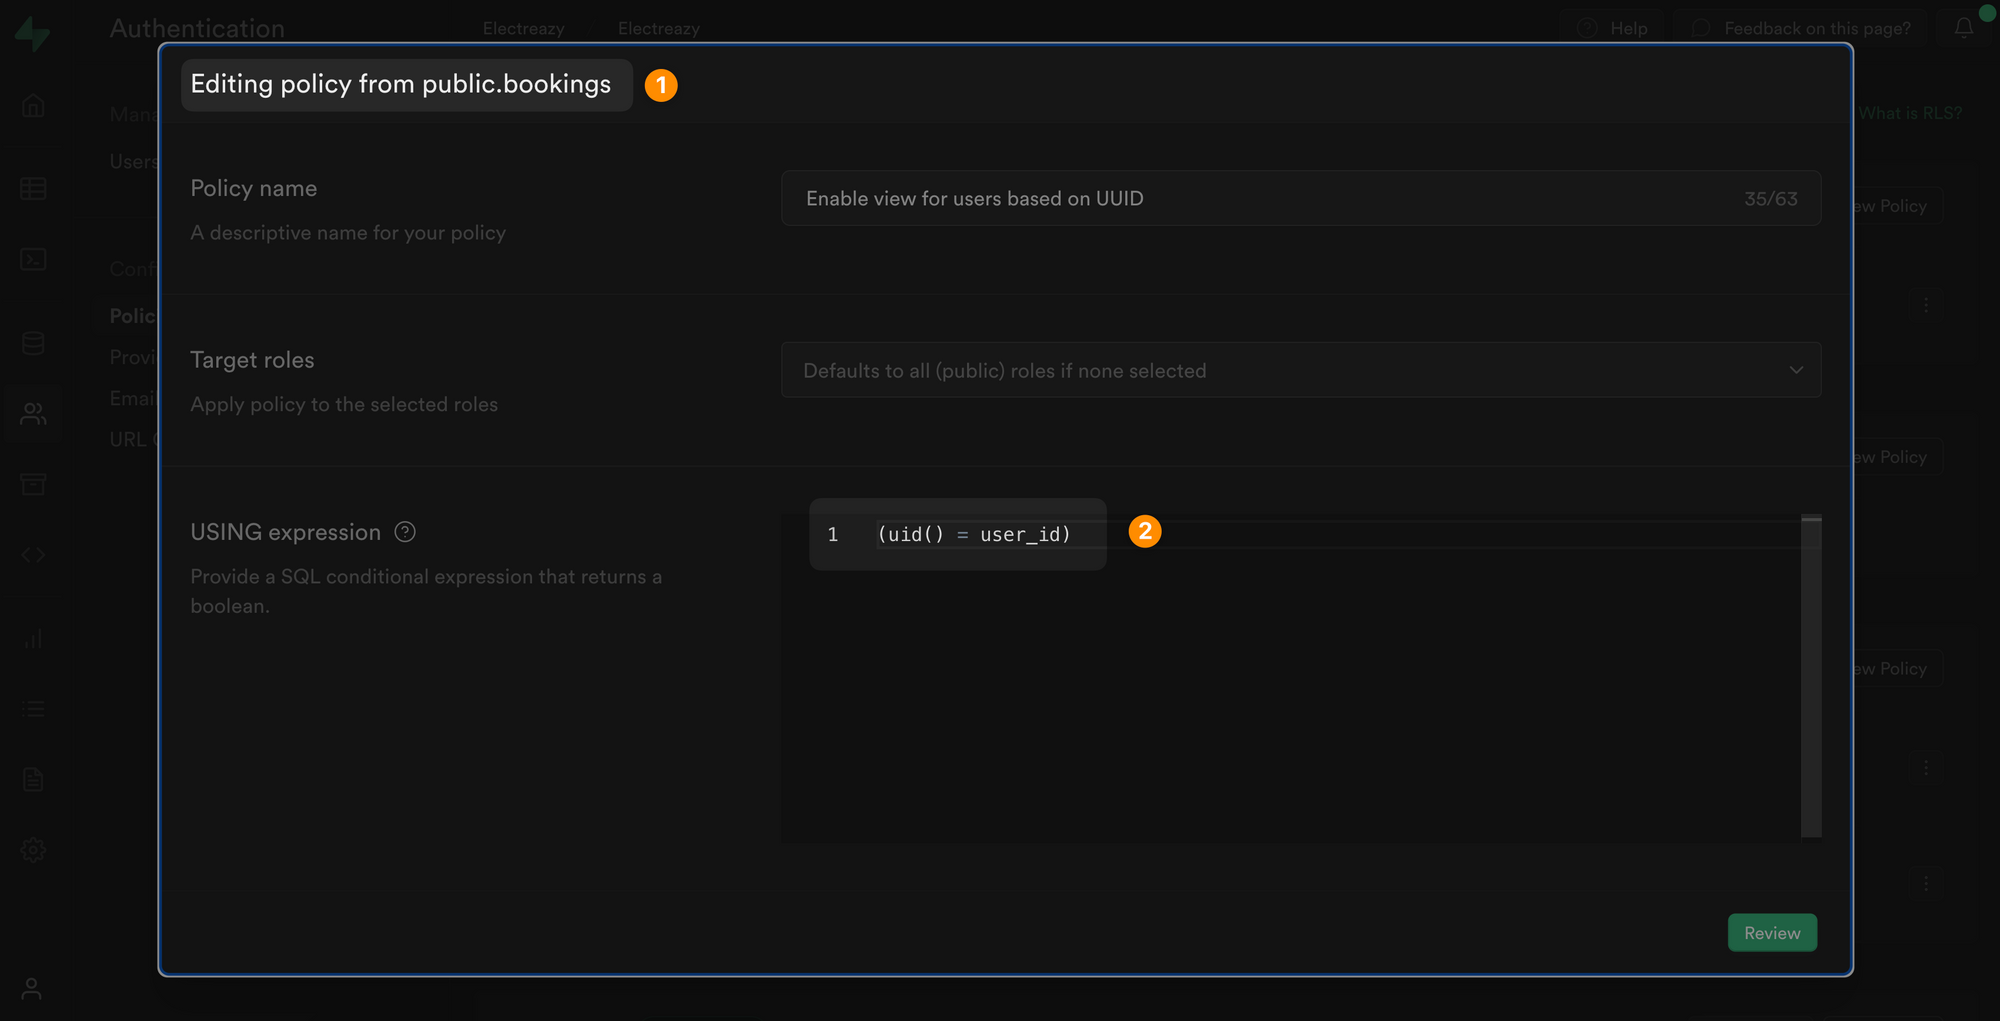
In the Supabase example below, we edited the policy to access a list of bookings so that the user_id in the bookings table matches the uid of the user who is currently authenticated:
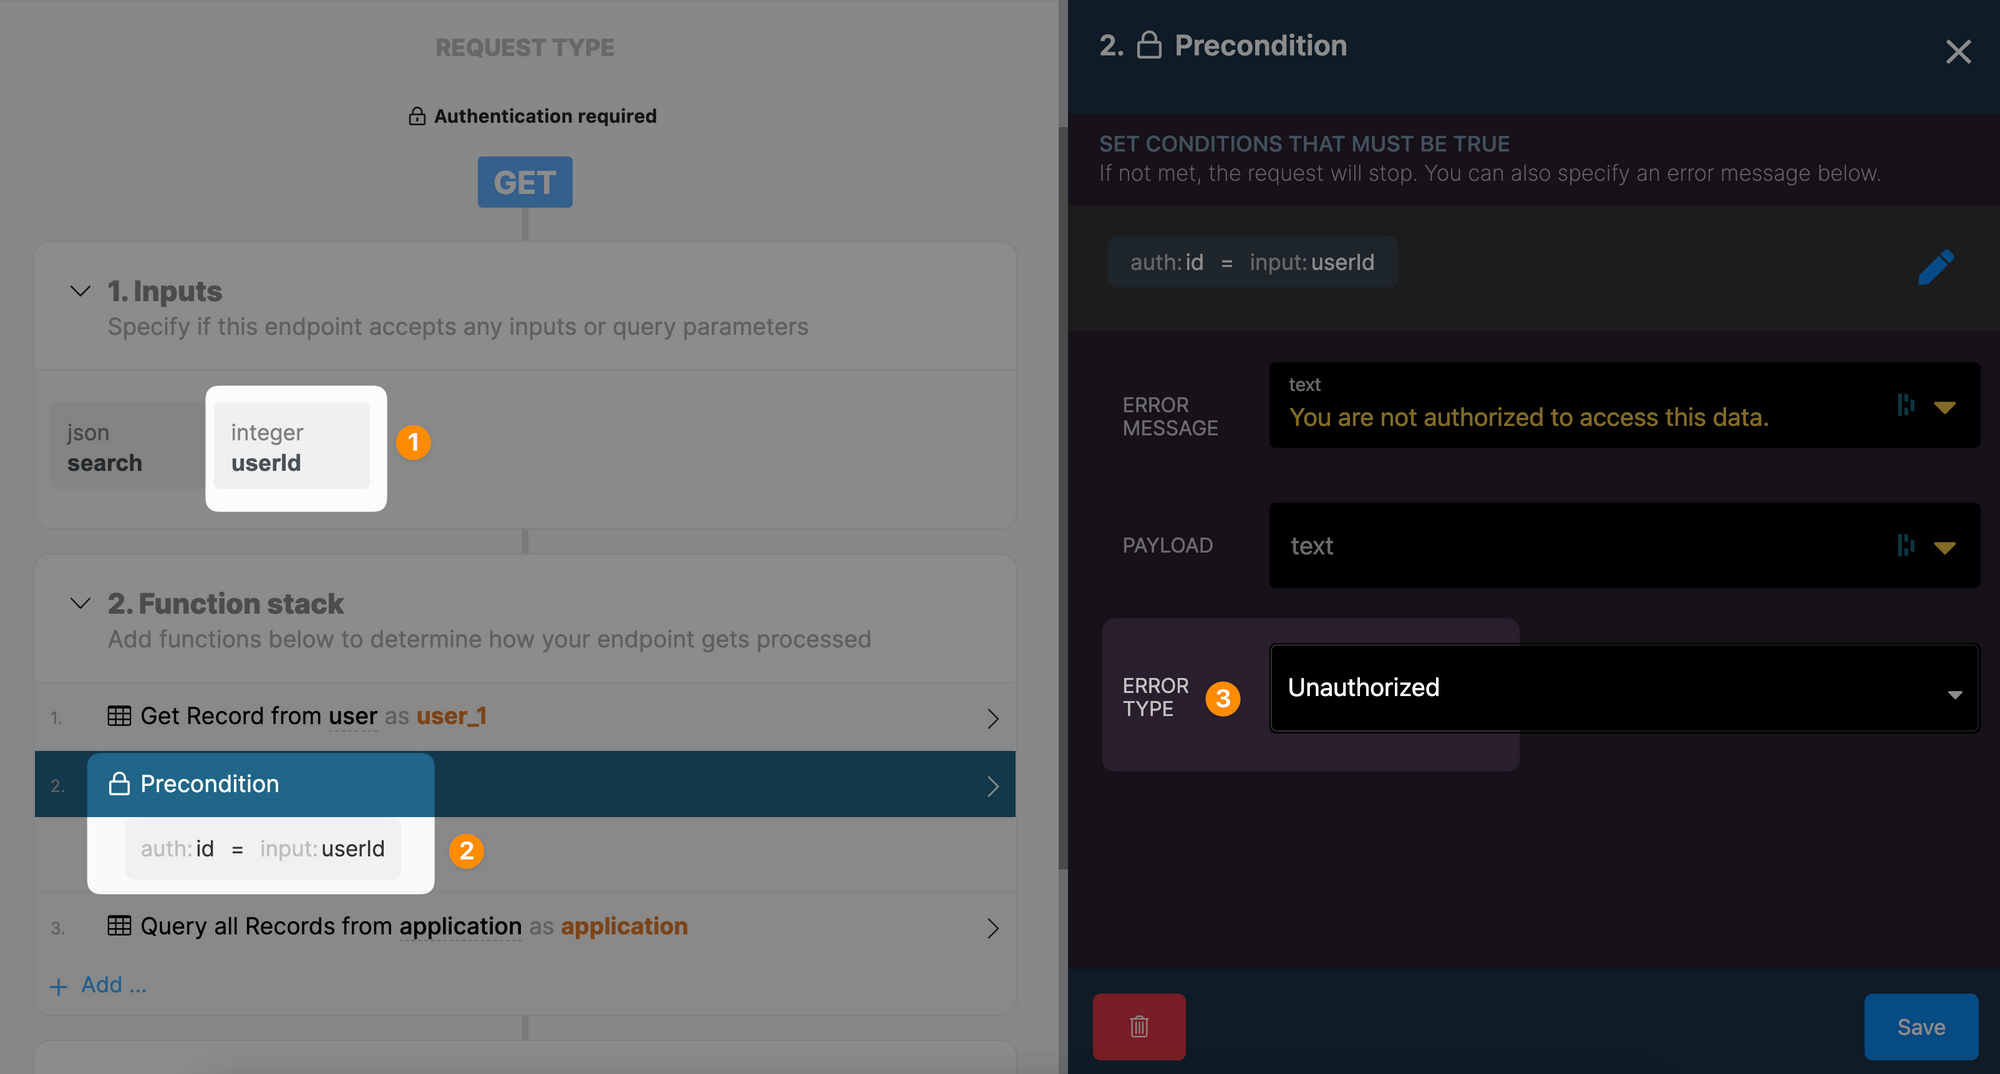
In the Xano example below, we added a precondition to check that the userId passed in the API call matches the id of the user who is currently authenticated:
Ok great, now users can only view their own data but what if we wanted team leaders or admins to view and edit other users' information?
Step 4 - Prevent escalation of privileges
ChatGPT says that:
Escalation of privileges is the process of gaining higher levels of access or privileges in a system or network, beyond what is normally granted to a user or application. This can be done through exploiting vulnerabilities, using backdoors or by exploiting the actions of authorized users with higher privileges. The end goal is often to gain administrative or root access, which would allow full control over the system.
In simpler terms:
The first thing a hacker will try to do is make themselves an admin of your app.
This is because, once they're an admin, they can do whatever they want more easily.
In the example below, I had access to a page where admins can update user profiles and made myself an admin by changing the value of my role:
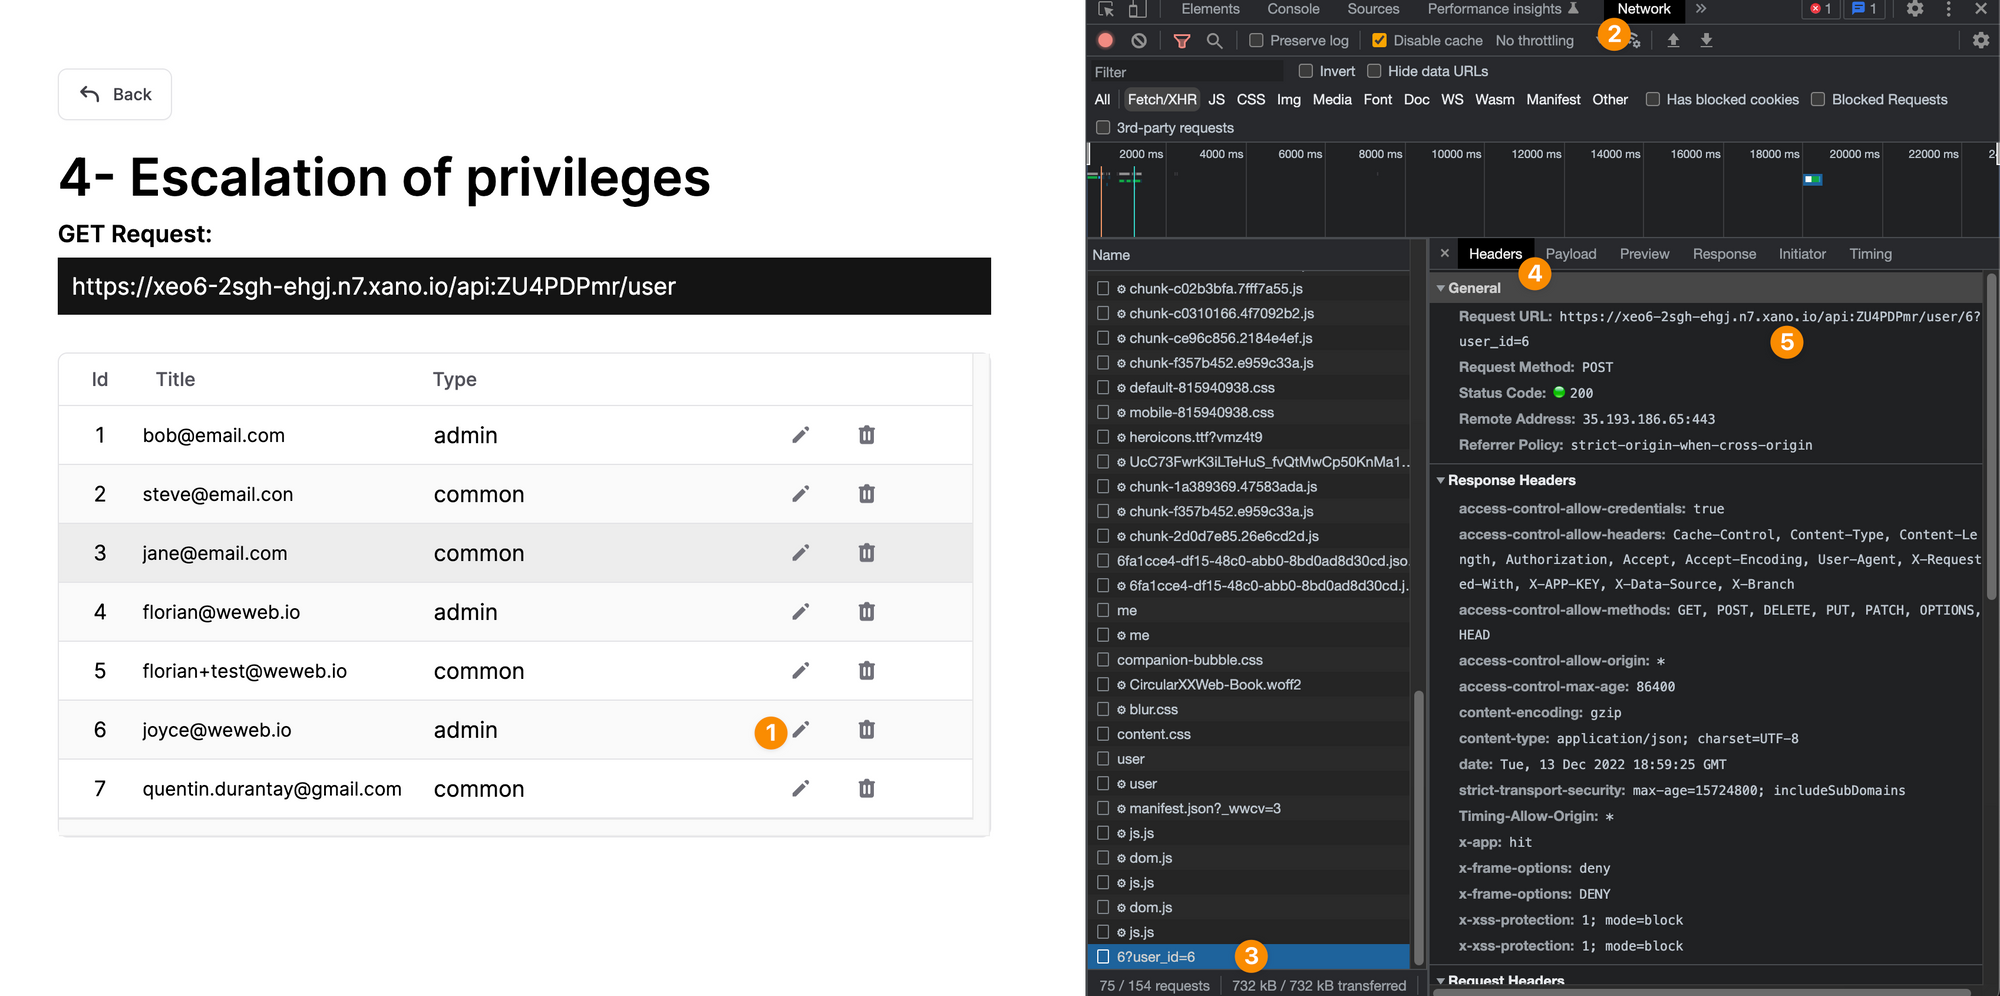
It may seem obvious not to do that because we're displaying the user role on the web page here but remember, even if the user role wasn't displayed on the page, a hacker could see the API endpoint and test multiple options to update their own user role.
The solution
- keep the profile update and admin pages separate
- protect the admin page in the front, don't make it visible to everyone
- create separate API endpoints for the profile update and admin pages
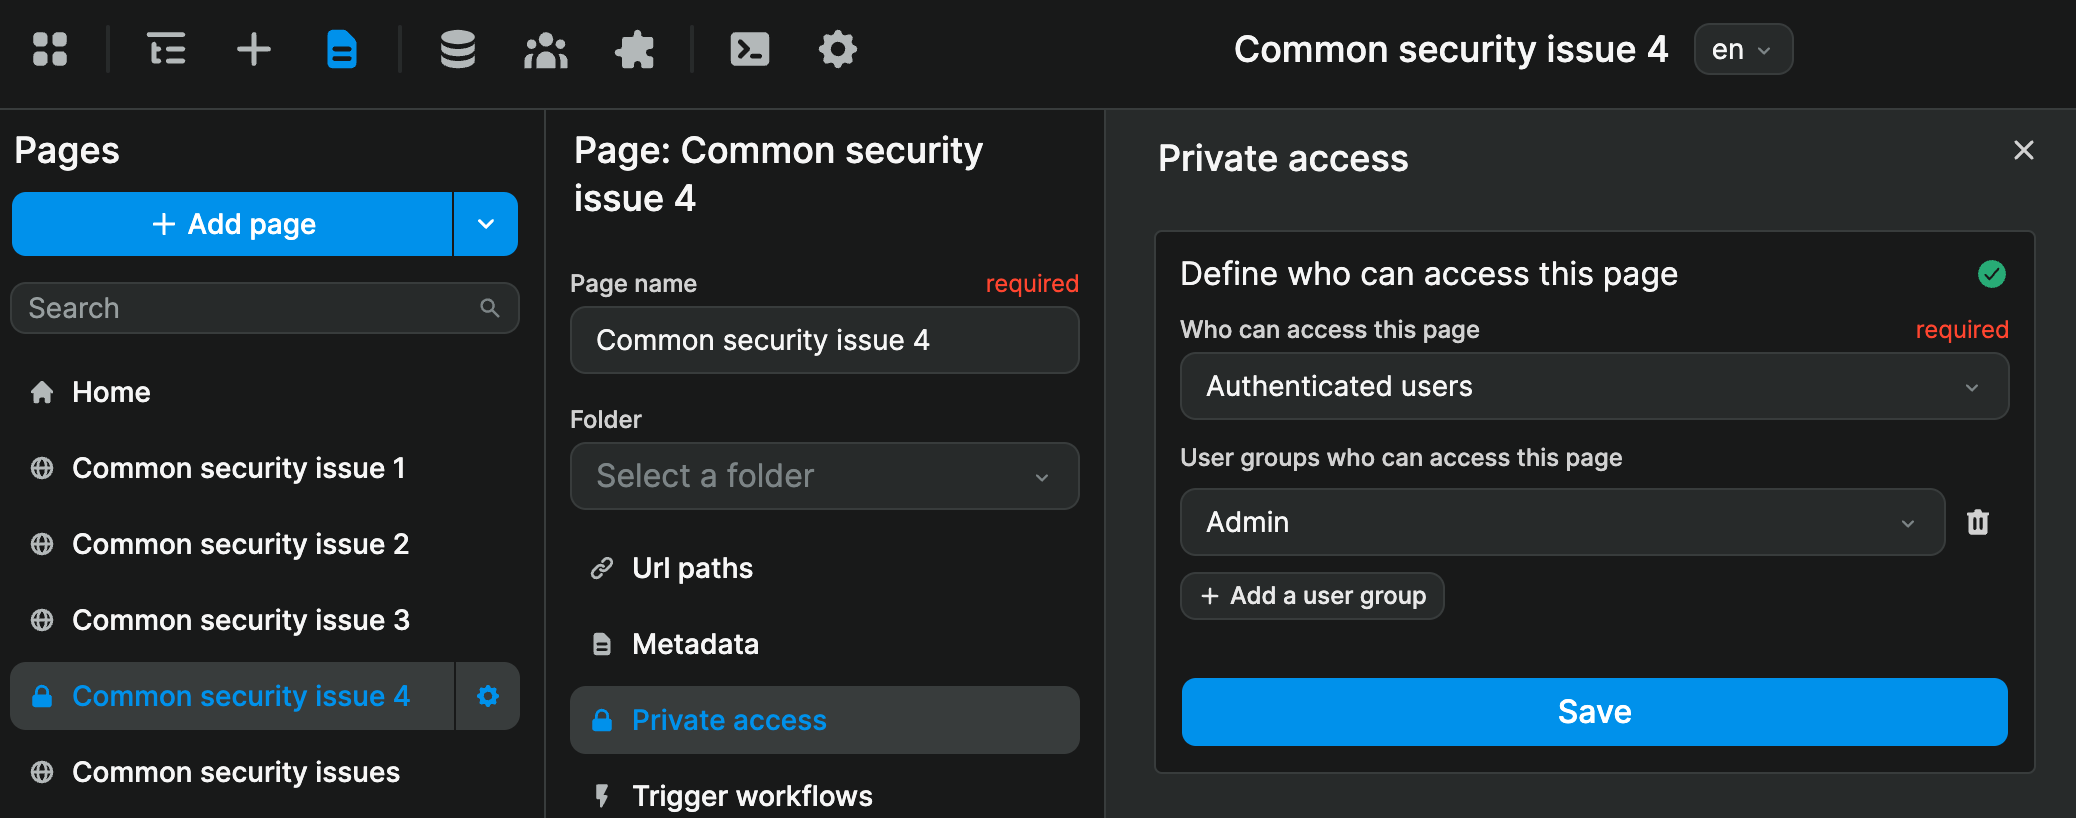
In the example, below, we created a dedicated page for admins that only authenticated users that are part of the Admin user group can access:
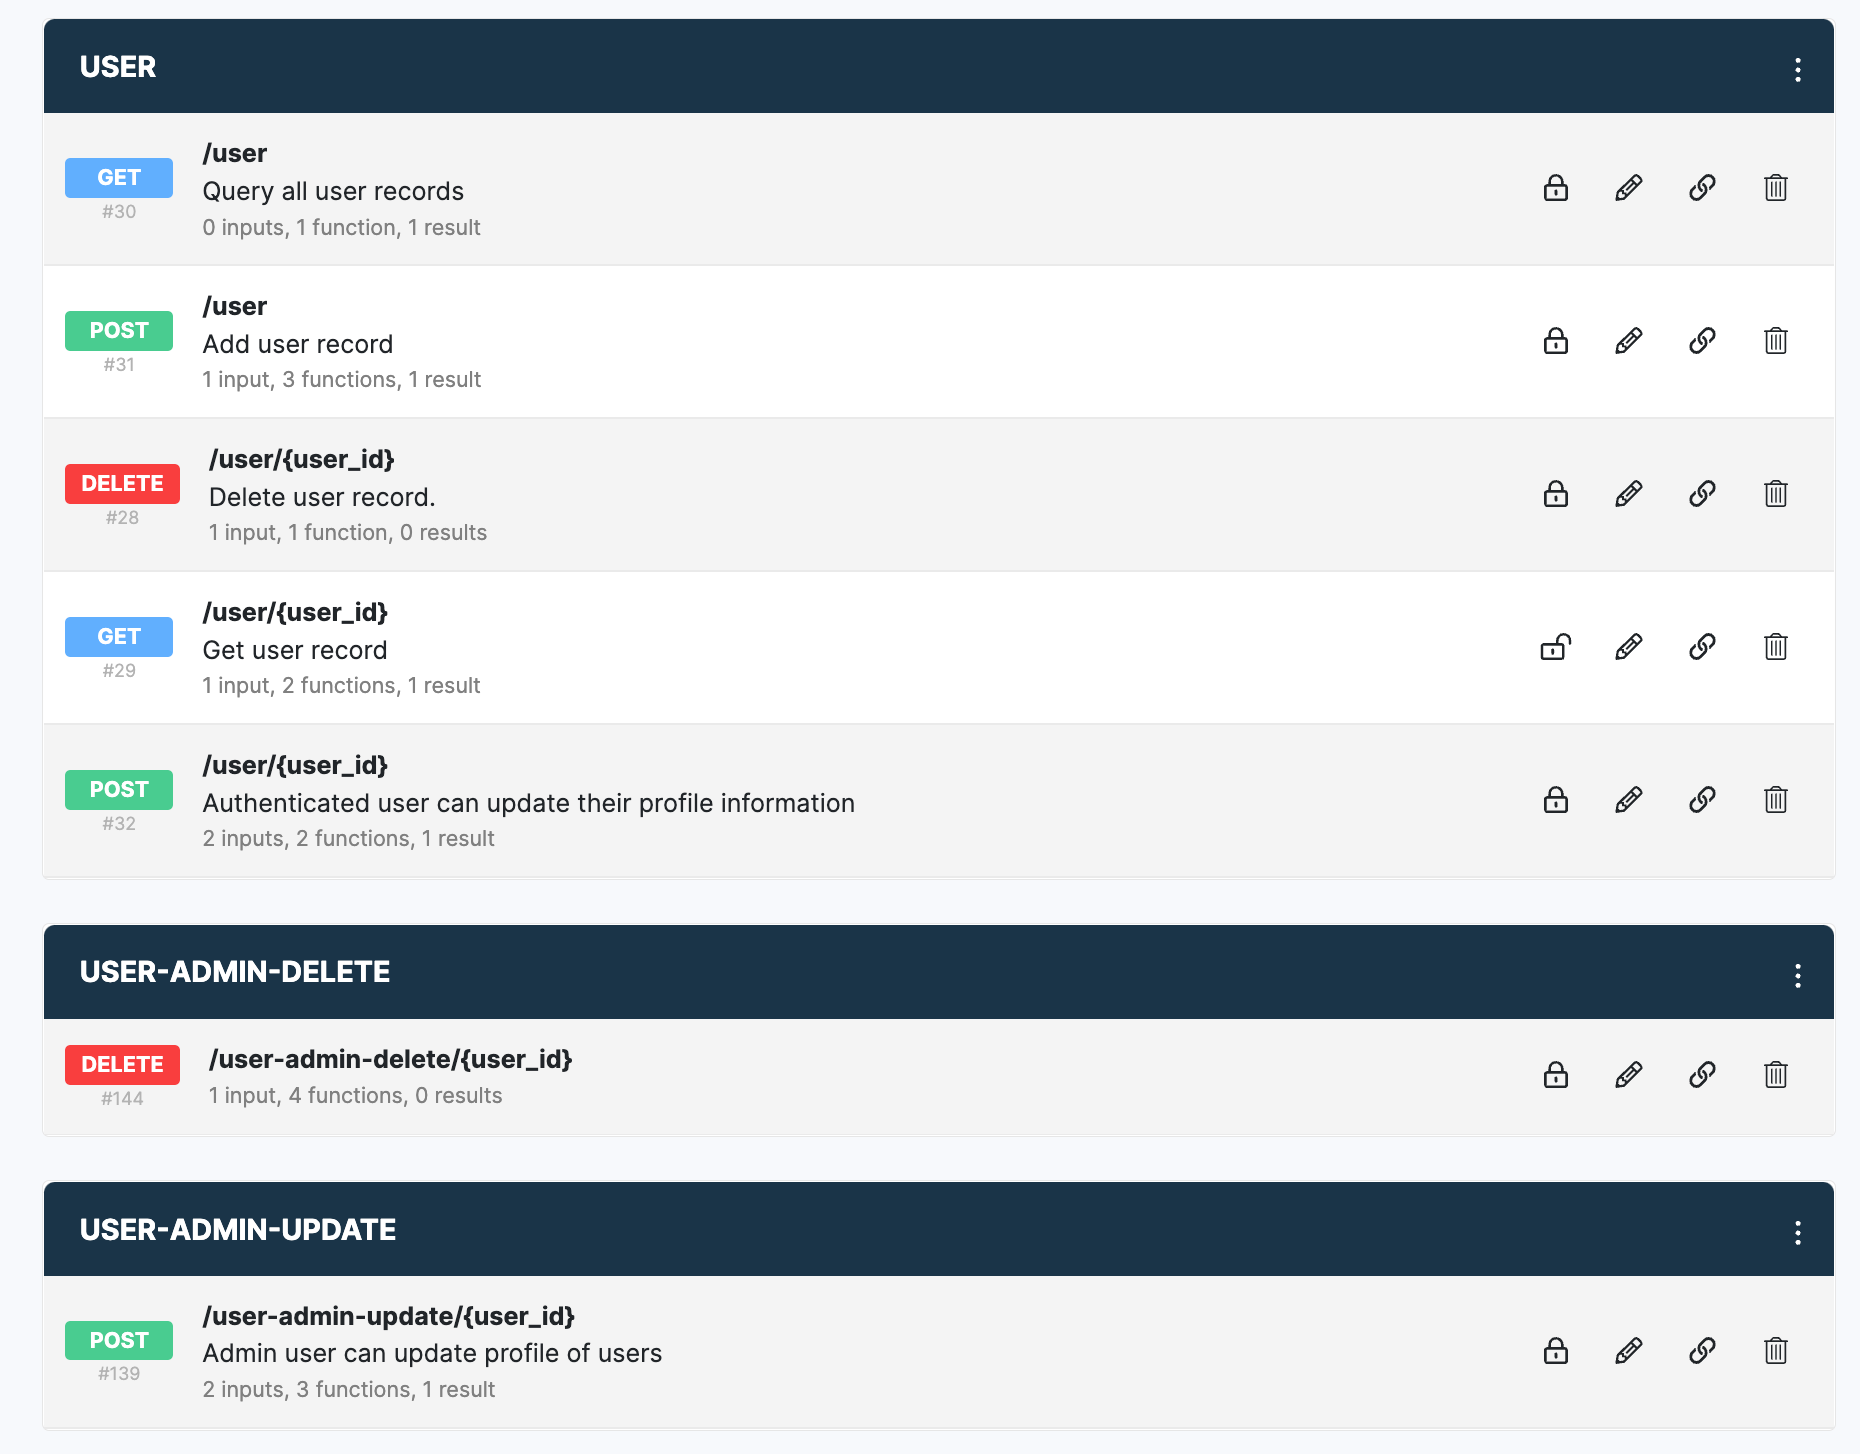
In addition, we created two dedicated endpoints for admins in Xano:
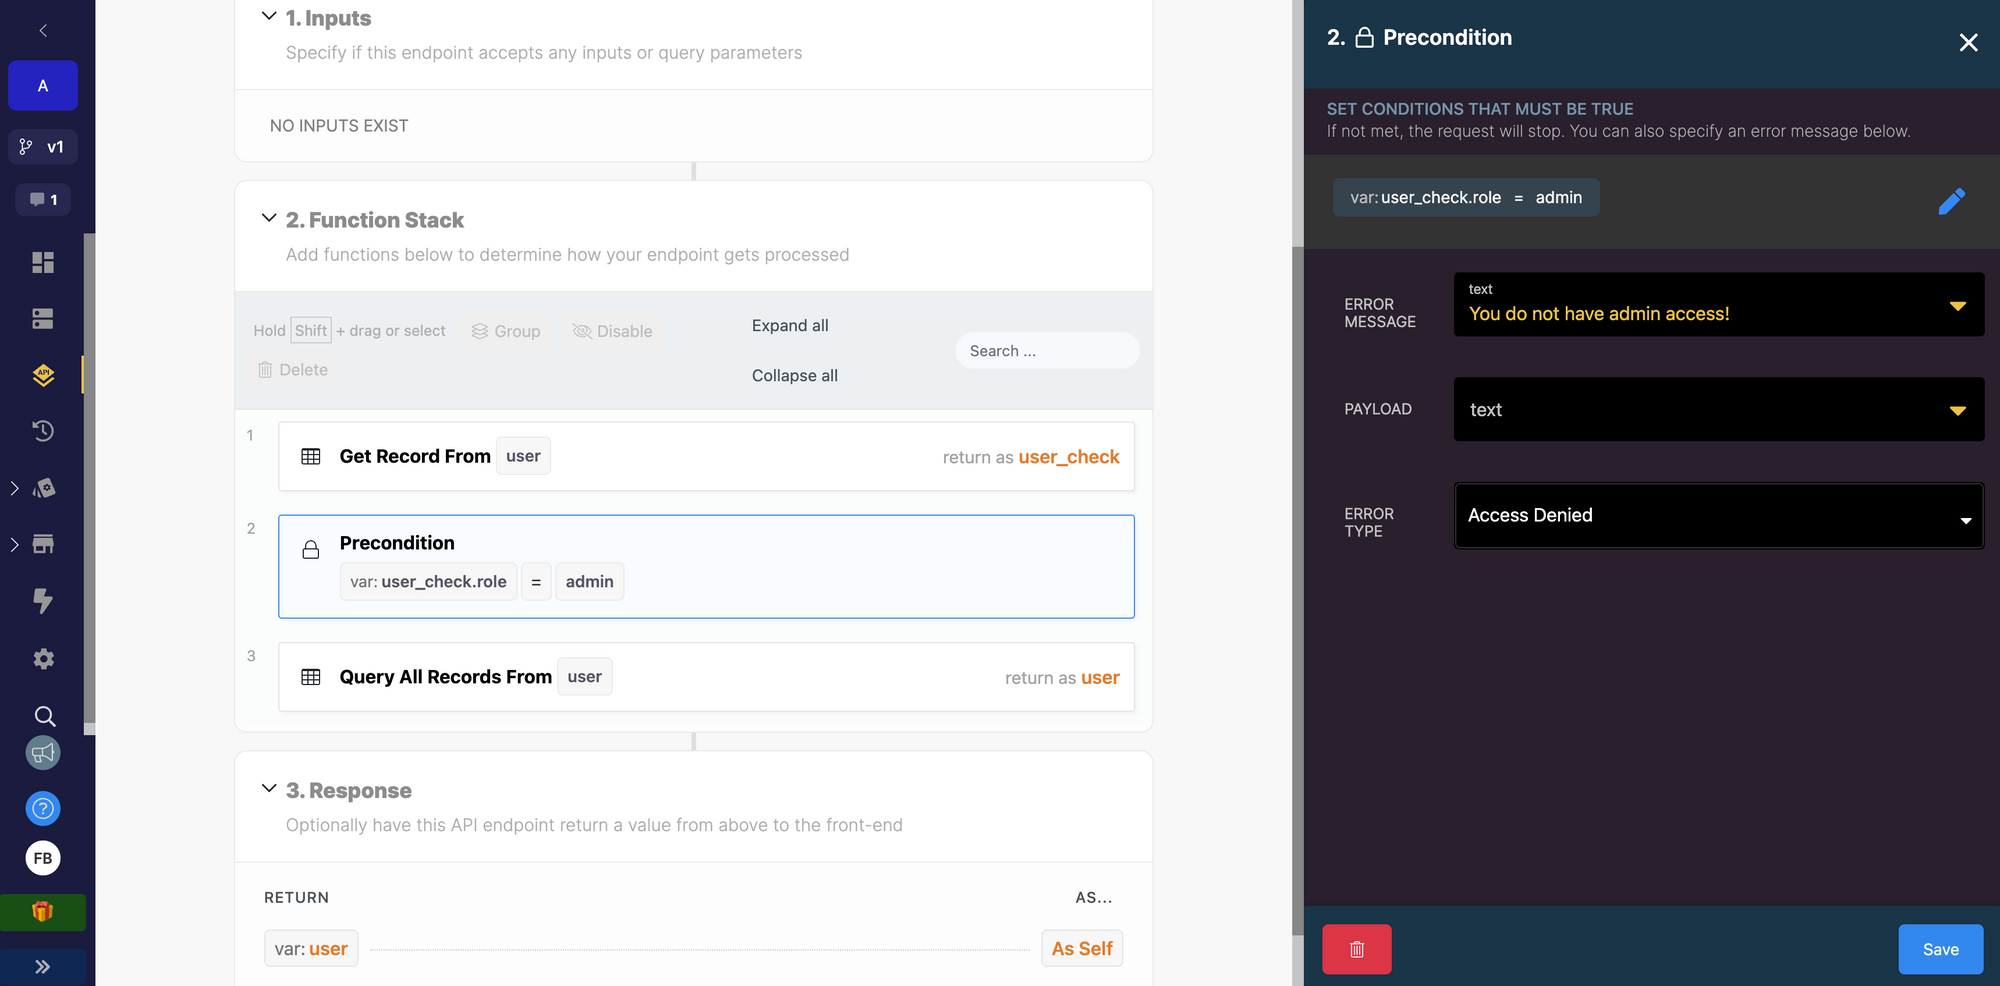
In those endpoints, we added a function to check that the user has admin rights. If they don't, the frontend will receive an error message from Xano:
That's it. There's a lot more to security on the web that you'll want to learn about as you grow but simply following the four steps outlined above will put you in a great position to deliver a professional web app your users can trust.