🧑🏫 Job board with Xano
801
In this use case walkthrough, we use two templates to get started quickly:
- WeWeb’s “Job Board” template for the frontend, and
- Xano’s “Careers” template for the backend.
Table of contents:
- Setup your project in Xano and WeWeb
- Display a list of jobs in WeWeb
- Filter a list of jobs in WeWeb (with a select and a search)
- Redirect user to a job description page in WeWeb
- Allow users to upload their resume and apply to a job in WeWeb
- Update your Xano database with a user’s job application
- Add Xano authentication
- Link job applications to authenticated users
Alright, let’s get started!
You can follow a video walkthrough here or read a step-by-step guide below:
1- Setup new projects in Xano and WeWeb
In Xano
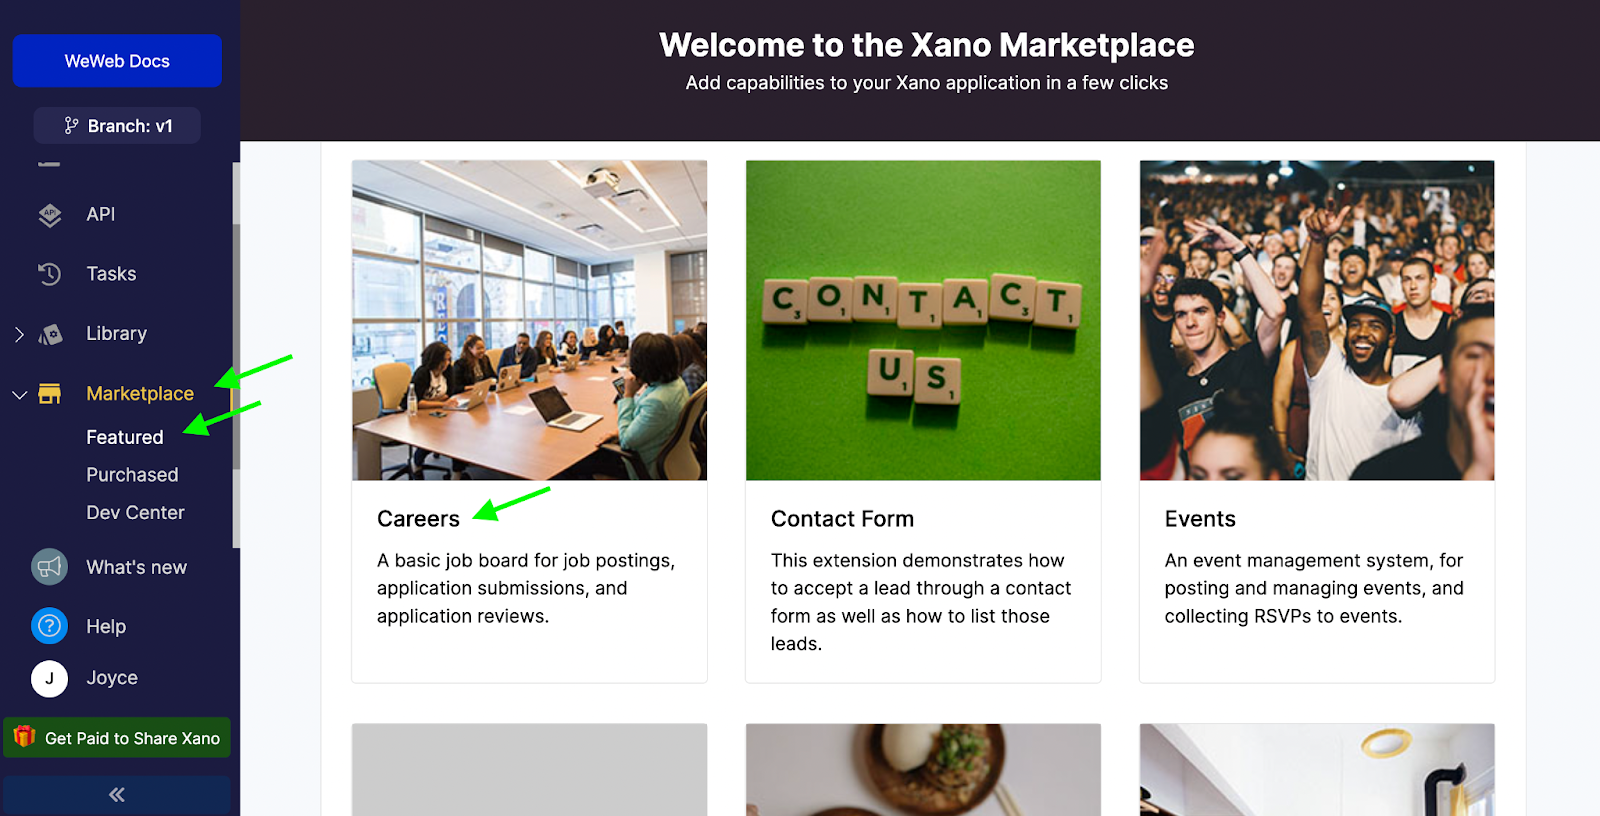
- Create a free XANO account and choose the “Careers” template in the Marketplace
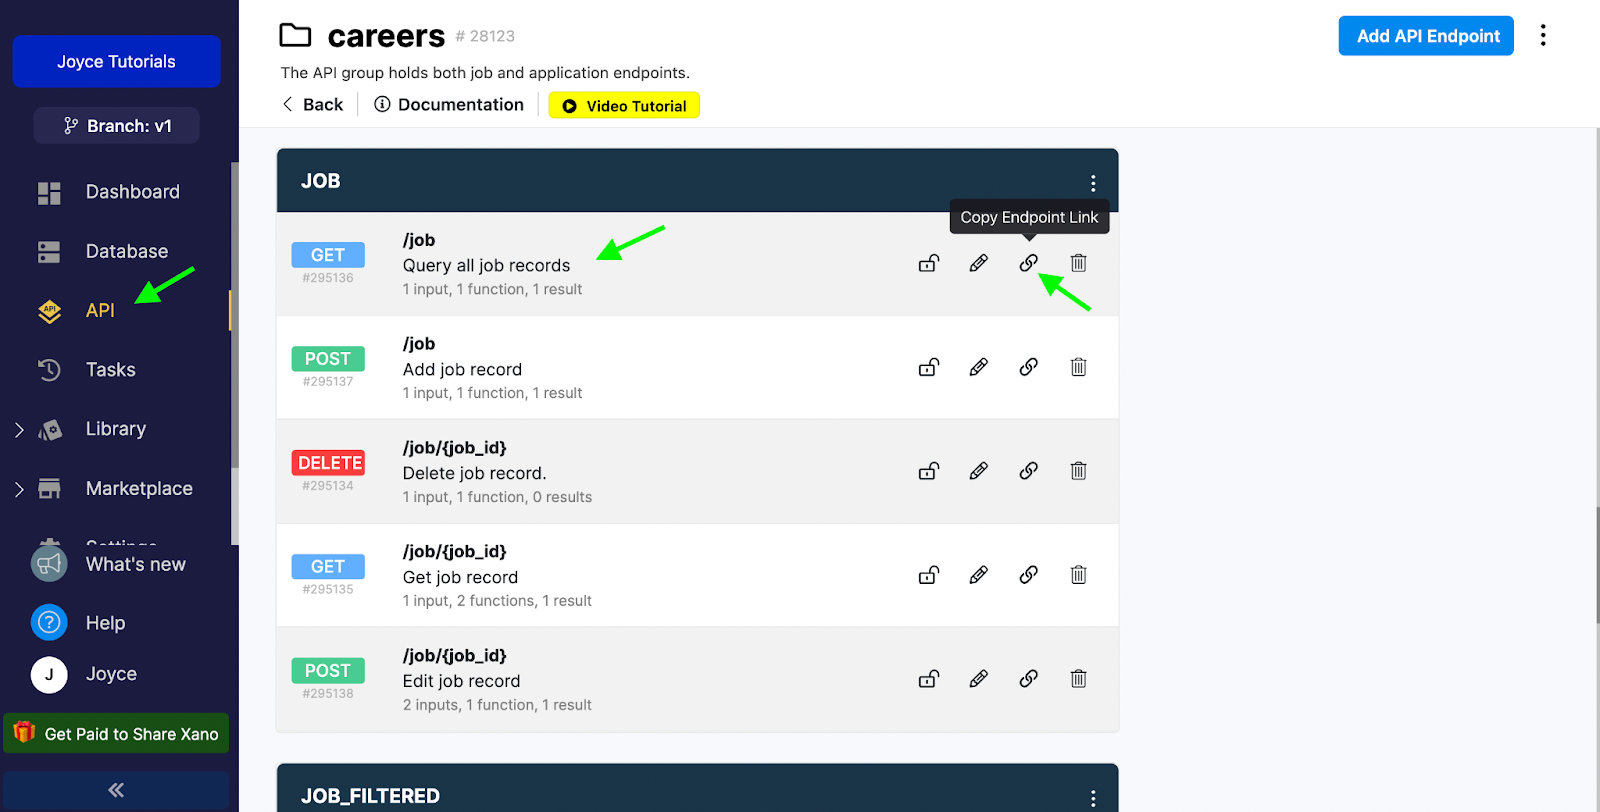
You’ll notice 3 tables and 16 API endpoints are created automatically:
The 3 tables – job, application, and category – is where you’ll find your list of jobs, applications, and job categories respectively.
The 16 API endpoints are how you’ll be able to fetch data from your Xano tables to display it in WeWeb.
If you’re not familiar with APIs, you might want to pause and learn more here.
In WeWeb
In WeWeb, create a new project and choose the “Job board” template.
You’ll notice a page where you can add your list of jobs and a page where you can display the details of a job offer:

2- Display a list of jobs in WeWeb
In order to display data in WeWeb, we first need to get data from XANO.
Create “All Jobs” collection in WeWeb
- Create a new REST API data source in WeWeb
- Set the collection type to dynamic so the list of jobs is updated dynamically in your web-app
- Copy the GET url that fetches the list of jobs in the “job” table from Xano, i.e. “query all job records”, and paste it in WeWeb
- Type in “items” as the result key. Note that this is specific to how Xano returns the data. Other APIs may require a different result key.
To find the API url in Xano, go to your API endpoints:
This is what your API call should look like in WeWeb:
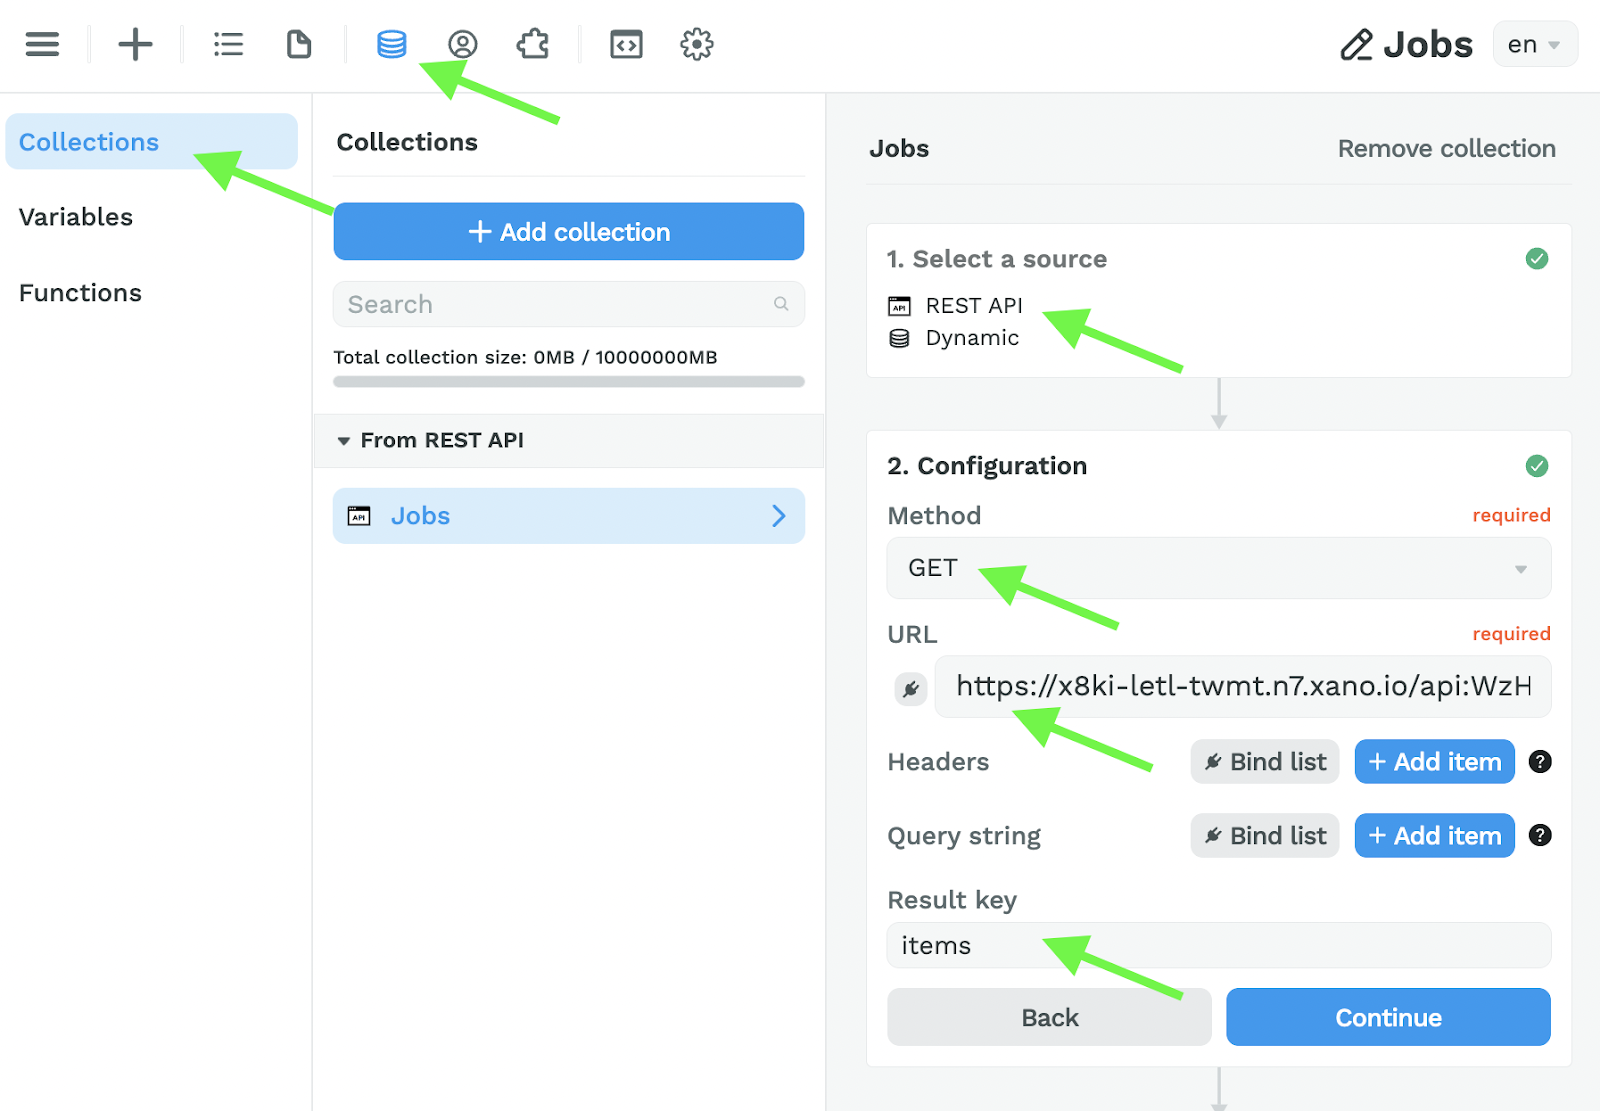
The URL will be different from the screenshot since you’ll be getting data from your own Xano database, but the rest should look the same 🙂
On the “Jobs” page, bind the “Collection List” of jobs to the “All Jobs” collection

You will notice that, once you bind your collection, even if you only have one Job container in the navigator, you’ll have as many repeated items on the page as there are items in your Xano database.
Inside the “Job container”, i.e. the first child element of the container where you bound the collection, you can then bind the information from a repeated item.
In the example below, we bound the job title and type of contract.
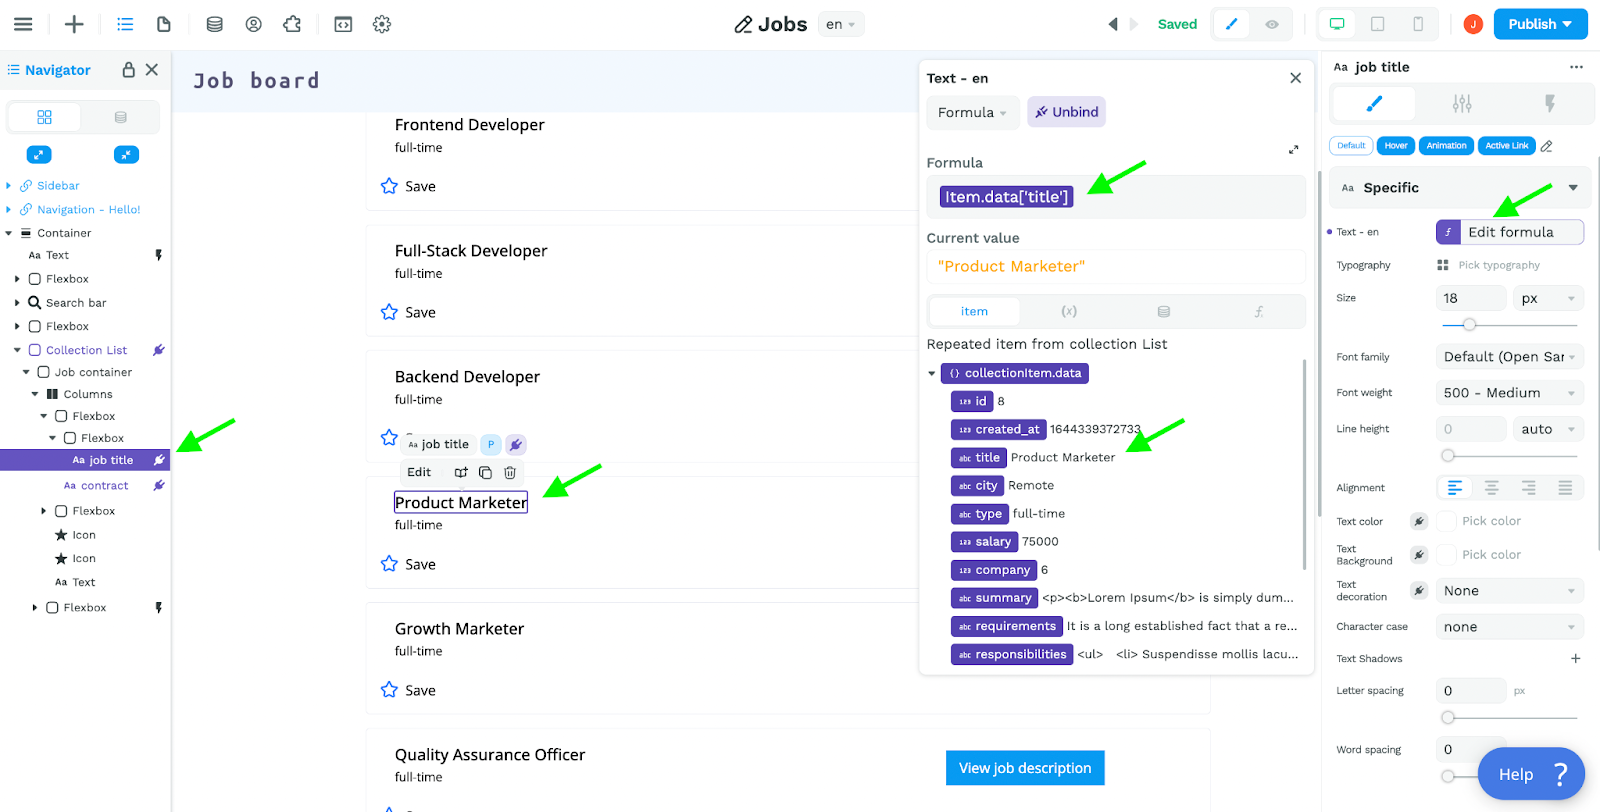
We also deleted the information we didn’t need from our template.
3- Search, sort & filter a list of jobs in WeWeb
When you have a list of items on a page, it is common to let users filter that list by searching for a term or selecting an option for example.
Searching through a list in WeWeb
There is a search bar element by default on the “Jobs” page of the “Job board” template in WeWeb.
However, if you ever needed to add a search, know that you can find it in the “Add” menu of the editor:
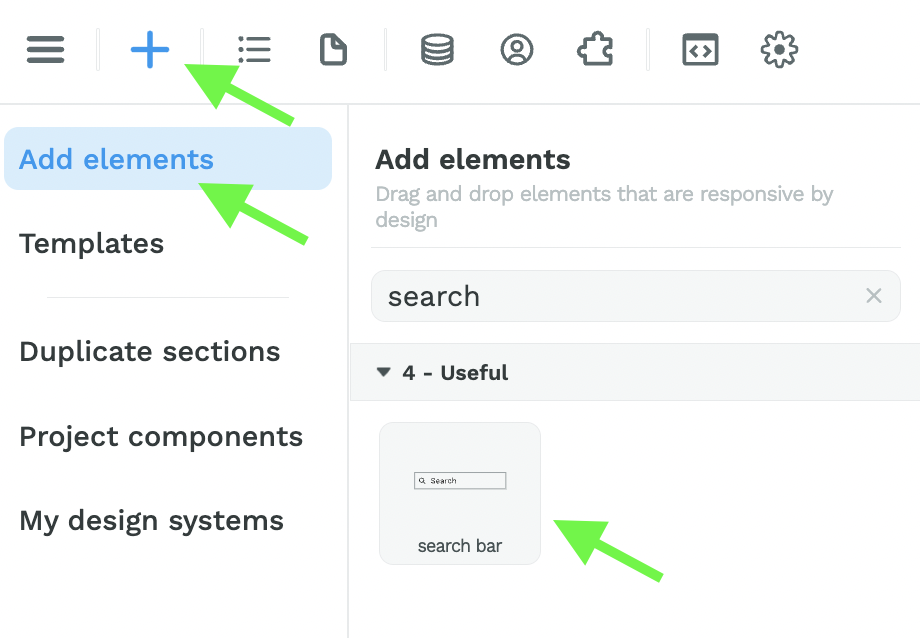
Whenever a search bar element is dragged and dropped onto the page, a new component variable is created in your project.
By default, it is named “Search bar - value” but you can change the name in the element’s settings. You can also change the placeholder of the element in its settings:

In preview mode, you can type in search terms in the search bar to see the “Search bar - value” variable change in your navigator:

Once you’ve set up the search bar element on the page, you’ll need to add a filter to your list of jobs.
You could do this several ways.
If you were working with a large collection of items, say more than 10Mb, the best practice would be to add a search filter to your backend so that the REST API collection in WeWeb only fetched data that matches the search criteria.
This takes a little bit more time, usually a couple of seconds, but has two main benefits:
- You can choose what data you load in your user’s browser (hint: nothing sensitive!)
- You don’t load as much data in your user’s browser and therefore don’t risk crashing it.
For the purposes of this tutorial, since WeWeb is a frontend builder, we’ll explain how to add a search filter to your frontend but please bear in mind that, if you’re working with large collections, you should spend a little more time learning how to add a search filter in your backend.
To search in the frontend in WeWeb:
- Add a filter to your Collection List,
- Where the field you want to search “Contains” the “Search bar - value” component variable, and
- Apply this filter if… the “Search bar - value” component variable is not empty.
In the example below, we are filtering the jobs list based on whether the search term is in the title or summary of the job description:

Filtering a list with a select dropdown element
Now let’s say you also want to filter the job list by job category.
First, you’ll want to create a new collection for job categories in WeWeb, using the API endpoint to query all categories from Xano.
Not sure how to do that? Might want to revisit how we created the “All jobs” collection above 😉
Once you have your “Categories” collection setup in WeWeb, you’ll want to drag and drop the “Select” element on the page. As with the search bar element, this will automatically create a component variable in the navigator, named “dropdown - value.”
In the screenshot below, you can see that:
- On the select element,
- We bound the “Categories” collection
- Set the display field to <category> (e.g. “Software Development”, “Marketing”, etc.)
- Set the value field to <id>

Since we selected “Software Development” in our select dropdown element, the “dropdown - value” variable is 3 which matches the data we have in our “Category” table in Xano.

Now, to filter your list of jobs based on the job category selected in the dropdown, all you need to do is add a filter to your existing Collection List where the “category” field of the job contains the “dropdown - value” variable.

When the user lands on the page, before they select anything, we don’t want the filter to apply, so we can add a condition to the condition group, i.e. Apply if… the “dropdown - value” variable is empty.

4- Redirect a user to a job description page in WeWeb
Ok great. We have a page with a list of job offers.
Now we want to let users access individual job pages.
There are several ways we could do this in terms of user interface.
Let’s do it in the most obvious way by creating a button that users can click on to learn more about a specific job.
Step 1 – Add a button
In the “Add” menu, search for the “Button” element, drag and drop it in your repeated item container.

Step 2 – Create a variable
In order to give more information to the user about the job they click on, we first need to create a variable that contains the information.
To do that, you can add a variable of Object type called “selectedJob” and save it to local storage. This means that the variable will be saved in the user’s browser.

Once you have this “selectedJob” variable, you’ll want to create a workflow that updates the variable with the current item information and goes to the “Job template” page.
Step 3 – Create a workflow on the button
- Name: Go to job page
- Trigger: On click
- Action 1: Update the “selectedJob” with the <item.data> in quick access
- Action 2: Change page, go to the “Job template” page

Step 4 – Display the job data on the template page
Once you’re on the template page, you can bind fields as you would on any other page, finding the data you need in the “selectedJob” variable.

5 – Allow users to upload their resume and apply to a job through your WeWeb application
Our web application wouldn’t be complete without the option for users to create, update, or delete a record.
For our use case, we want to let users upload their resume and apply to a job by submitting a form on our WeWeb app.
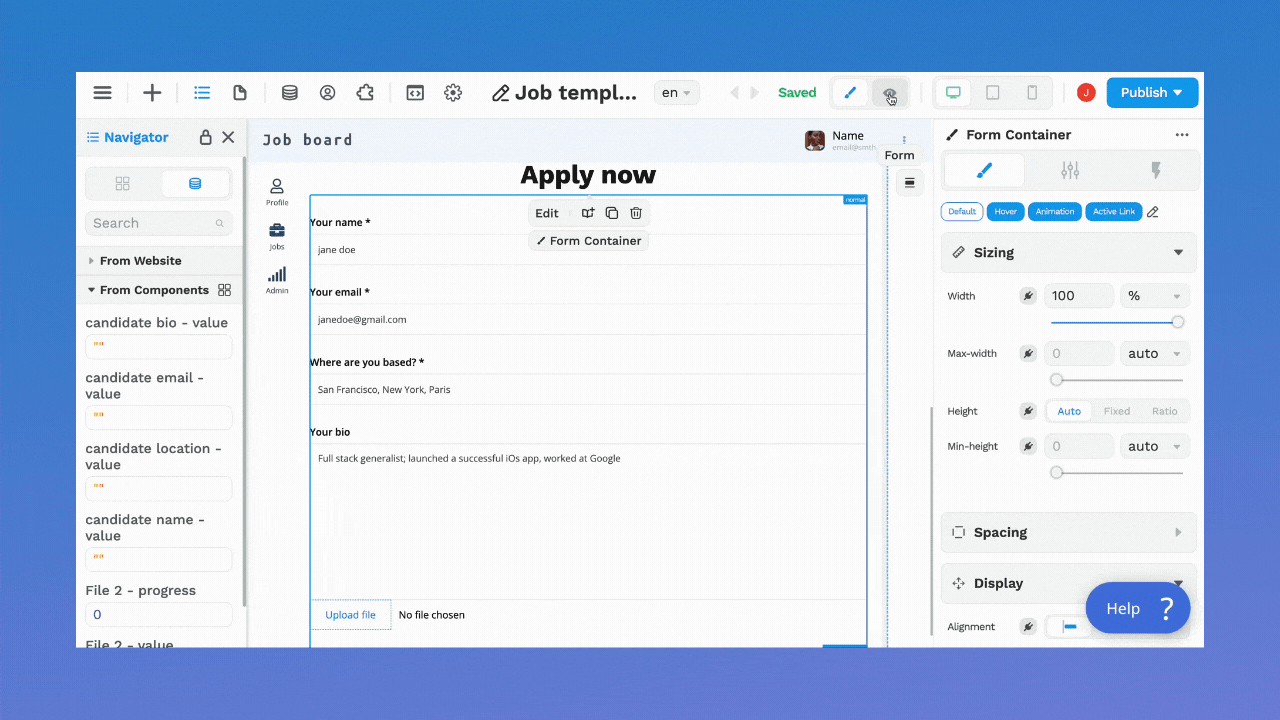
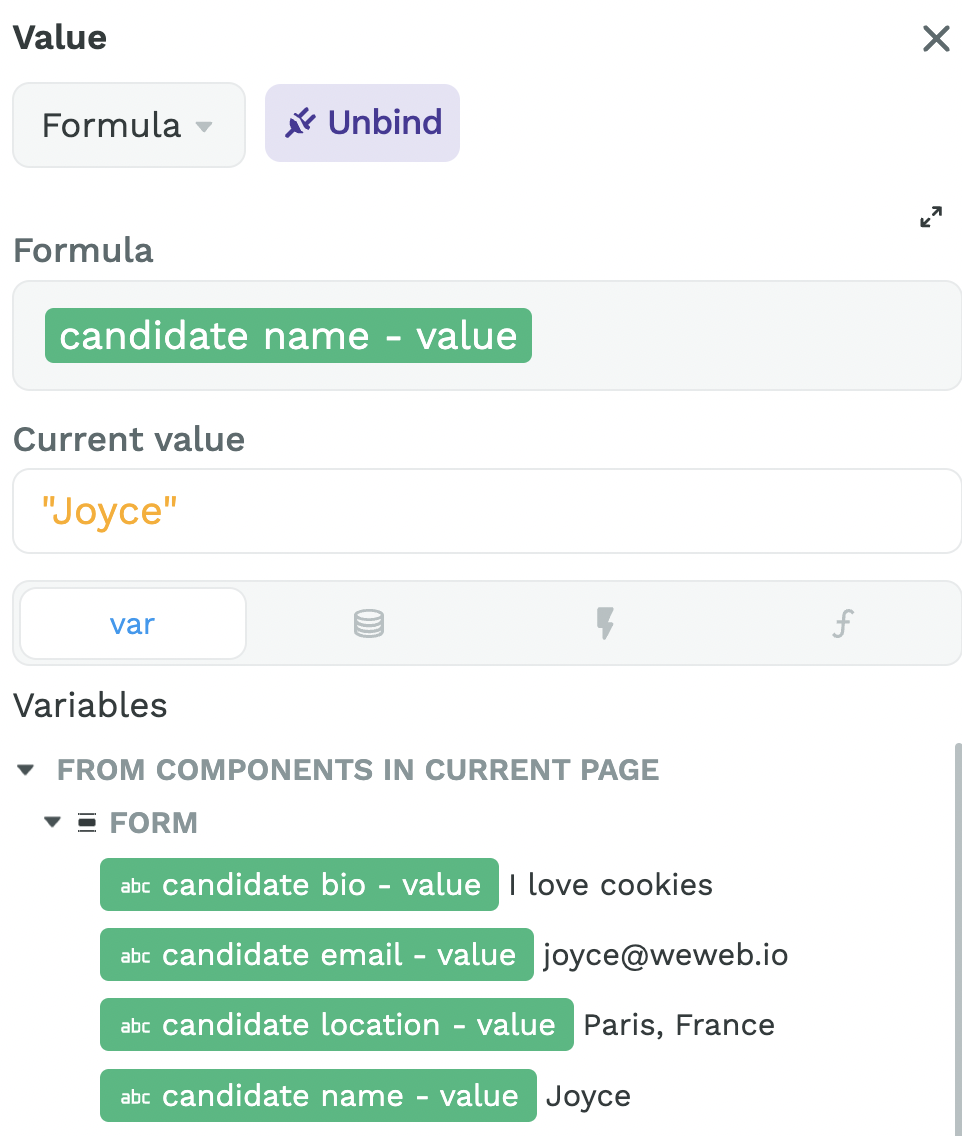
By default, on the “Job template” page of the “Job board” template, there is a Contact form container with 4 component variables:
- User name
- User email
- User location
- User bio
You can see these component variables when you open the “Variables” sub-menu of the “Navigator” menu, see green arrows below:

To allow users to upload a resume, we’ll drag and drop a “File upload” element inside our form container:

You’ll notice that, as soon as you drop the element on the page, two new component variables are created by default:
- “File 1 - progress”, and
- “File 1 - value”
Both these variable names will change if you change the file upload element’s name:

You can test this in Preview mode by typing in data and uploading a file as if you were a user.
You’ll notice the value of the component variables in the navigator are updated in real time:
6 – Update your Xano database with the user’s job application
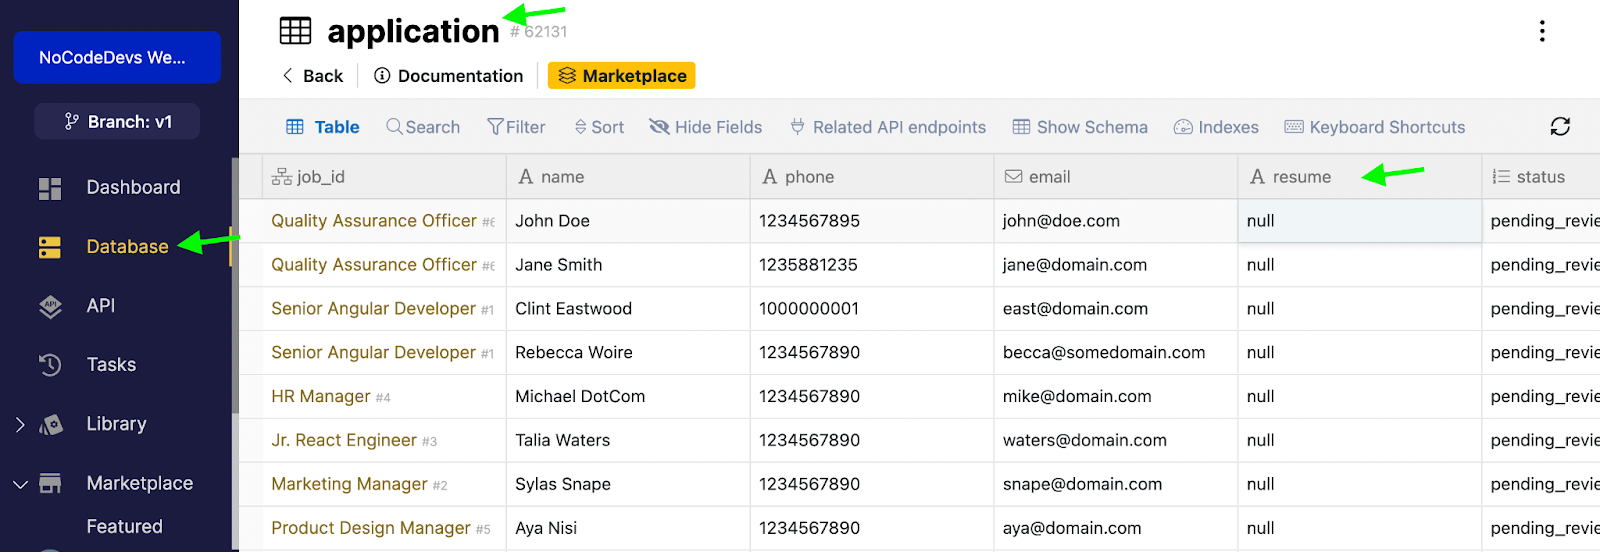
By default, the “resume” field in Xano’s “application” table is a “file resource.”
However, in WeWeb, when a user uploads a file, we upload it to our CDN and the value of the file is a URL, i.e. a “text” field.
Before we show you how to send data from WeWeb to Xano, you therefore need to change the type of the “resume” field in Xano so it’s a “text” type:
Then, to update your Xano database with the user’s job application, follow these steps:
- Create a workflow on the form container
- Name: “Send Job Application”, or anything you find more descriptive
- Trigger: On Submit, i.e. when the user submits the form
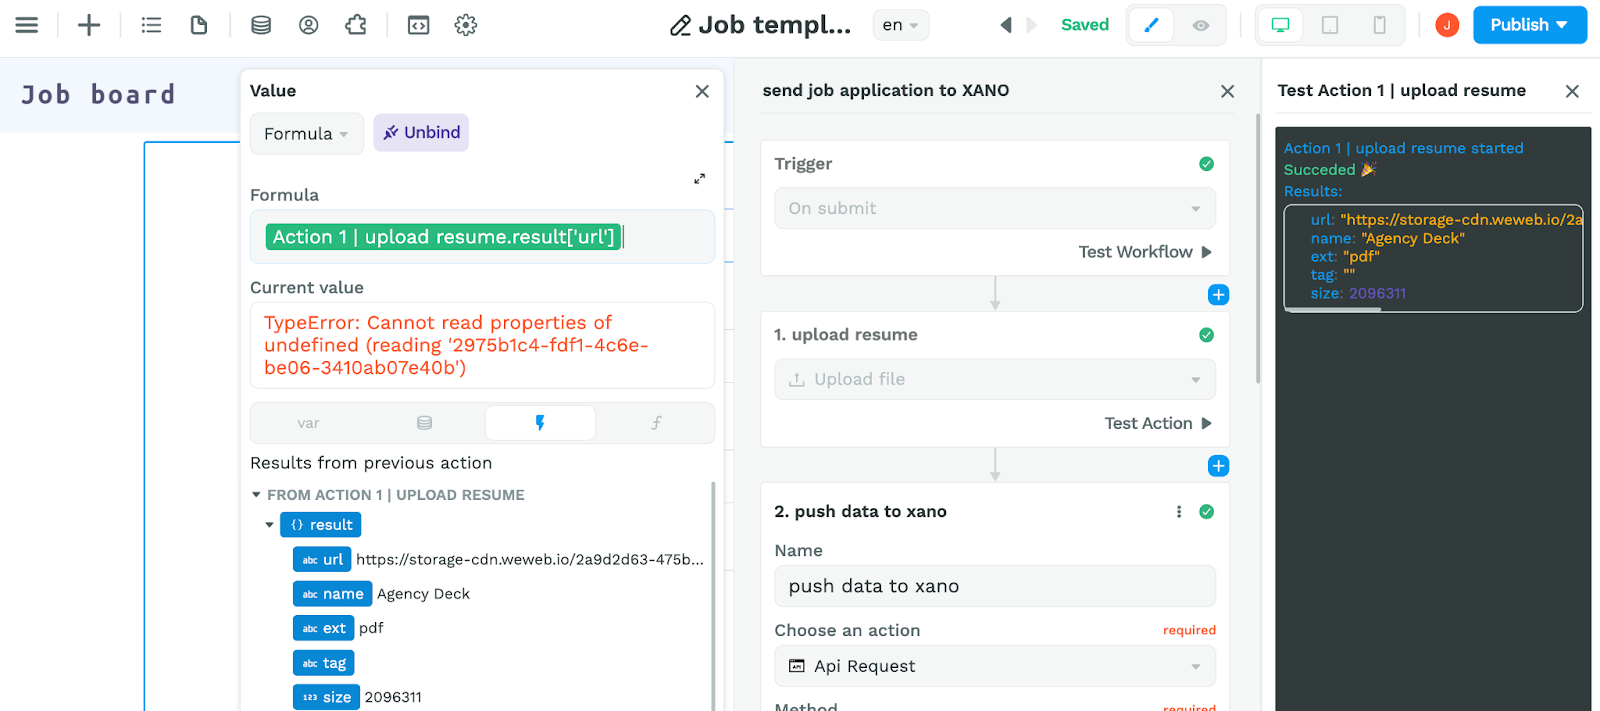
- Action 1:
- Choose an action: Upload file
- Select upload element from this page: select the component variable you setup
- Test Action 1 before moving on to Action 2
This is very important because you will need the result of Action 1 to set up Action 2.

- Action 2:
- Choose an action: Api Request, note that you will only have this option if you already set up REST API as a data source
- Method: POST, because we will be posting data to Xano
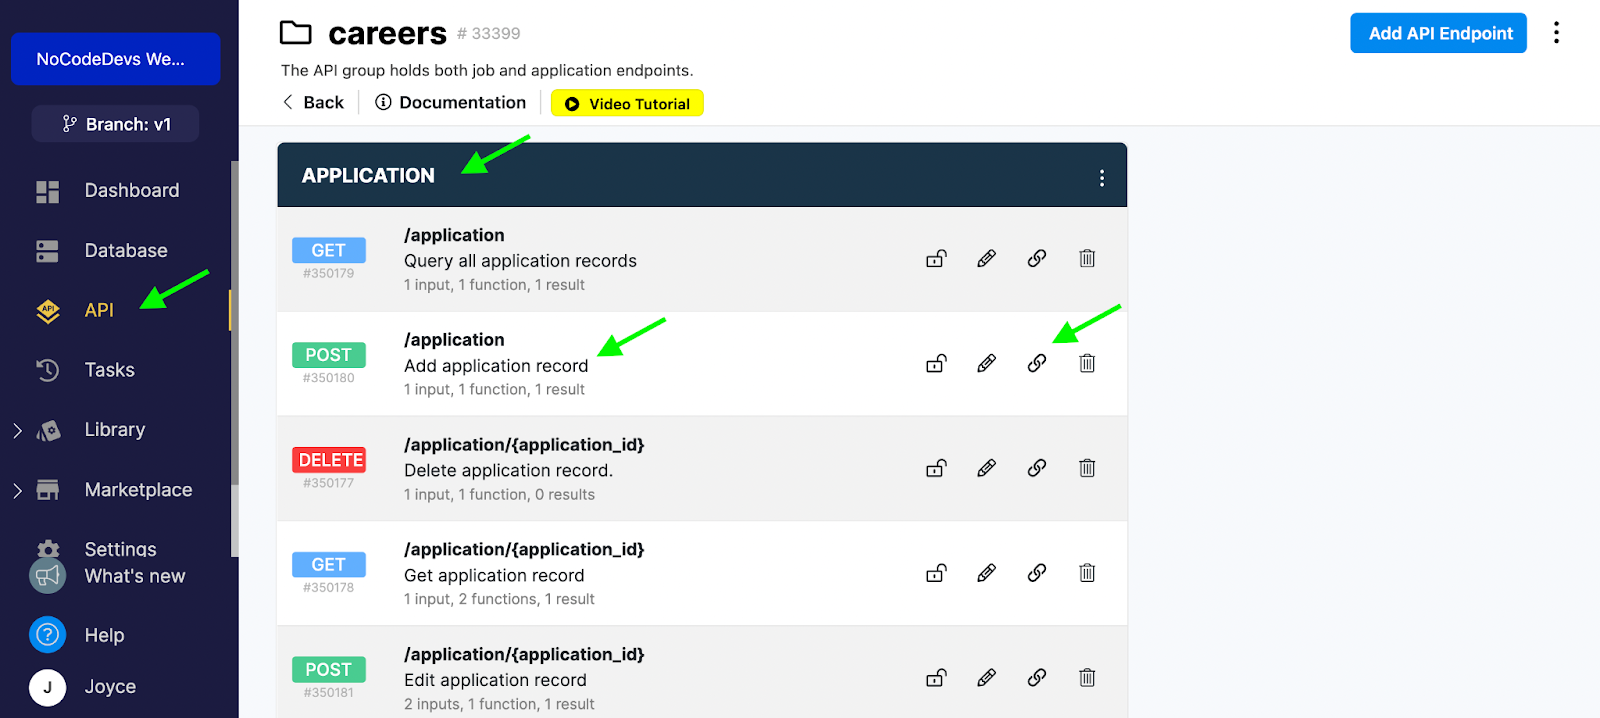
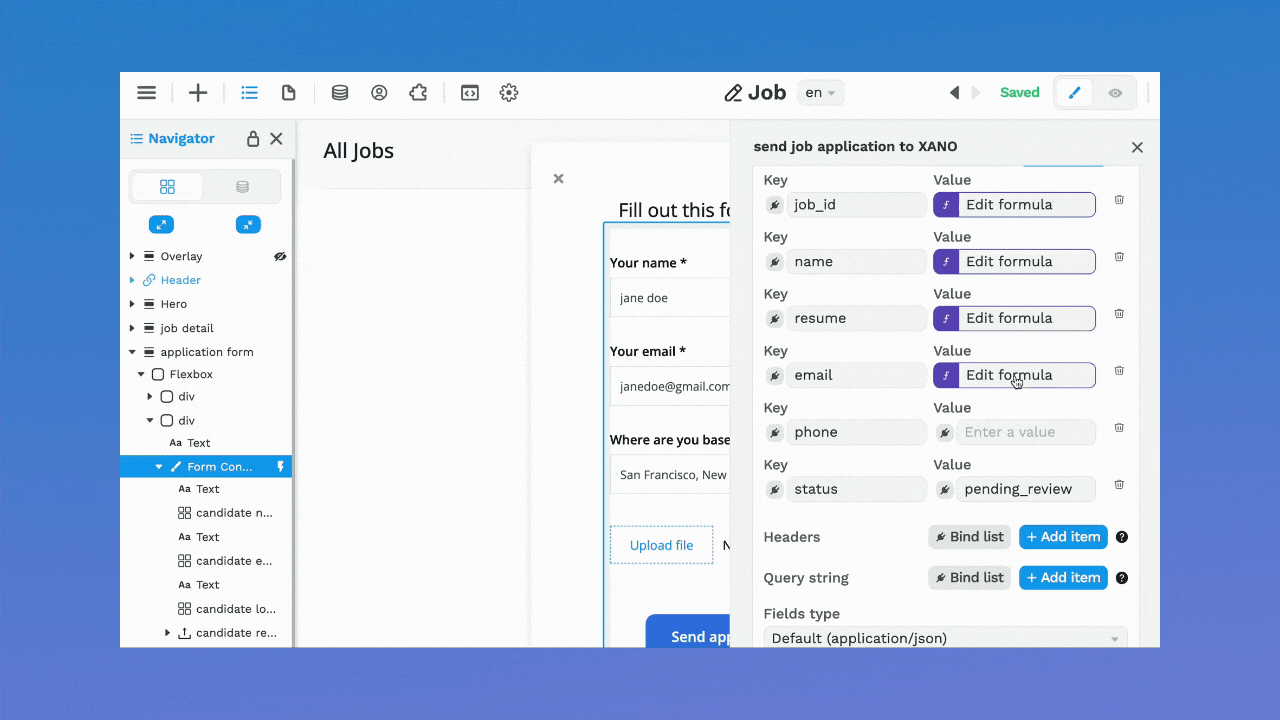
- URL: paste the Xano endpoint that allows you to add an application record
- Fields: for each column in the Xano “application” table, bind the corresponding value in WeWeb
What does this mean?
It means that, in Xano, you have 6 columns with data. The keys for these columns are as follows:
- job id,
- name,
- resume,
- email,
- phone, and
- status.
In WeWeb, you have a corresponding variable for each key:


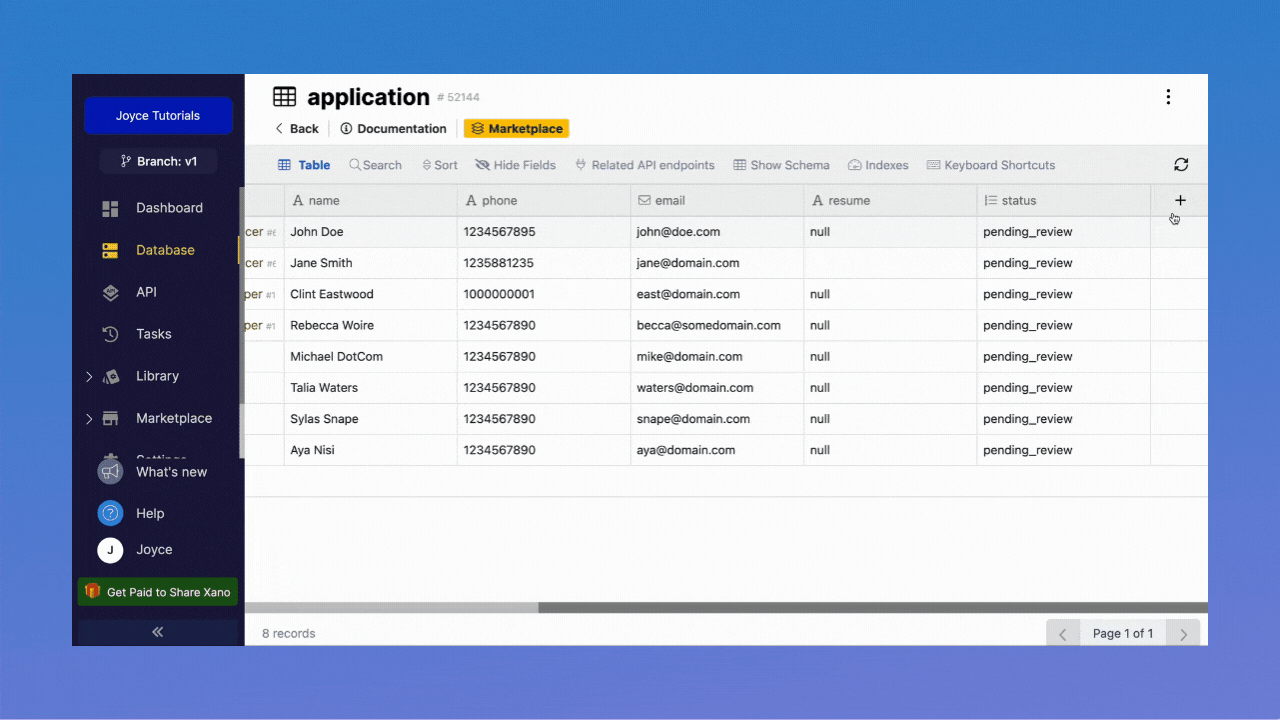
Once that’s done, you can test Action 2, refresh the “application” table in Xano and jump with joy when the test application comes through 😀
7 – Add Xano authentication
Let’s say you want to force users to authenticate themselves before they can apply to a job.
In order to do that, you’ll need to:
- Add a user table to your Xano database
- Add authentication endpoints to Xano
- Set up Xano authentication plugin in WeWeb
- Prevent users who are not authenticated from applying to a job (create login page and gate content)
A- Setup a User Table in Your Xano Database
By default, there is no user table in Xano’s “Careers” template but you can easily add one.
Got to “Database” > “Add Table” in the top right corner.
Your user table should include at least two fields:
- One field where you store the login. For example, an email field type, and
- One field of type “password” where you store the encrypted password.
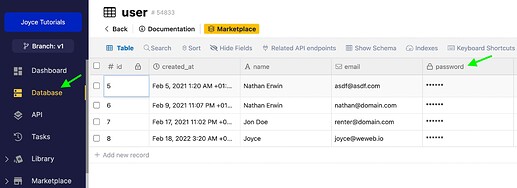
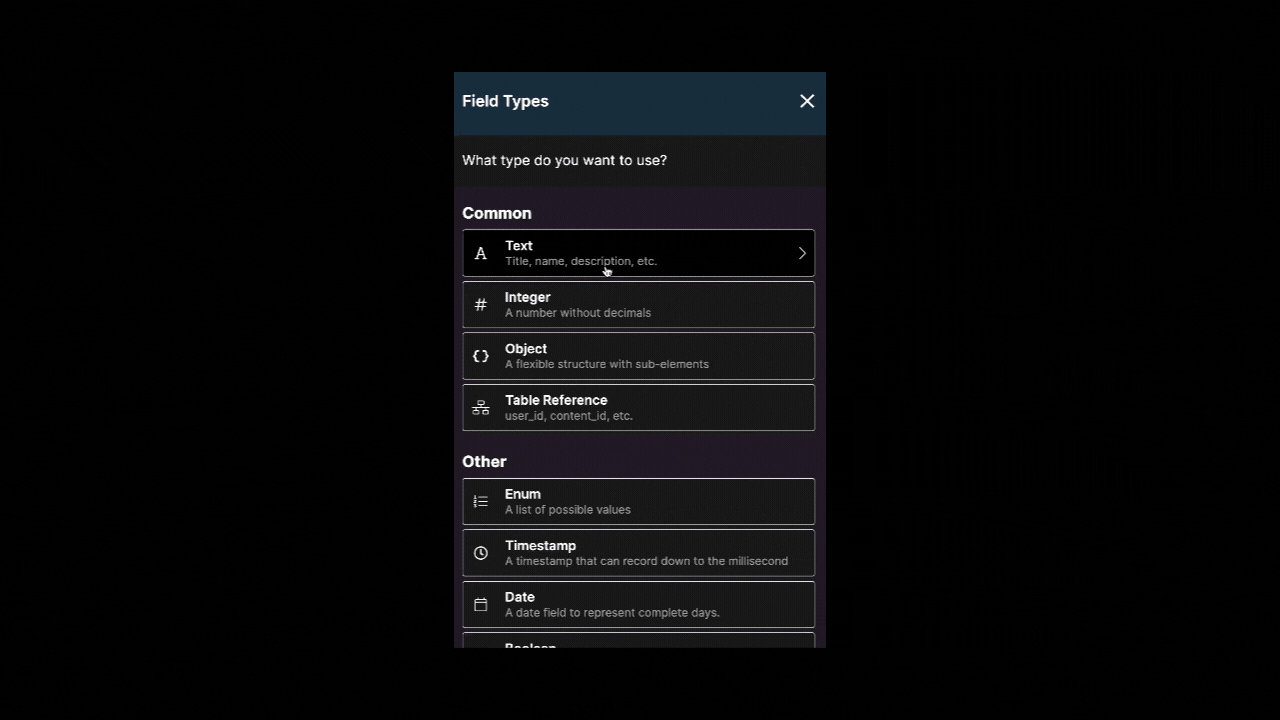
⚠️ It’s important that you choose the field type “password” when creating your user table in Xano. ️️⚠️
This will ensure that:
- you can use Xano’s authentication API points, and that
- the user input is encrypted when the user first creates an account with your web-app.
B- Create Authentication API Endpoints in Xano
For Xano authentication to work, you need three API endpoints:
- signup
- login
- me
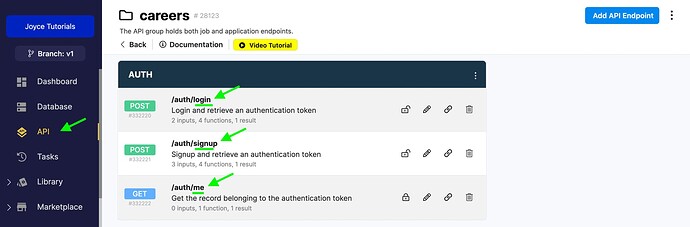
If you’re using Xano’s “Careers” template, you’ll need to create these three endpoints yourself by going to “API” > “Add API Endpoint” > “Authentication”

C- Copy Xano Authentication Endpoints Into WeWeb
In WeWeb, you’ll need to add the “Xano Auth” plugin and copy/paste the URL of each Xano API endpoint:

️️⚠️ Warning: the order in which endpoints are displayed in Xano may vary. Make sure to copy the correct URL in each WeWeb ️️⚠️
D- Ask Users to Login Before They Apply to a Job
There are several ways you could do this.
You could trigger a popup that requires users to signup or login when they click on an “Apply to job” button.
For the purposes of this tutorial, we’ll simply show you how to redirect unauthenticated users to a signup page.
- Create a new blank page
- Name it “Signup”
- Drag and drop the “Signup” element on the page

- Add a “Change page” step to the workflow so the user is redirected to the “Jobs” page after signing up

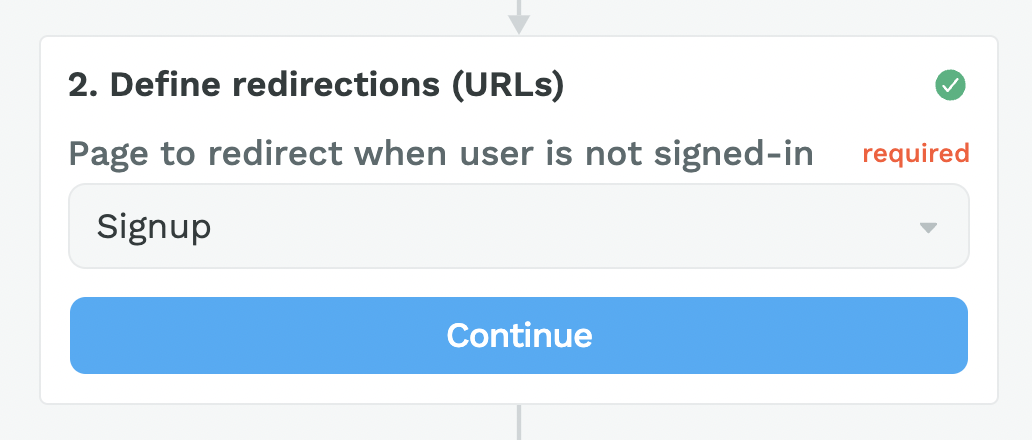
- In the Xano Auth plugin, redirect users who are not signed in to the “Signup” page you just created
8 – Link an Application Form Submission in WeWeb to a User in Xano
Now that you have a user table in addition to the application table that comes with Xano’s “Careers” template by default, you can link the two.
In the “application” table, add a “user_id” Table Reference field that refers to the user:
In WeWeb, change the API call when the user submits a job application in order to add the user_id to the application POST request:
What’s happening here?
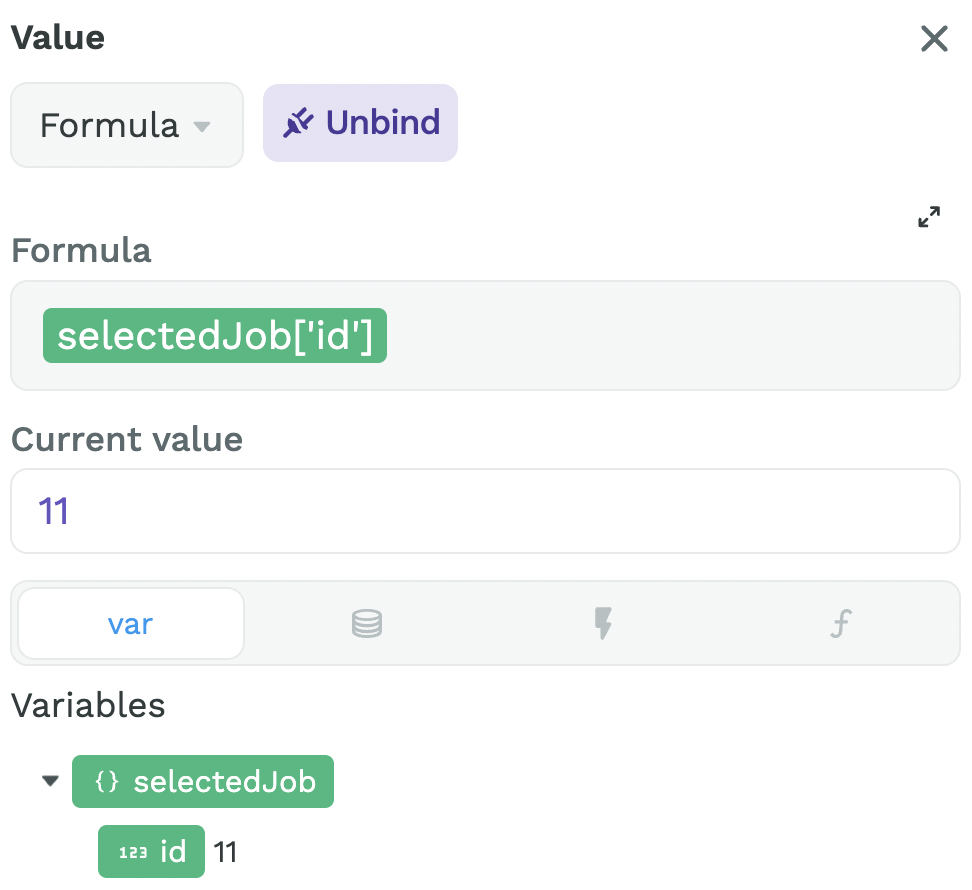
Instead of binding an “email” field to the user’s email input in the application form, you are binding a “user_id” field to the “id” of the authenticated user.
Xano will recognize the user’s id and populate the “user_id” field with that user’s email in the “application” table.
There you go!
Go into Preview mode in WeWeb > Signup > Select a Job > Submit an application
After refreshing the “application” table in Xano, you should see your job application 🙂