🚗 Car Rental App with Supabase
In this guide, we will walk you through how you can build a car rental booking system with WeWeb and Supabase.
You will learn:
- How to get started with Supabase
- How we structured our database in Supabase
- How to configure the Supabase Data Source Plugin in WeWeb
- How to add a Supabase Collection in WeWeb
- How to add Supabase Authentication in WeWeb (including roles)
- How to create policies in Supabase
- How to display user information in WeWeb
- How to enable realtime tables in Supabase (web sockets)
How to Get Started with Supabase
We can only recommend you watch the video we watched to get started!
It's 25 minutes but very clear, even at 2x speed 😉
It covers everything you need to get started:
- Overview of Supabase - 0:00
- Create a Project - 6:24
- Create a Table & Columns - 8:10
- Add Data in a Table - 9:21
- Make API calls to Read (9:38) and Create (12:14) Rows
- Enable Row Level Security - 13:55
- Create Policies to make Reading public (14:40), limit Reading to Authenticated Users (15:25) and limit ecord updates to the current user's records (18:20)
As we progress in our use case, we'll touch on other Supabase features we're sure you'll find helpful, like sorts and filters 🙂
🔥 Pro Tip 🔥
With WeWeb's native Supabase integration, a lot of the work to read, create, and update the data will be simple point and click.
How We Structured Our Database in Supabase
With a basic understanding of how Supabase works, we went ahead and created a Database with 4 tables:
- a list of locations, i.e. rental locations and garages
- a list of vehicles, i.e. rental cars and vans
- a list of bookings, i.e. reservations made by customers
- a list of users, i.e. customers, rental agents, and mechanics
🔥 Pro Tip 🔥
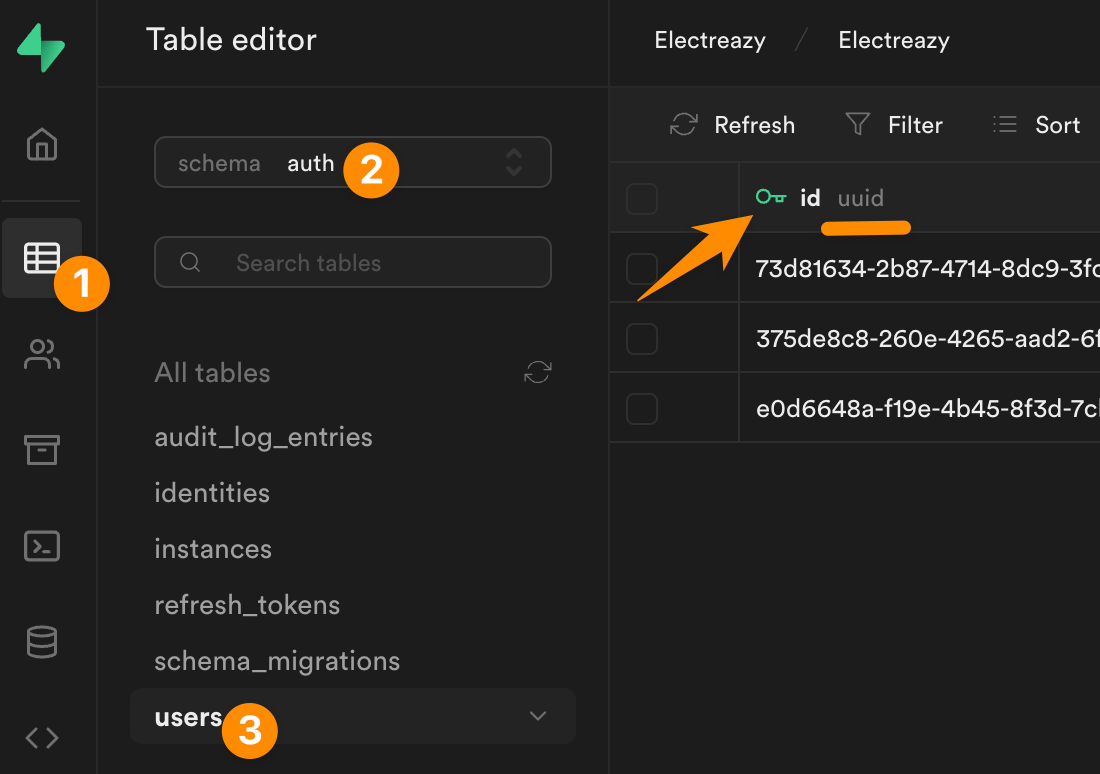
When you create a project in Supabase, a user table is created by default under the "auth" schema.
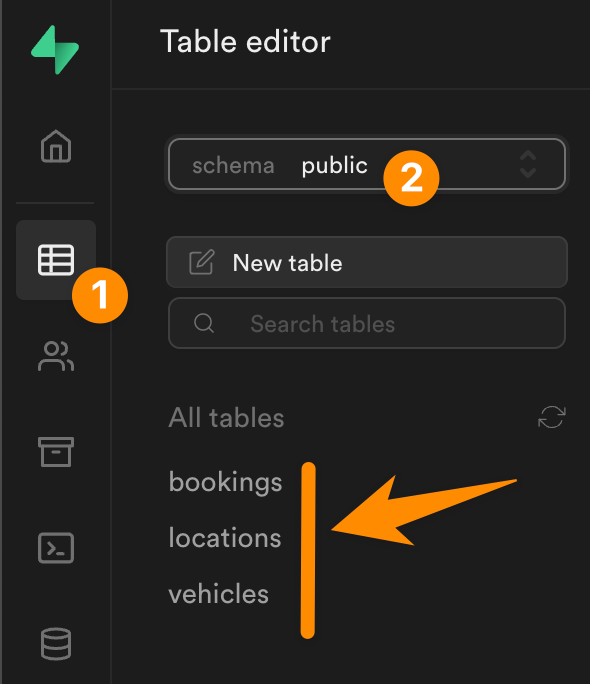
The 3 tables I created manually are in the "public" schema:
Why we use UUIDs
In the screenshot above showing the "users" table, you can see that the user "id" is of type "uuid".
It's considered best practice in web development to generate complex, random user ids such as UUIDs or GUIDs.
Both UUIDs and GUIDs make it harder for hackers to guess the ID of a user than if you were using 1, 2, 3, 4, 5 or email addresses as user ids.
As a result, it also makes it harder for them to make API calls on a user’s behalf.
There are advantages and disadvantages to both so we'll stick with the UUIDs that come by default in Supabase's "users" table.
Why we use 4 separate tables
In theory, we could have a table with all the cars that includes the location of each car.
If we decided to rename a branch in the future, we would then have to update the name of the branch multiple times, i.e. on every car record at that location.
Not ideal.
When structuring a database, and developing on the web in general, there are two principles we always try to keep in mind:
- Don't repeat yourself (DRY), and
- Keep things easy to change (ETC)
By creating 2 separate tables for cars and locations, we are effectively:
- writing the location name and information only once (DRY), and
- making it easy to update a location's name or information down the line (ETC).
In addition, having separate tables for each key piece of information will make it easier for us to load only the data we need in the frontend.
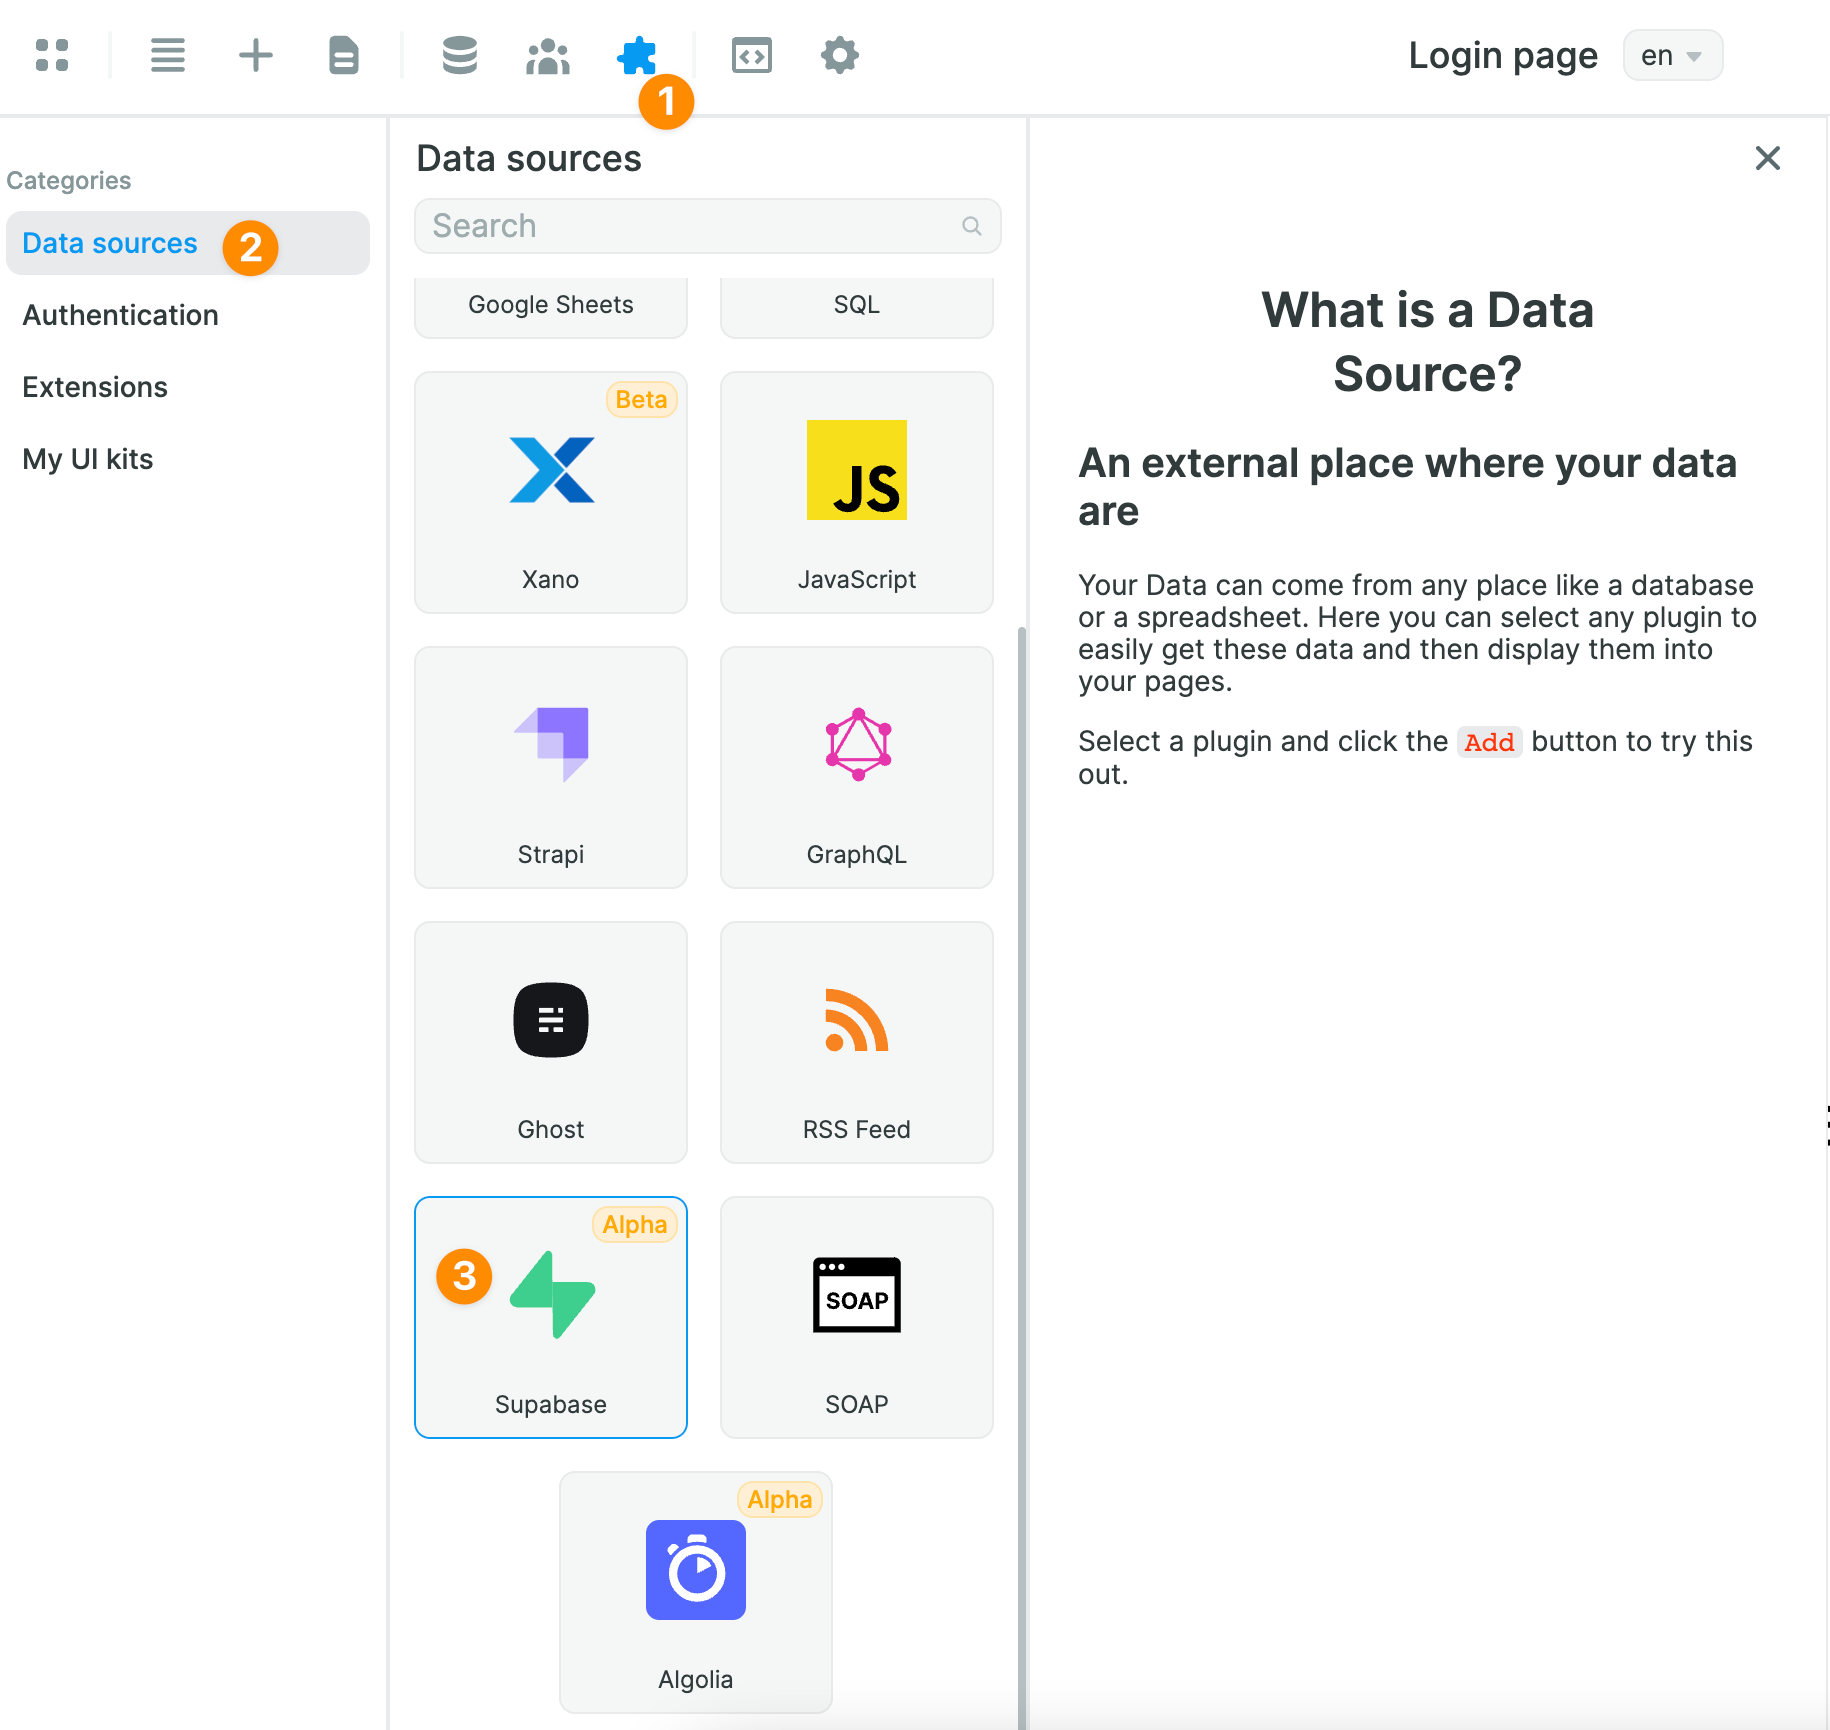
How to Configure the Supabase Plugin in WeWeb
In order to read Supabase data in WeWeb, you'll first need to add the Supabase Datasource Plugin:
Once you've added it, you will be invited to share your Supabase project URL and public API key:
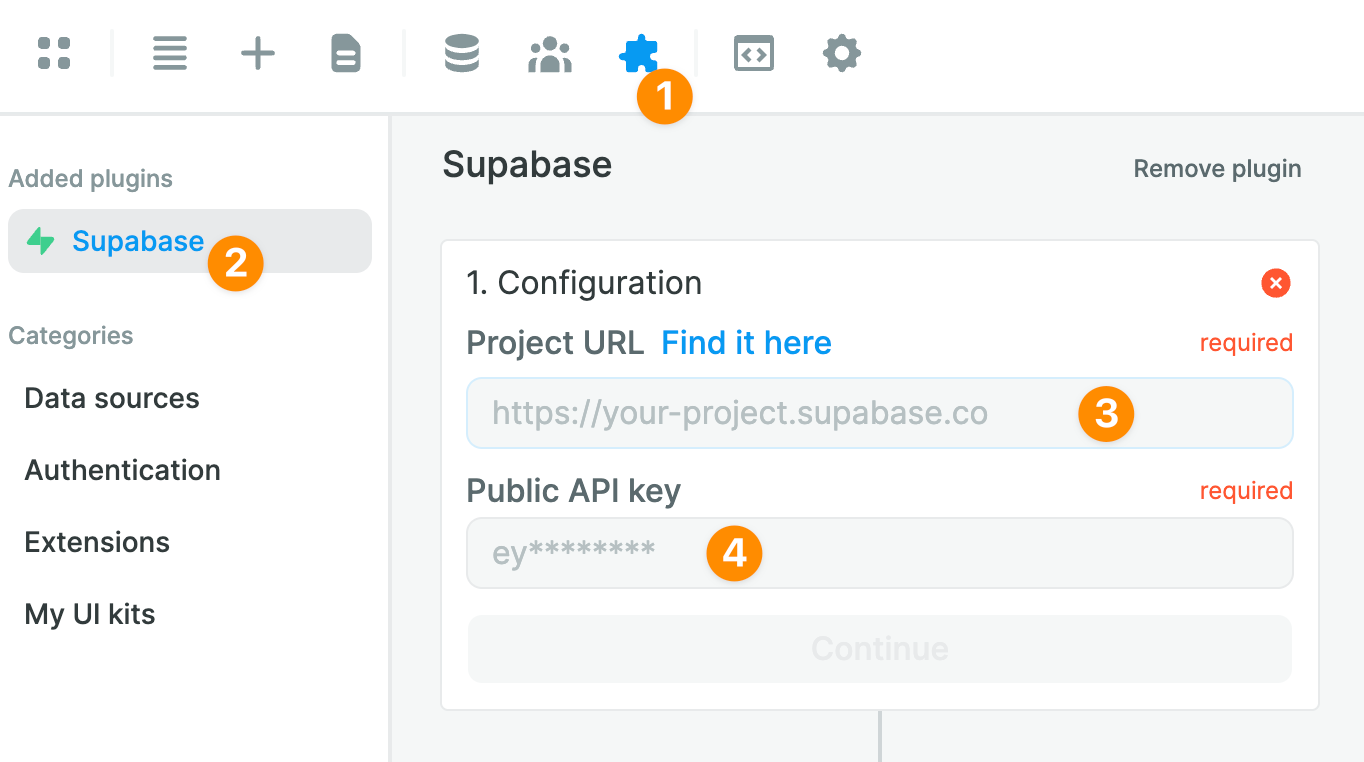
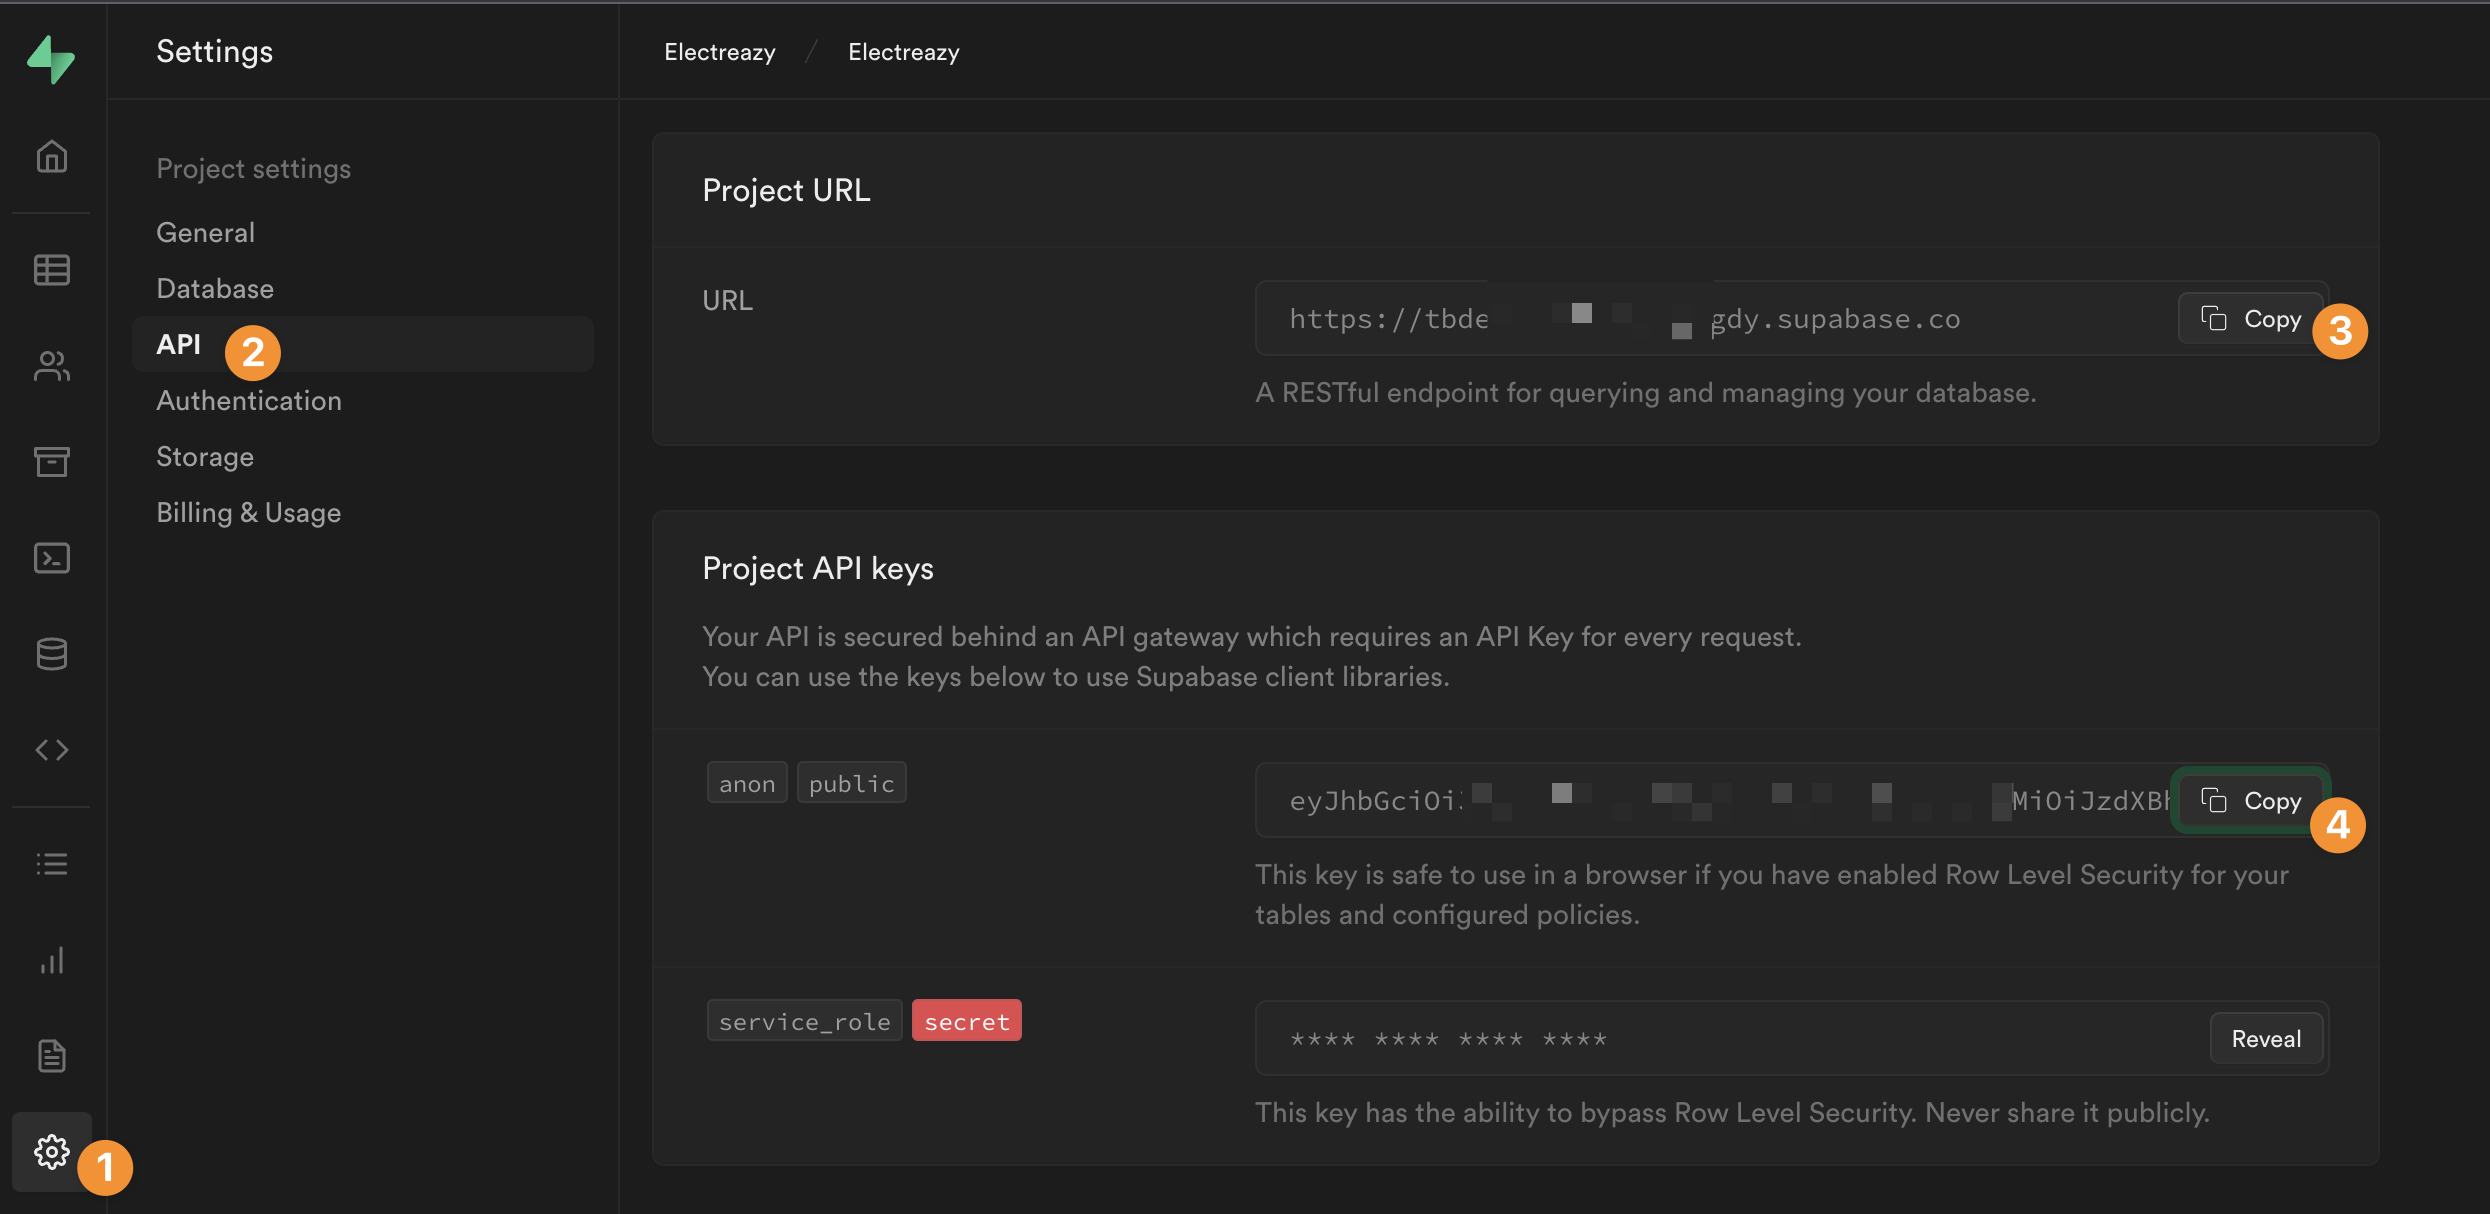
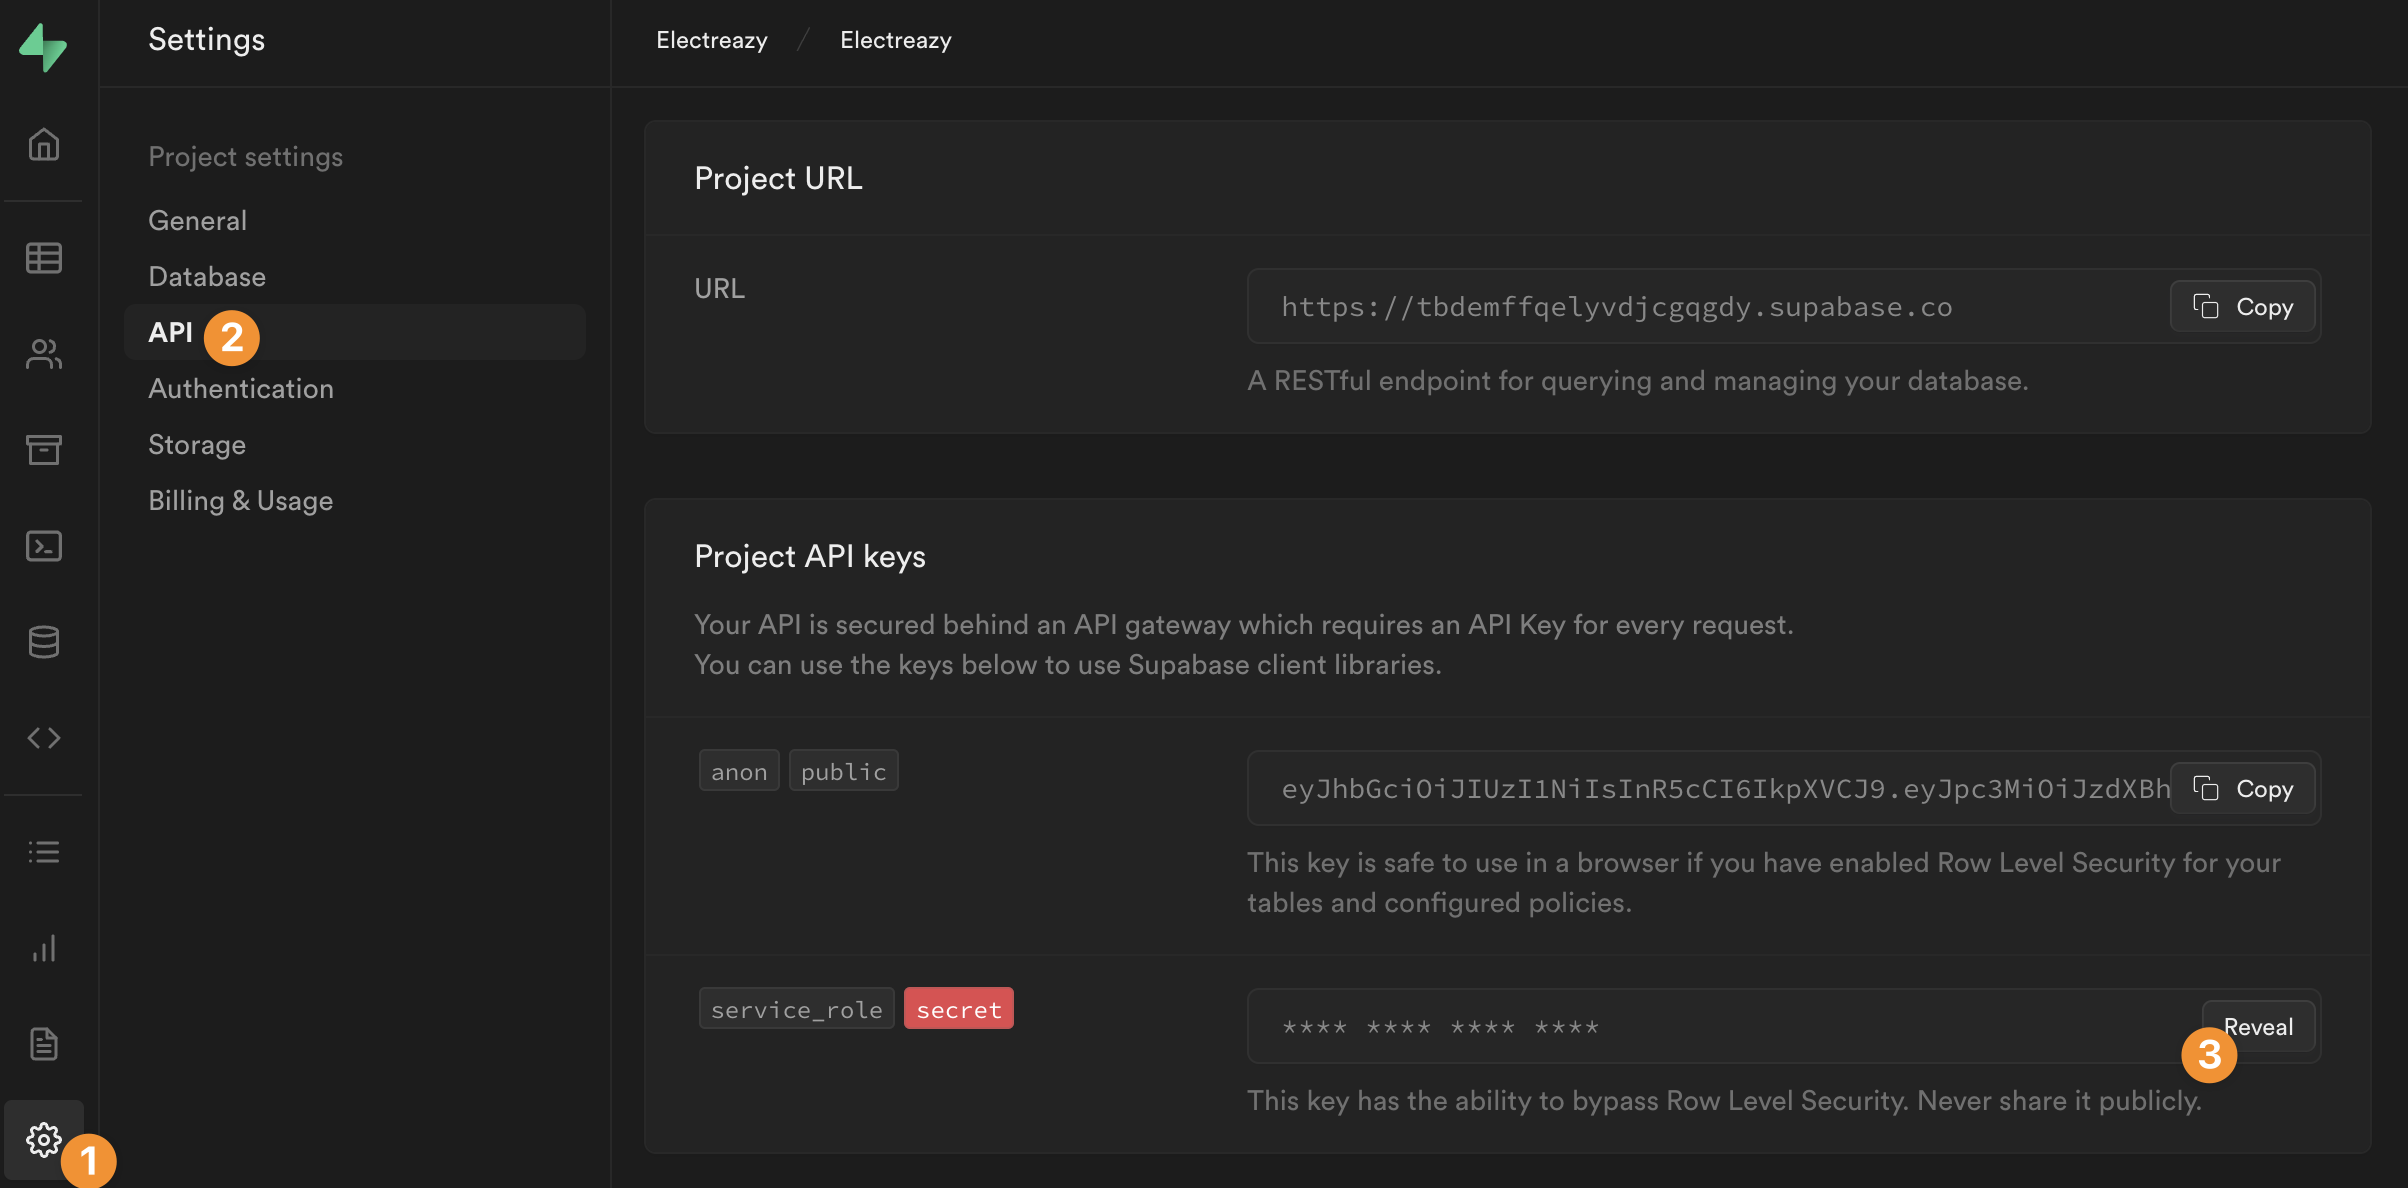
In Supabase, you can find both your project URL and public key in the "Settings" > "API" menu:
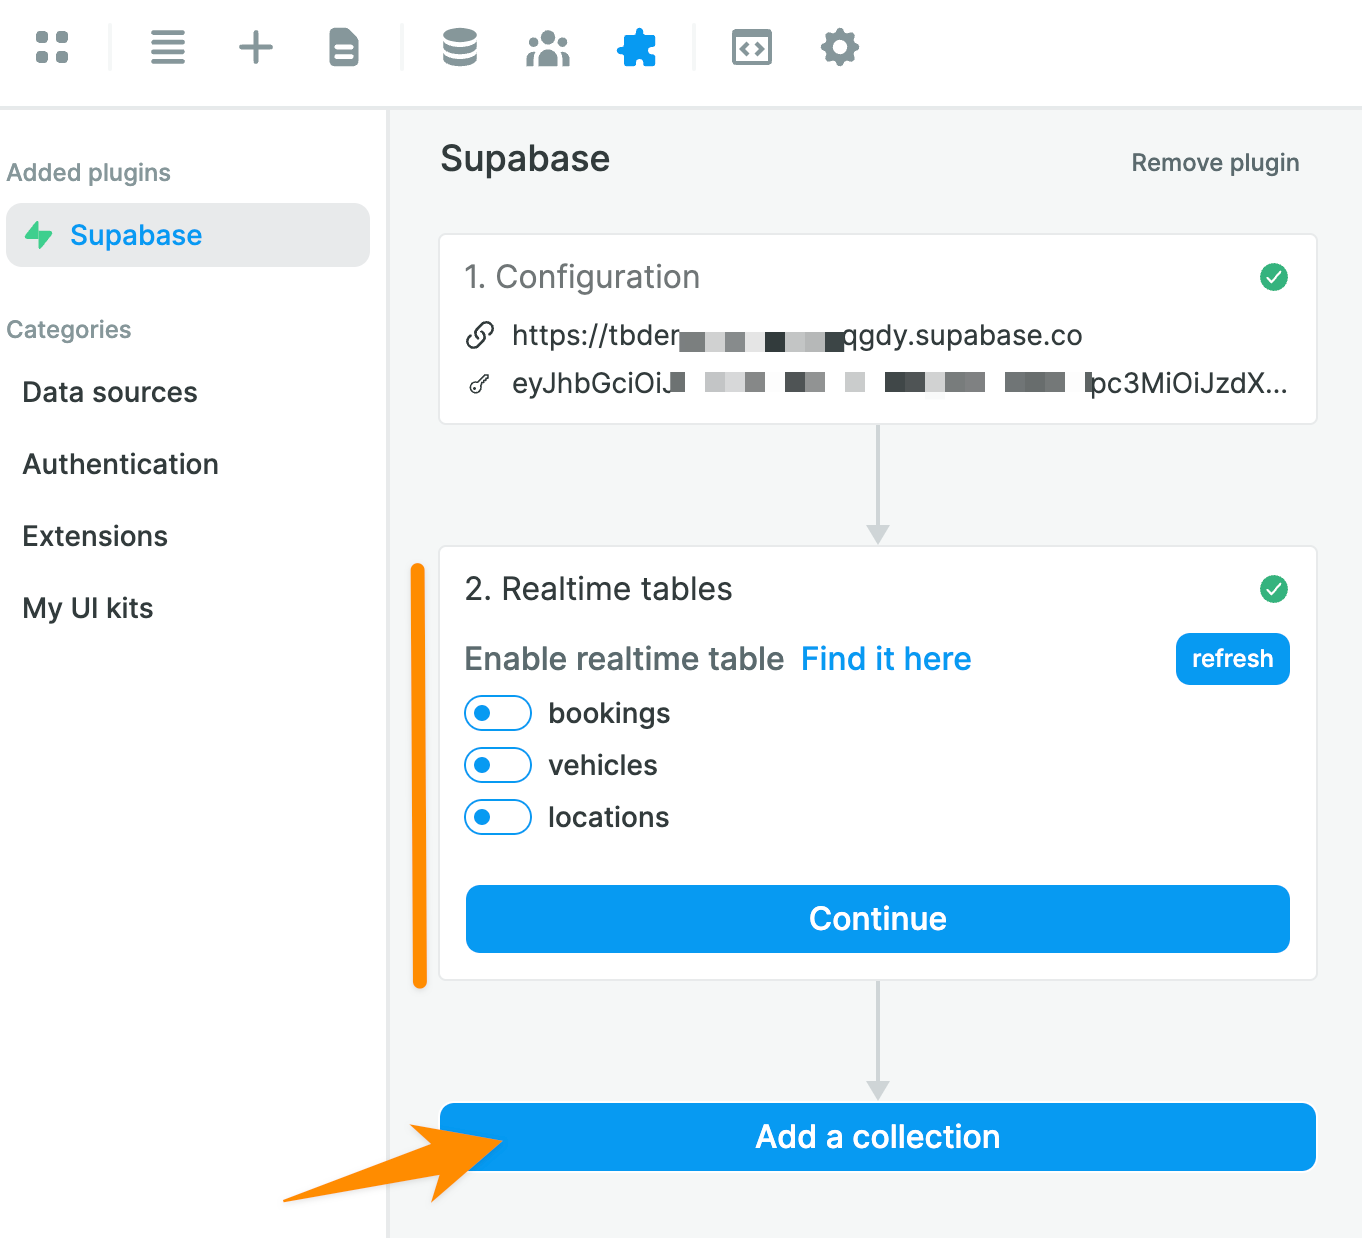
Once you have added both to WeWeb, you will have the option to enable realtime tables. We will leave those disabled for now and skip right to "Add a collection":
How to Add a Supabase Collection in WeWeb
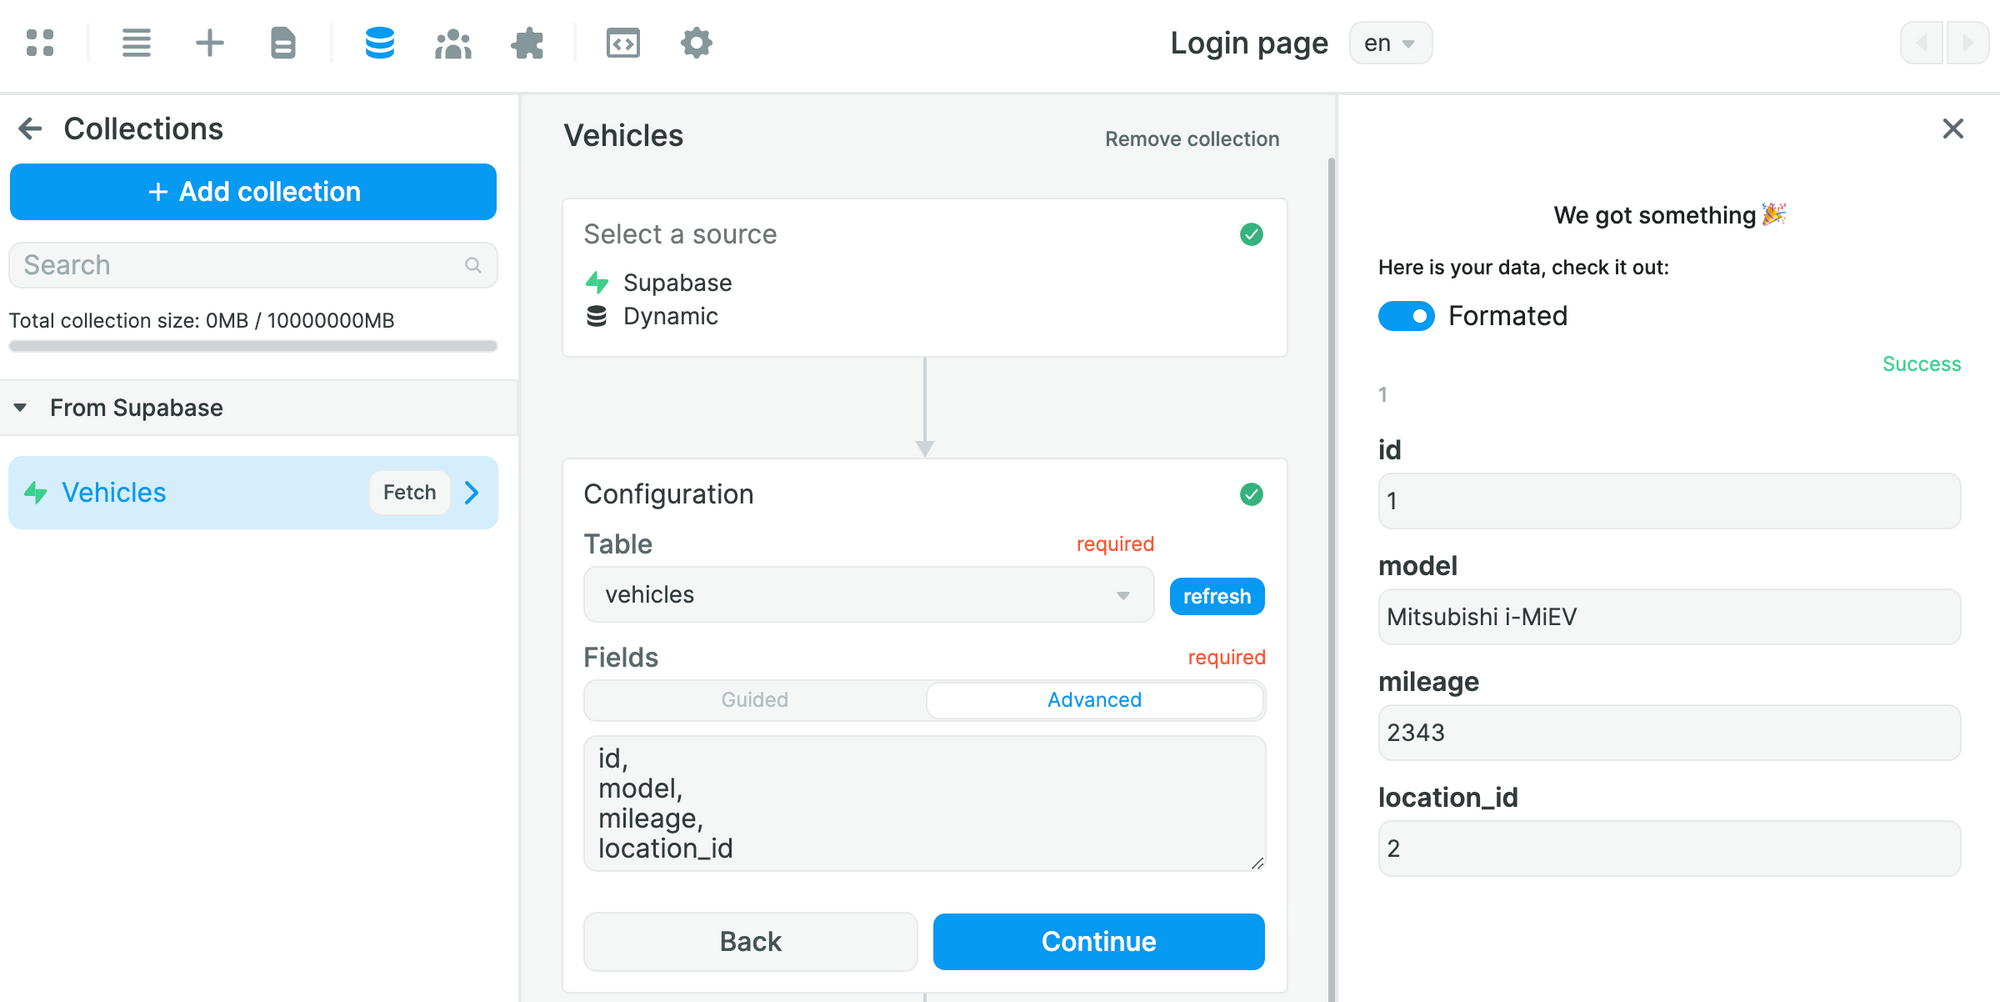
Once you click on "Add a Collection", you will be invited to give your Collection a name and choose Supabase as a Data source:
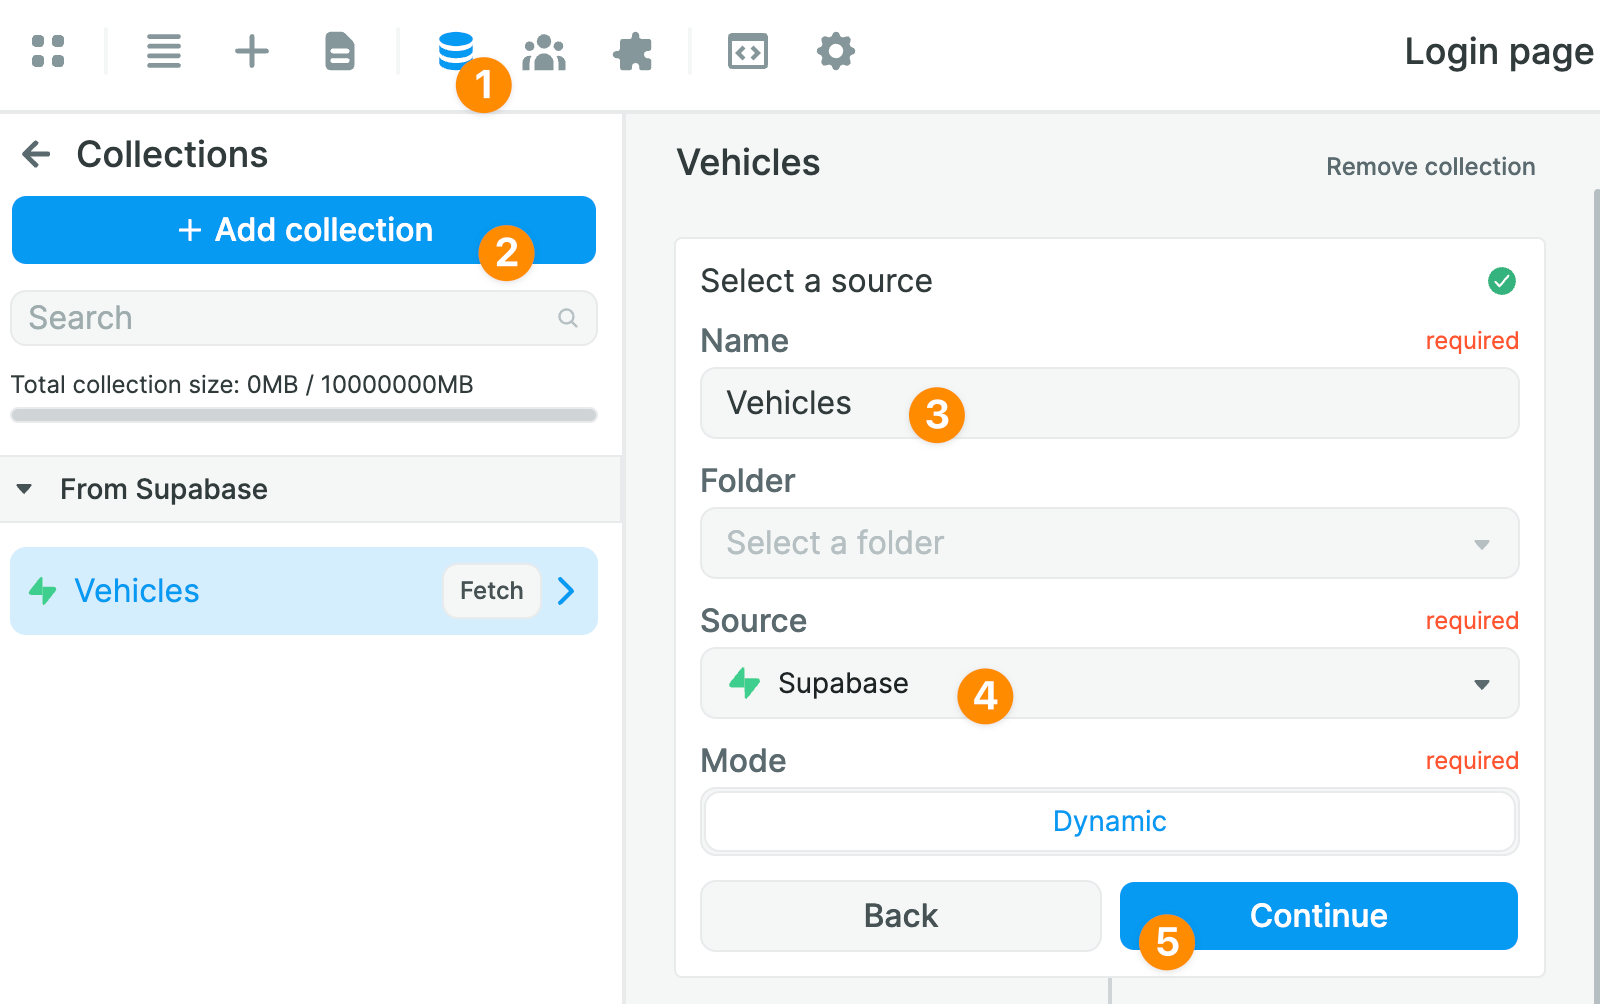
You will then be able to select the Table from which you want to pull data:
Notice that this gives you access to 2 separate modes to access the fields in the table:
- a "Guided" mode, and
- an "Advanced" mode.
Guided mode
By default, the "Guided" mode returns the data from all the fields.
In the example below, we decide to exclude the data from the "created_at" field in our "vehicles" table:
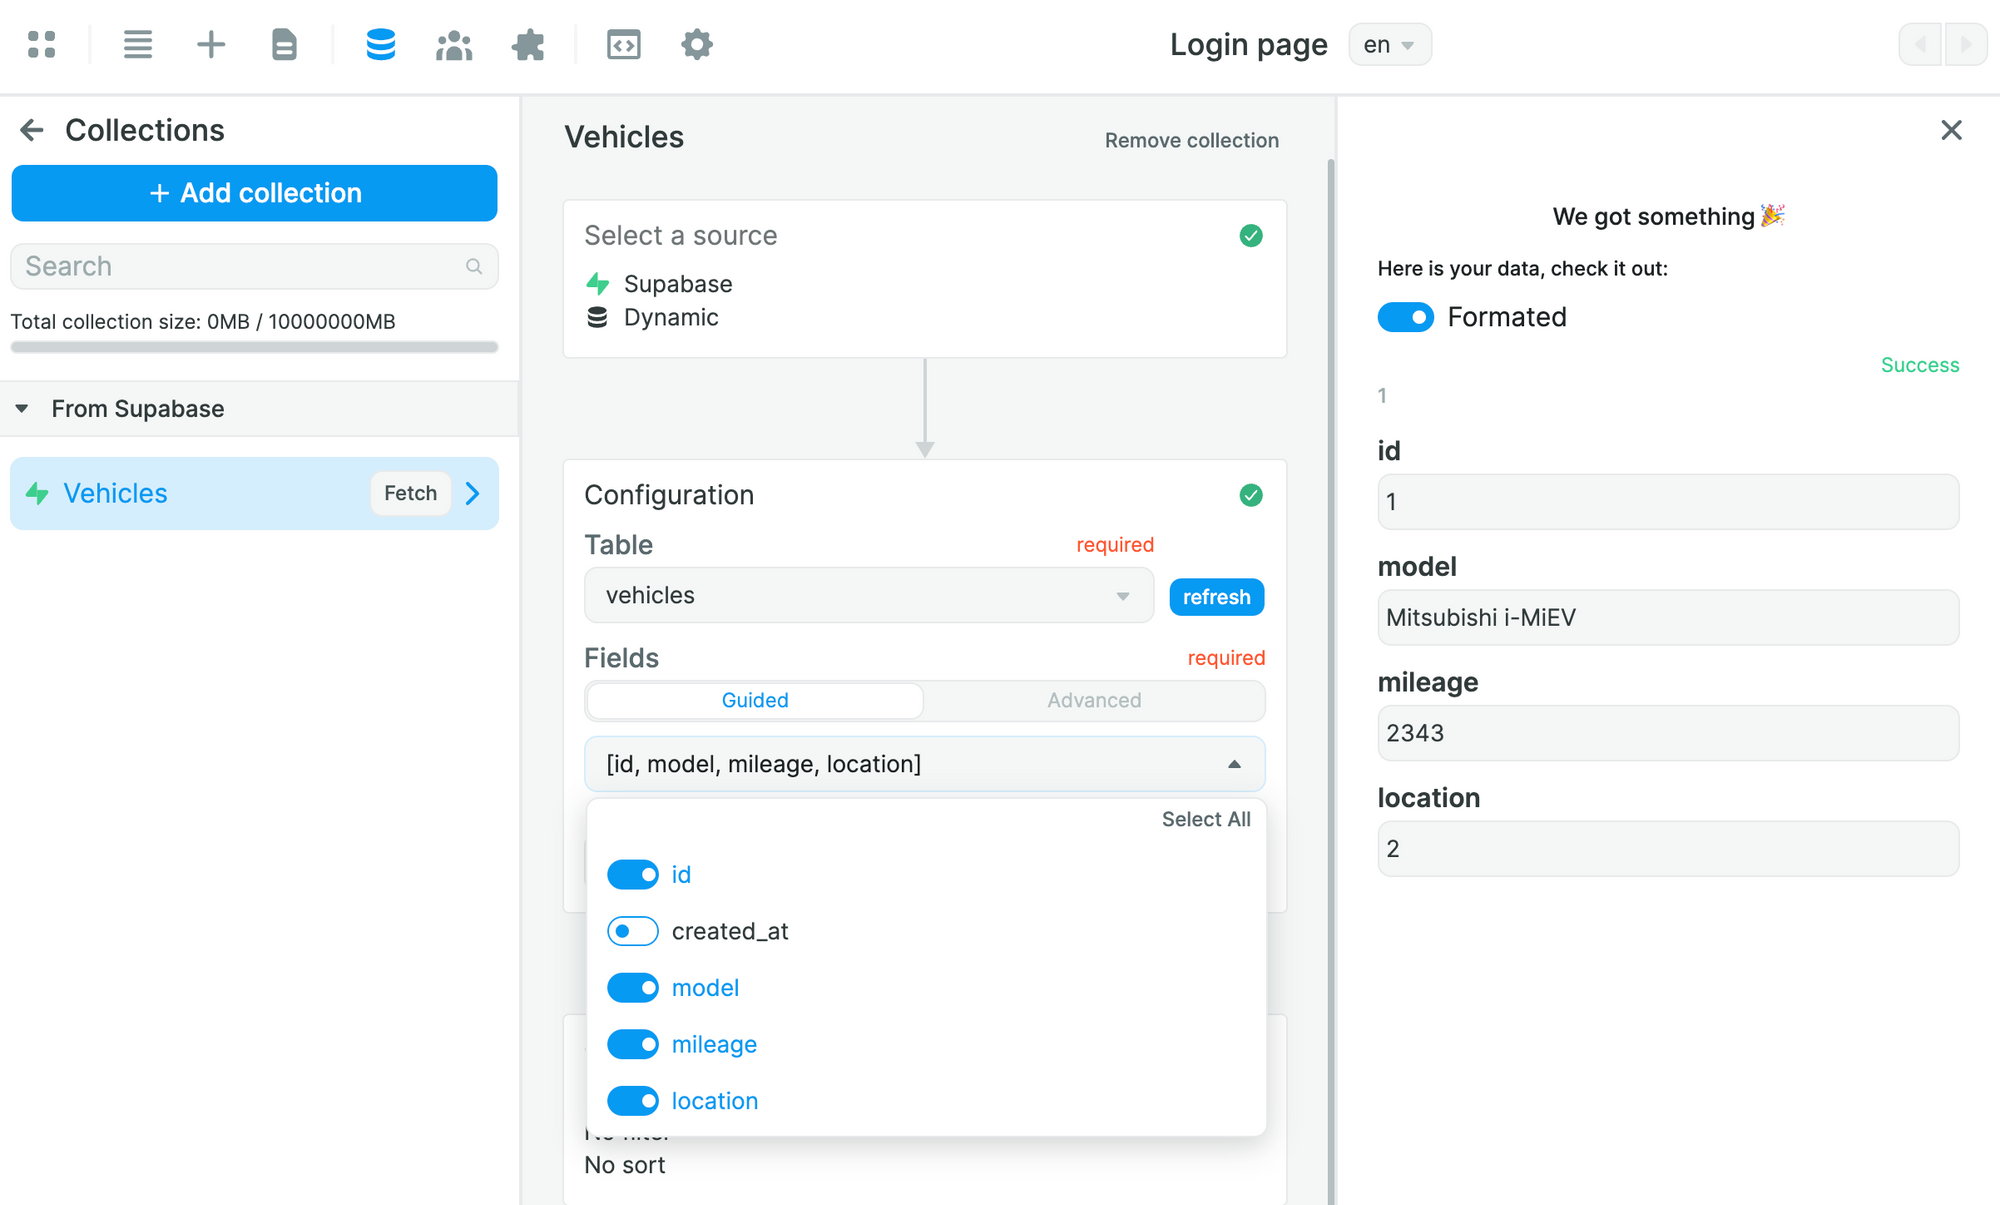
As a result, WeWeb does not fetch the "created_at" field.
This is helpful because we can exclude data that we don't want to load in the frontend, either because we don't need it or because it's confidential.
Advanced mode
Remember how we created 2 separate tables for vehicles and locations?
In the "vehicles" table, we made a reference to the "locations" table in our "location_id" field so we know where each car is:
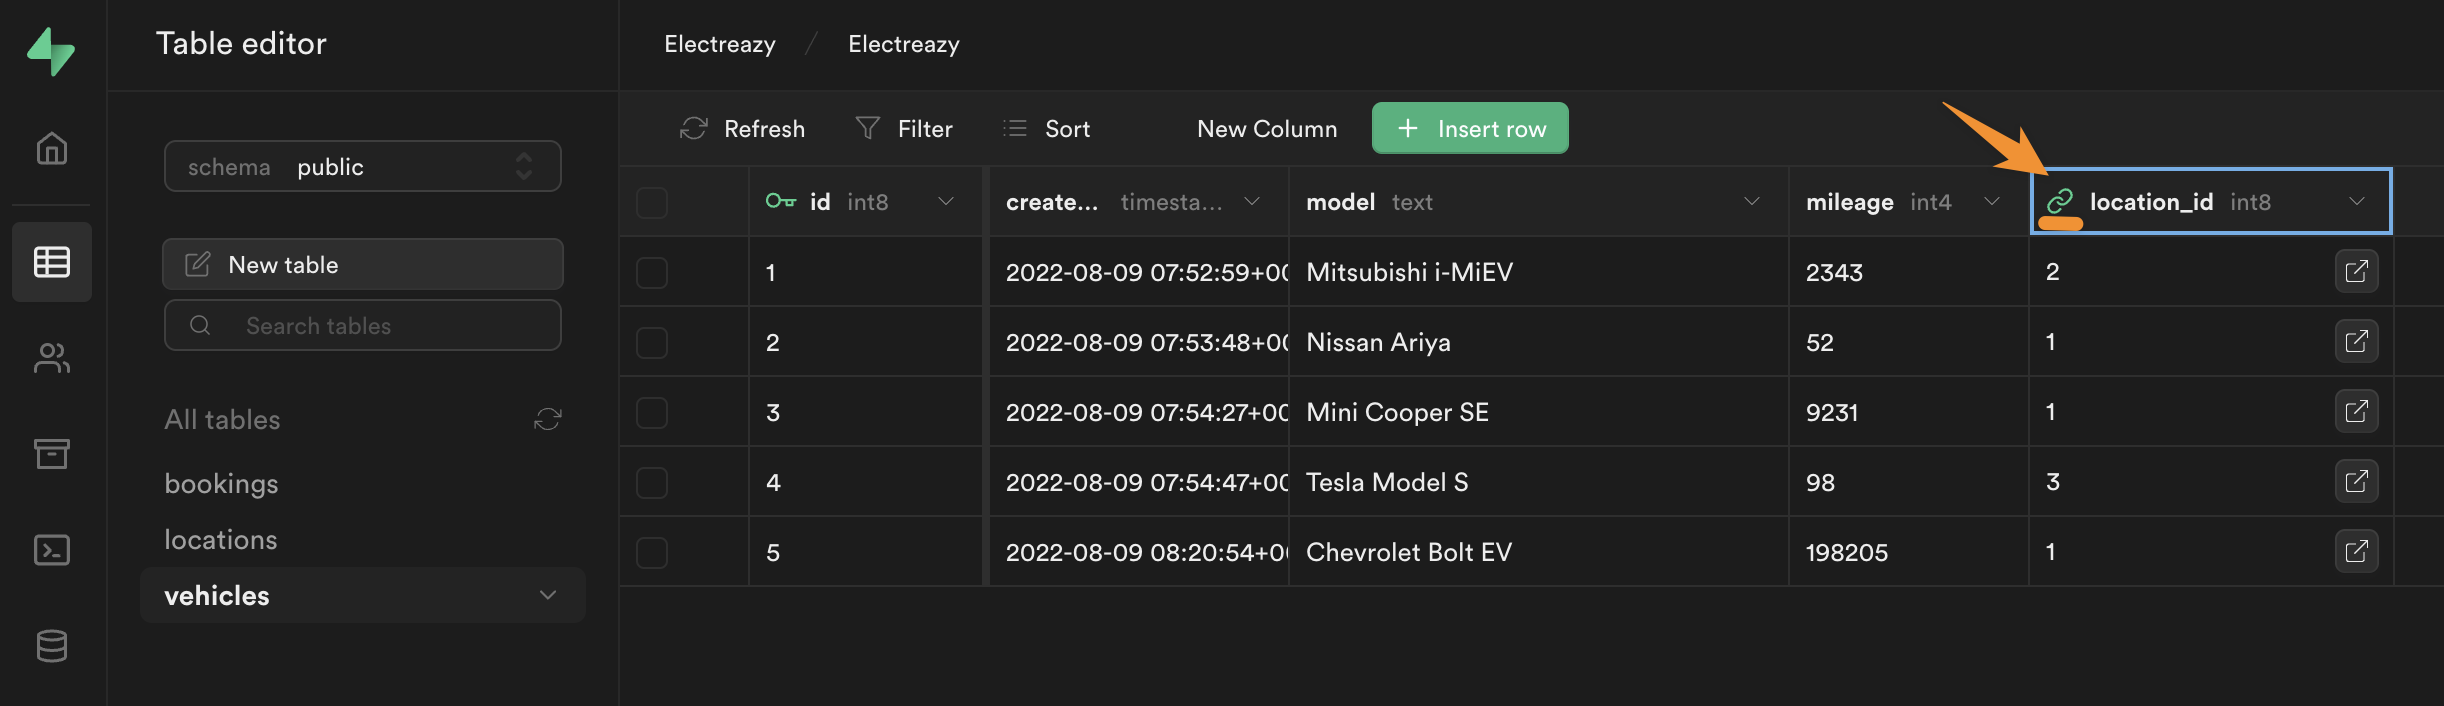
The problem is, the link only gives us the id of the location in the "locations" table.
If you choose the "Advanced" mode, you will be able to get the "name" field of the location instead of the id.
How?
By making custom queries to Supabase:
In the example above, we are telling Supabase:
- from the table selected in the Collection – in this case the "vehicles" table – please send me the data in the "id", "model", and "mileage" fields
- look for the "location_id" in the "vehicles" table in the "locations" table and send me the data in the corresponding "name" field
If we only ask for the data from the "location" field of the "vehicles" table, Supabase will only return the id:
🔥 Pro Tip 🔥
You may have noticed on our that our "mileage" field in Supabase is of type "int4" and not "int2" or "int8". All three types are integers but "int4" allow for bigger number than "int2" and smaller numbers than "int8". We chose "int4" because we expected some mileage numbers to be too big for "int2". Not springing for "int8" allows us to optimize our DB slightly. Learn more about Supabase data types.
Why we chose the Guided mode for this use case
Remember the DRY principle mentioned above?
Very often, you will not want to get the nested information from the Advanced mode because you already have it in another Collection.
When that's the case, it's preferable to avoid loading the same information twice, especially when it's a lot of information.
For the purposes of this guide, we could have gone with the "Advanced" mode because it's very convenient and we don't have a lot of data.
But for many use cases, it makes more sense to use the "lookup" and "rollup" formulas to link separate tables in WeWeb.
So that's what we'll do 🙂
How to Display Supabase Data in WeWeb
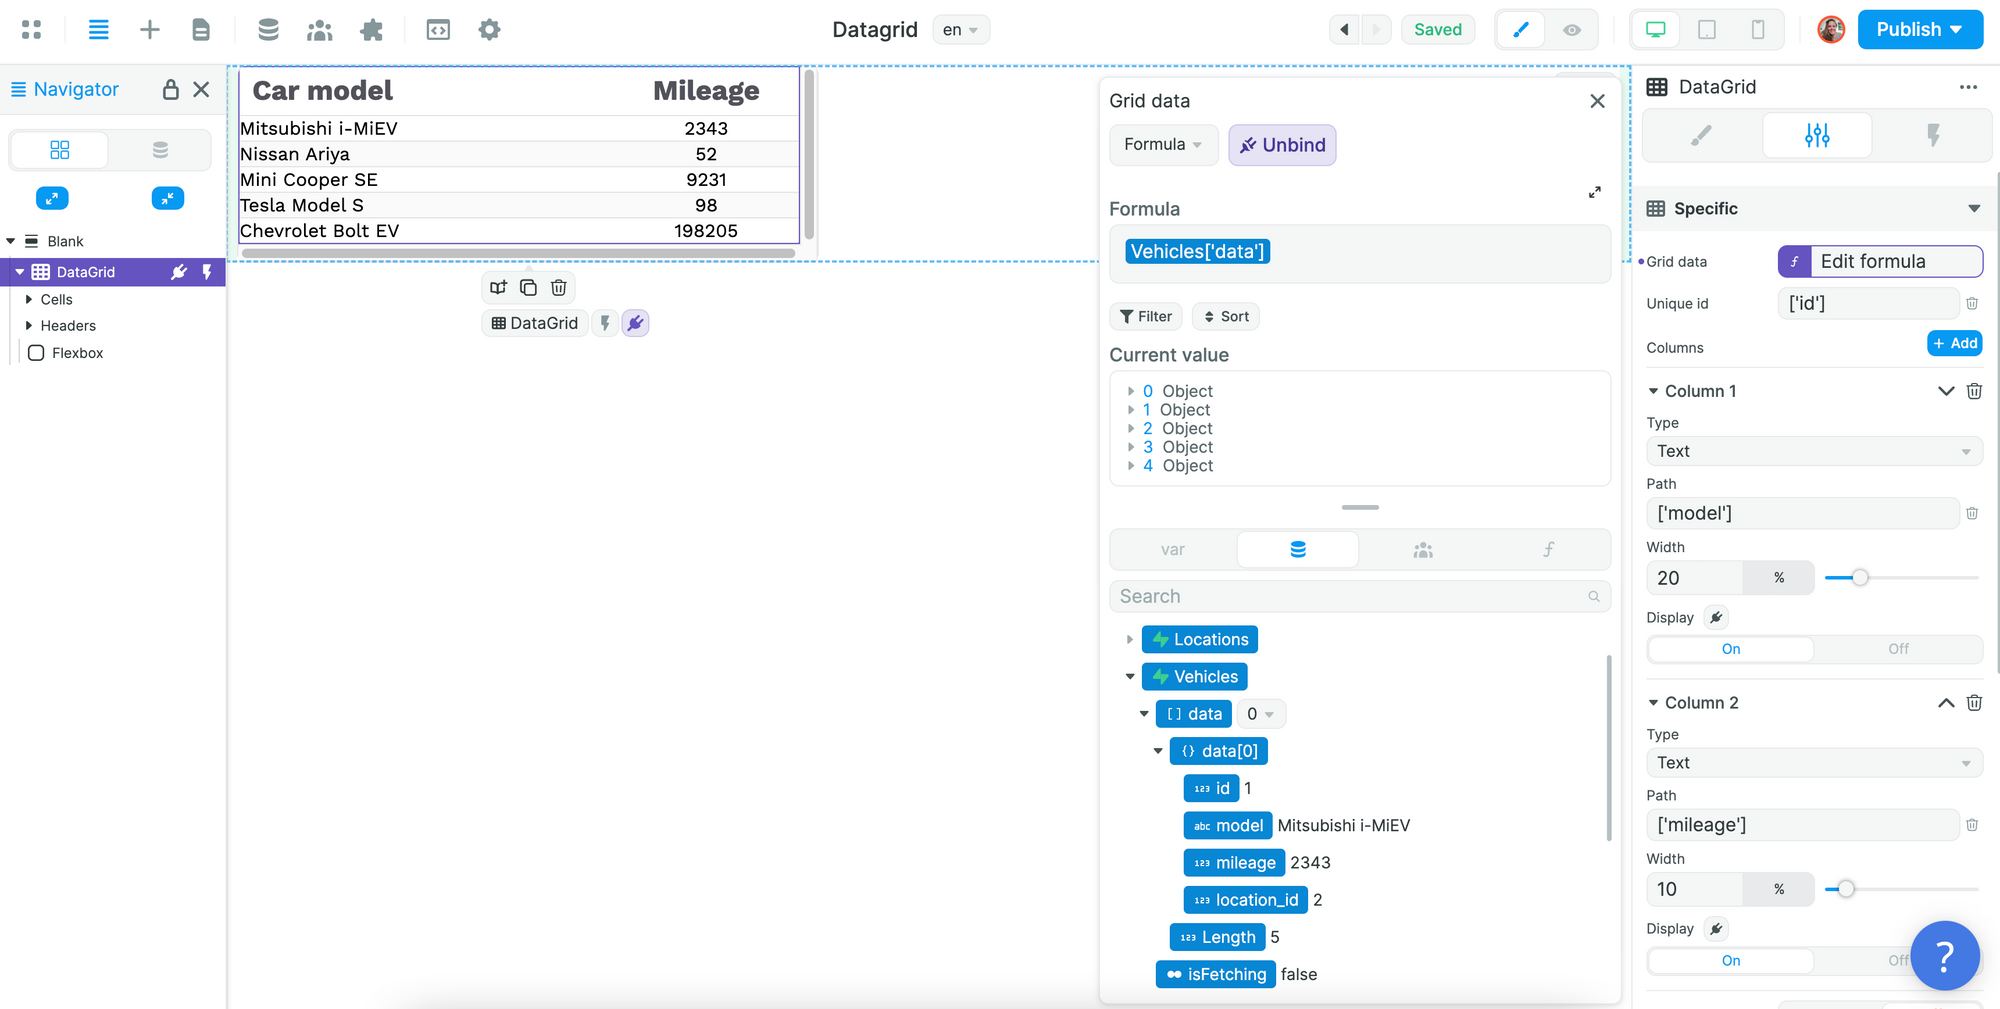
Assuming you were able to fetch data from Supabase in a WeWeb Collection, you'll be able to bind the data from that Collection on your pages.
In the example below, we chose to display the car model and mileage in a Data Grid element:
🔥 Pro Tip 🔥
You can bind arrays of data to any Container in WeWeb. Just bear in mind that the first child of the Container you bind the Collection to will be the repeated item. With that in mind, you might want the first child Element to be another Container with a number of items inside like a title, description, button or image.
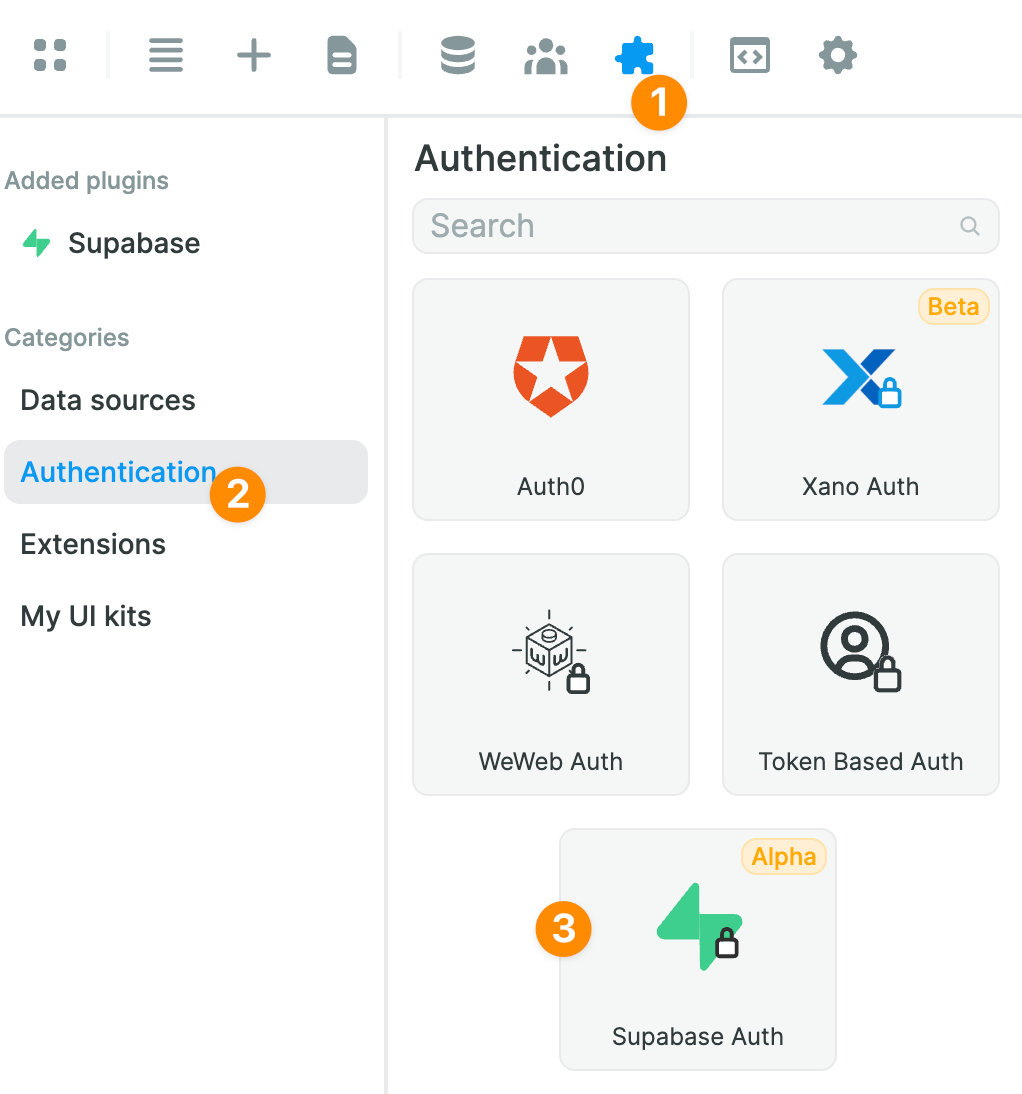
How to Add Supabase Authentication in WeWeb
Supabase comes with an in-built authentication system which you can use in WeWeb.
To add the Supabase Auth Plugin in WeWeb, go to "Plugins" > "Authentication":
Assuming you have already provided your Supabase project URL and public API key when setting up the Supabase Data source, the only thing left to do will be to add your private API key:
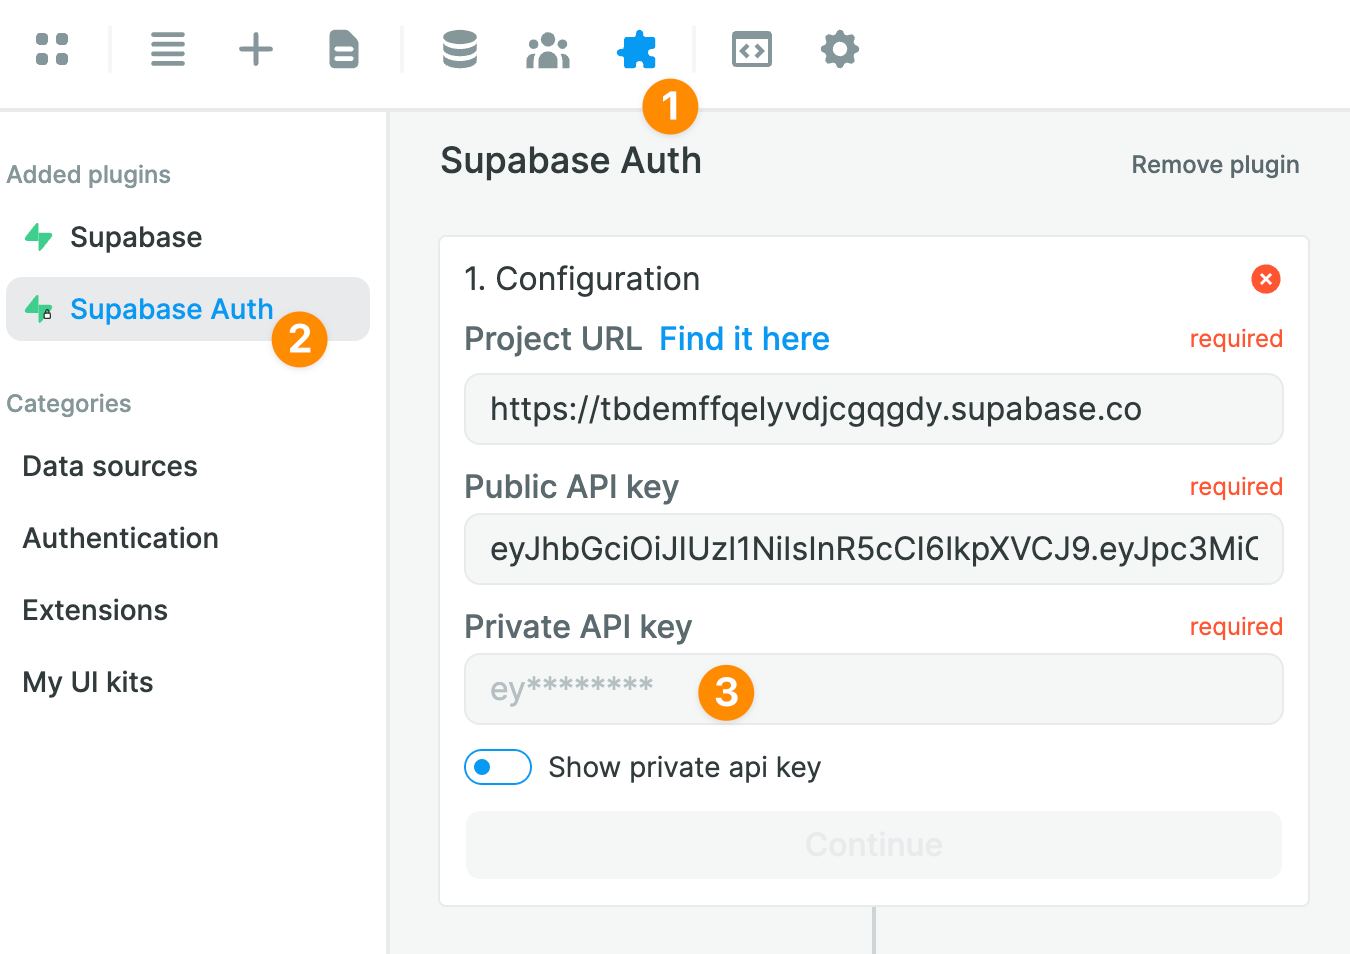
In Supabase, you can find your private API key in "Settings" > "API":
🚨 Warning 🚨
As the name suggests, you'll want to keep this API key secret! Assuming you copy it properly in the "Private API key" field of the Supabase Auth Plugin and don't use it anywhere else in your Weweb project, Weweb will never make it public.
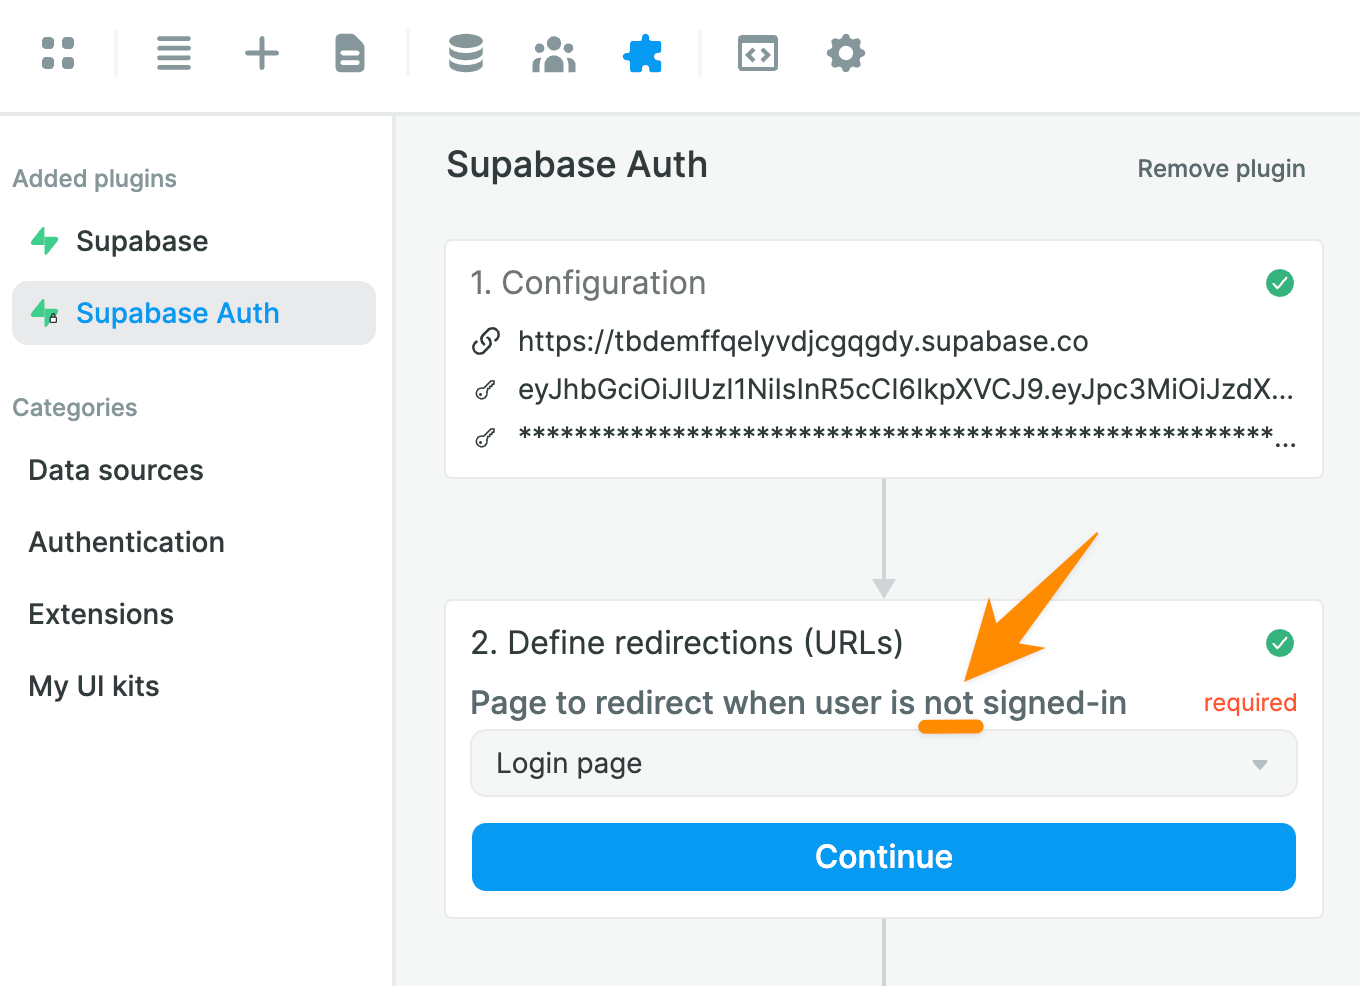
You will then be invited to choose a page to redirect unauthenticated users, i.e. users who are NOT signed-in:
🚨 Warning 🚨
When you setup your Login Workflow, make sure you don't redirect authenticated users to the same page. Otherwise, you'll be creating an infinite loop and your app will crash. This can easily happen when you forget you've redirected unauthenticated users to your home page instead of a dedicated Login page for example.
Allowing Users to Sign Up and Sign In
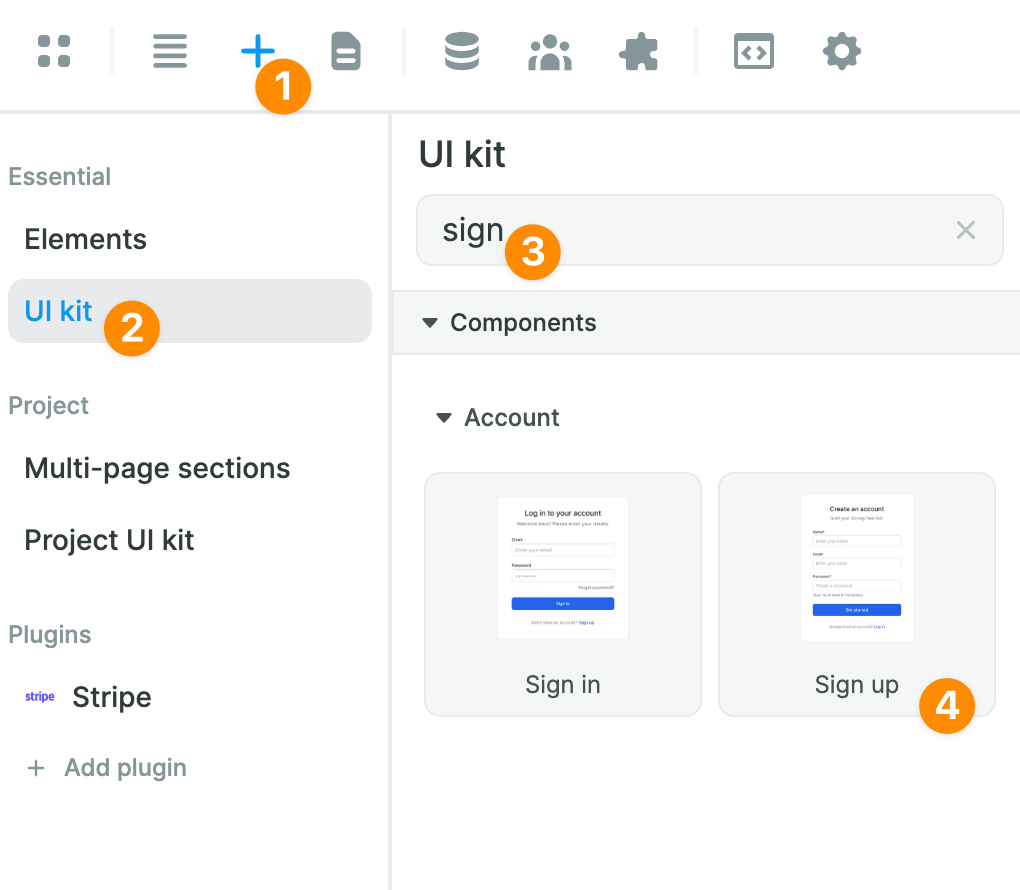
In the "Add" > "UI kit" menu, you can find read-made Sign in and Sign up Forms:
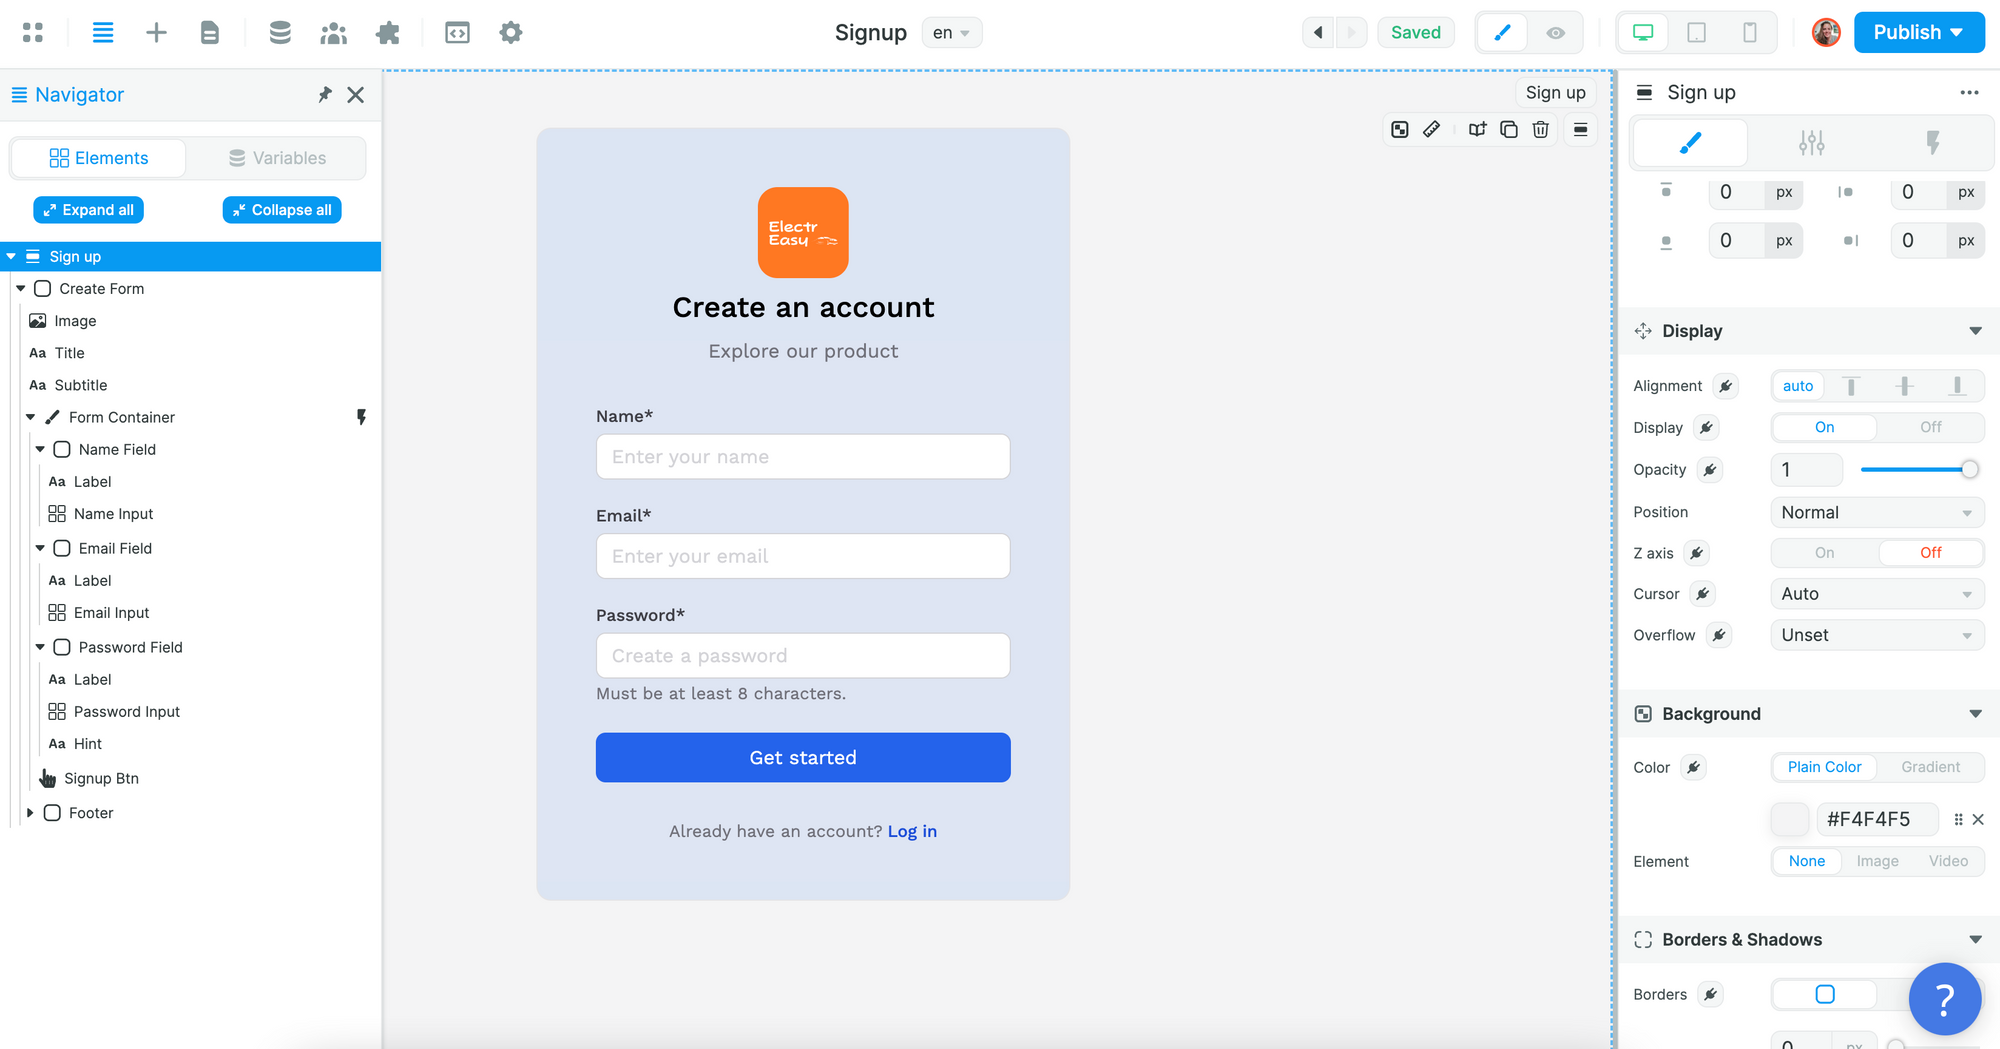
Once you've added a Form to the Canvas, you'll be able to style it whichever way you want.
In the example below, we added an image with the logo of our project to a Sign up Form and changed the background color of the "Create Form" Container:
To allow users to sign up, you'll need to create a Sign up Workflow on the Form Container:
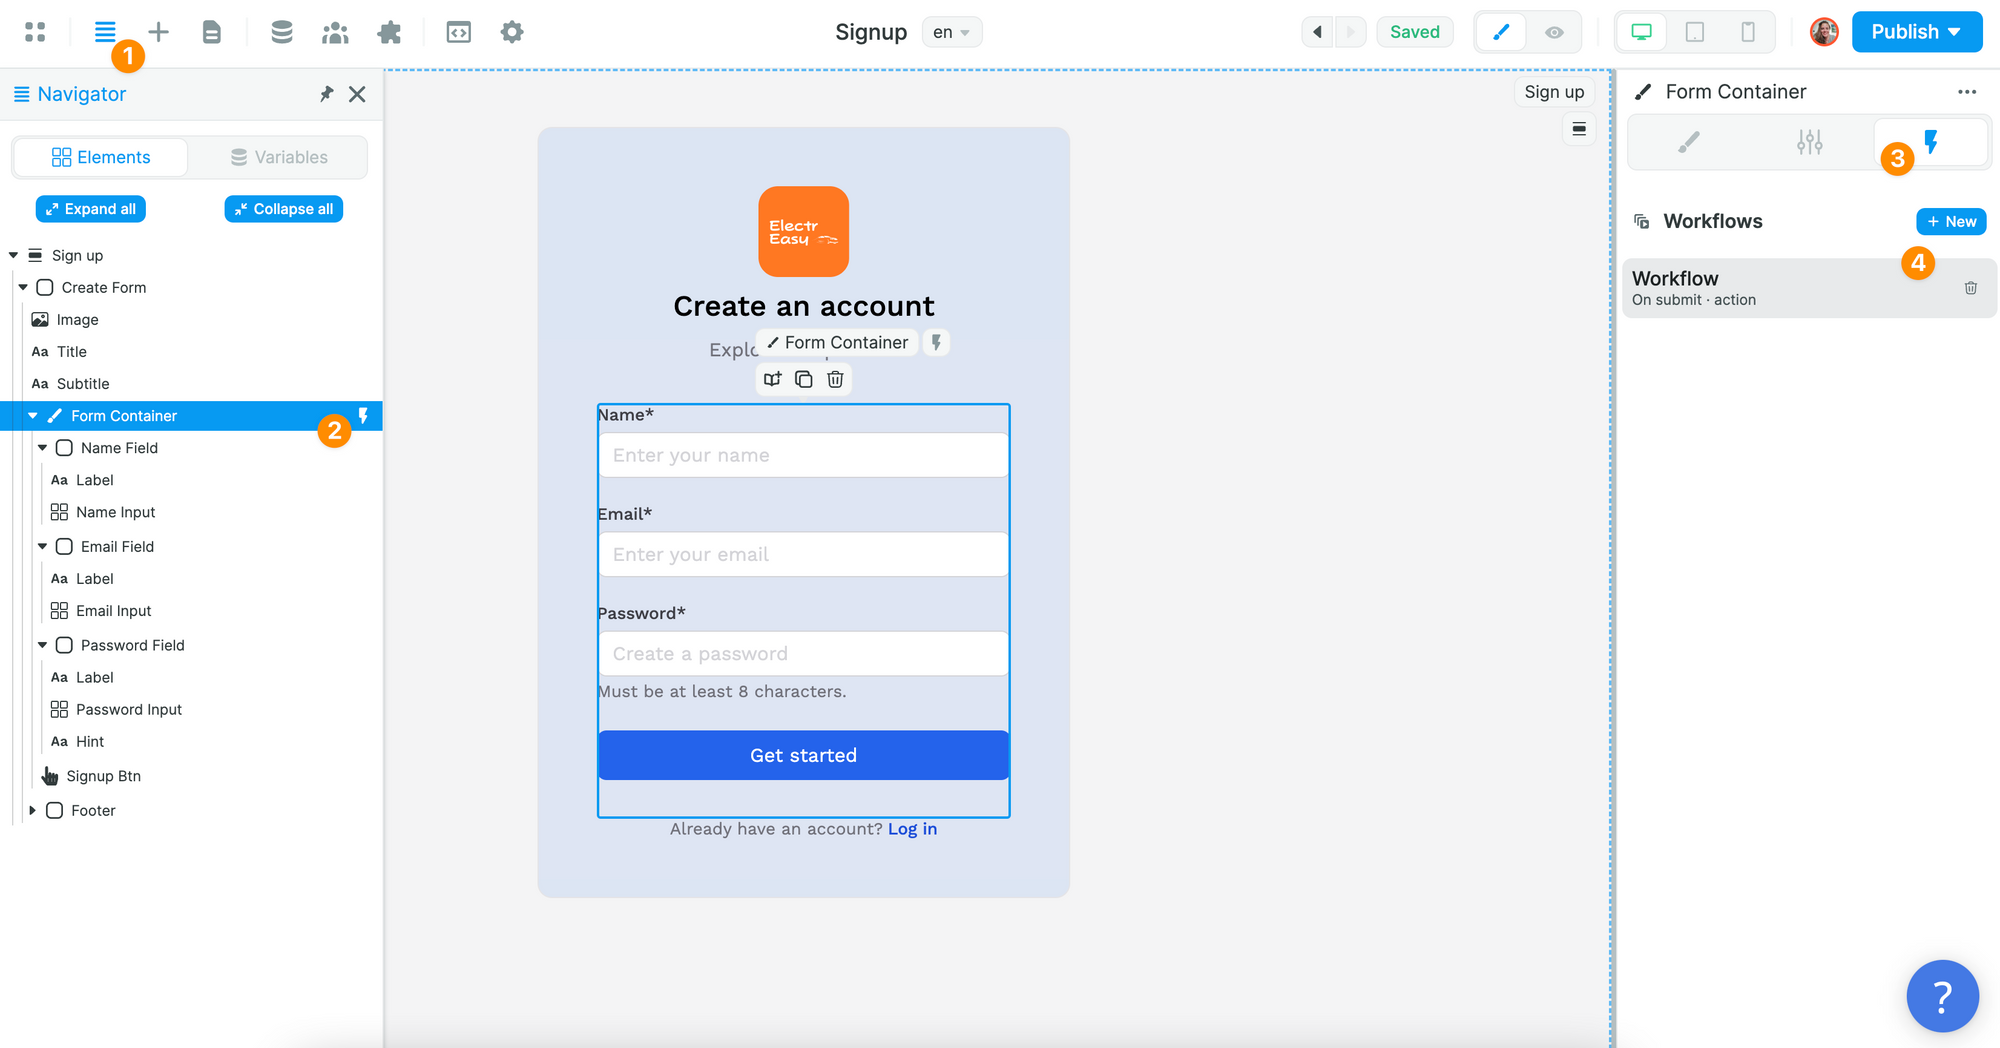
🔥 Pro Tip 🔥
It's important that the Workflow is on the Form Container and not the Sign up Button because we want to validate the fields of the Form when users submit it.
In the Workflow, you will choose the "On submit" trigger and add the Supabase "Sign up" Action:
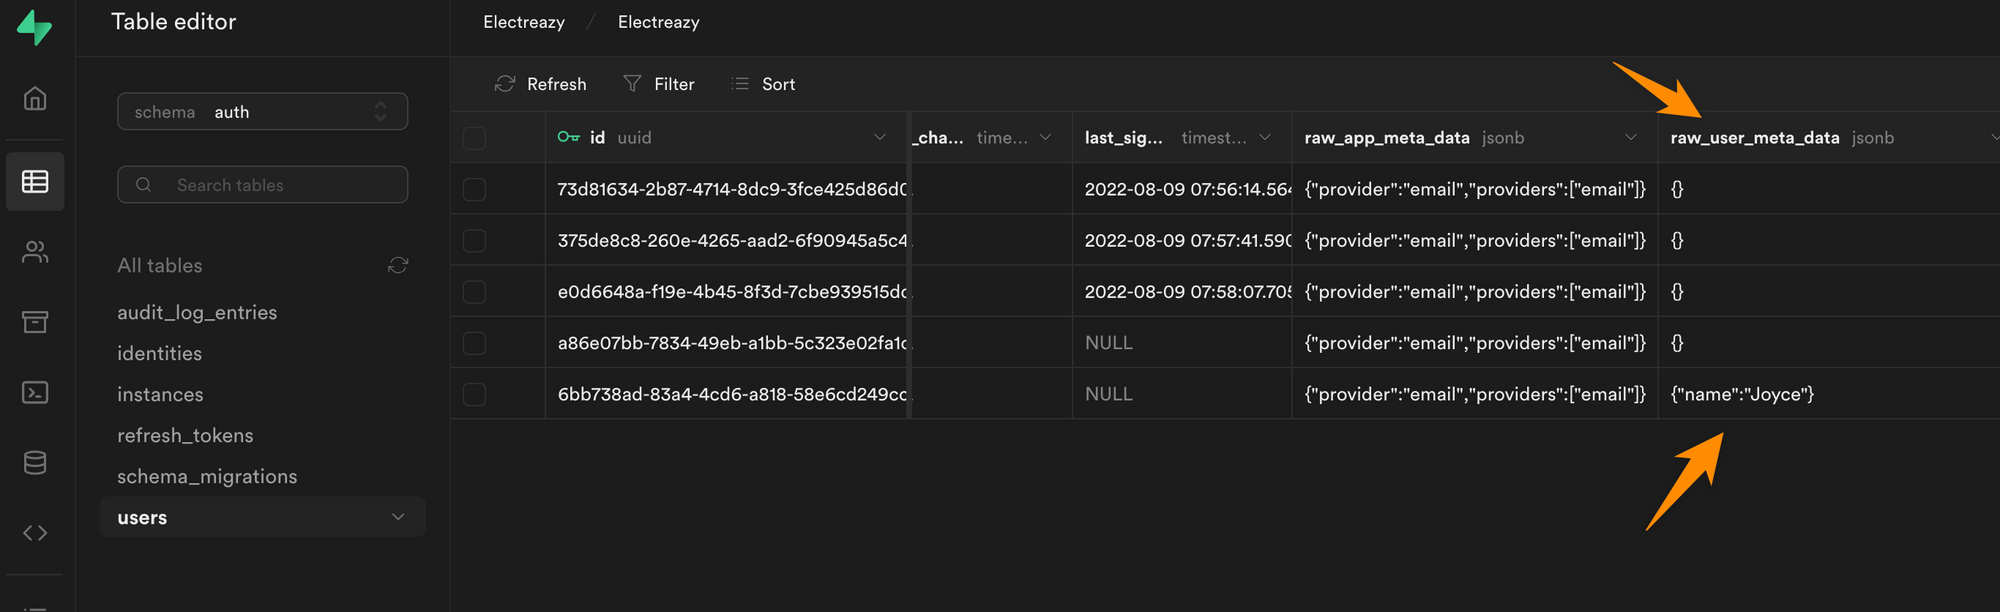
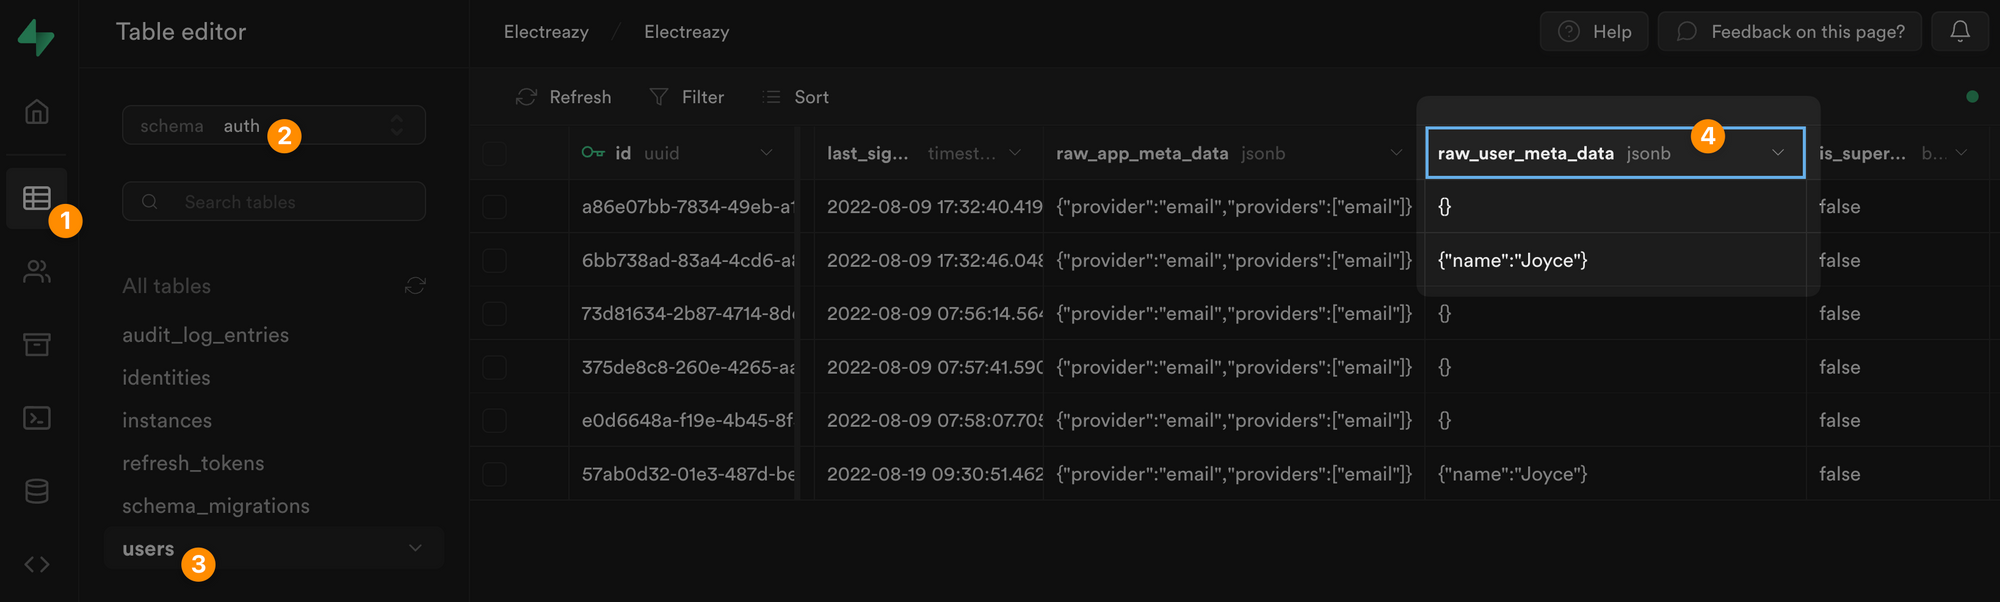
Then, you'll want to map the email, password, and metadata information in the Form to the email, password, and metadata in Supabase before choosing what page the new user should be redirected to:
In the example above, we made sure to add the user's name as an item in that user's metadata.
In Supabase, you can find the user's metadata in JSON format in a dedicated field of the "users" table, named "raw_user_meta_data":
The same logic will apply to any Supabase Action you want to trigger.
Adding User Roles & Permissions
Now let's say we want to gate content and set different permissions based on a user's role.
Adding Roles in Supabase
In Supabase, we'll need to create a "roles" table with a list of roles and a join table that links the "roles" table with our "users" table.
First, let's create a "roles" table with three roles and make sure that each role had a UUID and a "name":
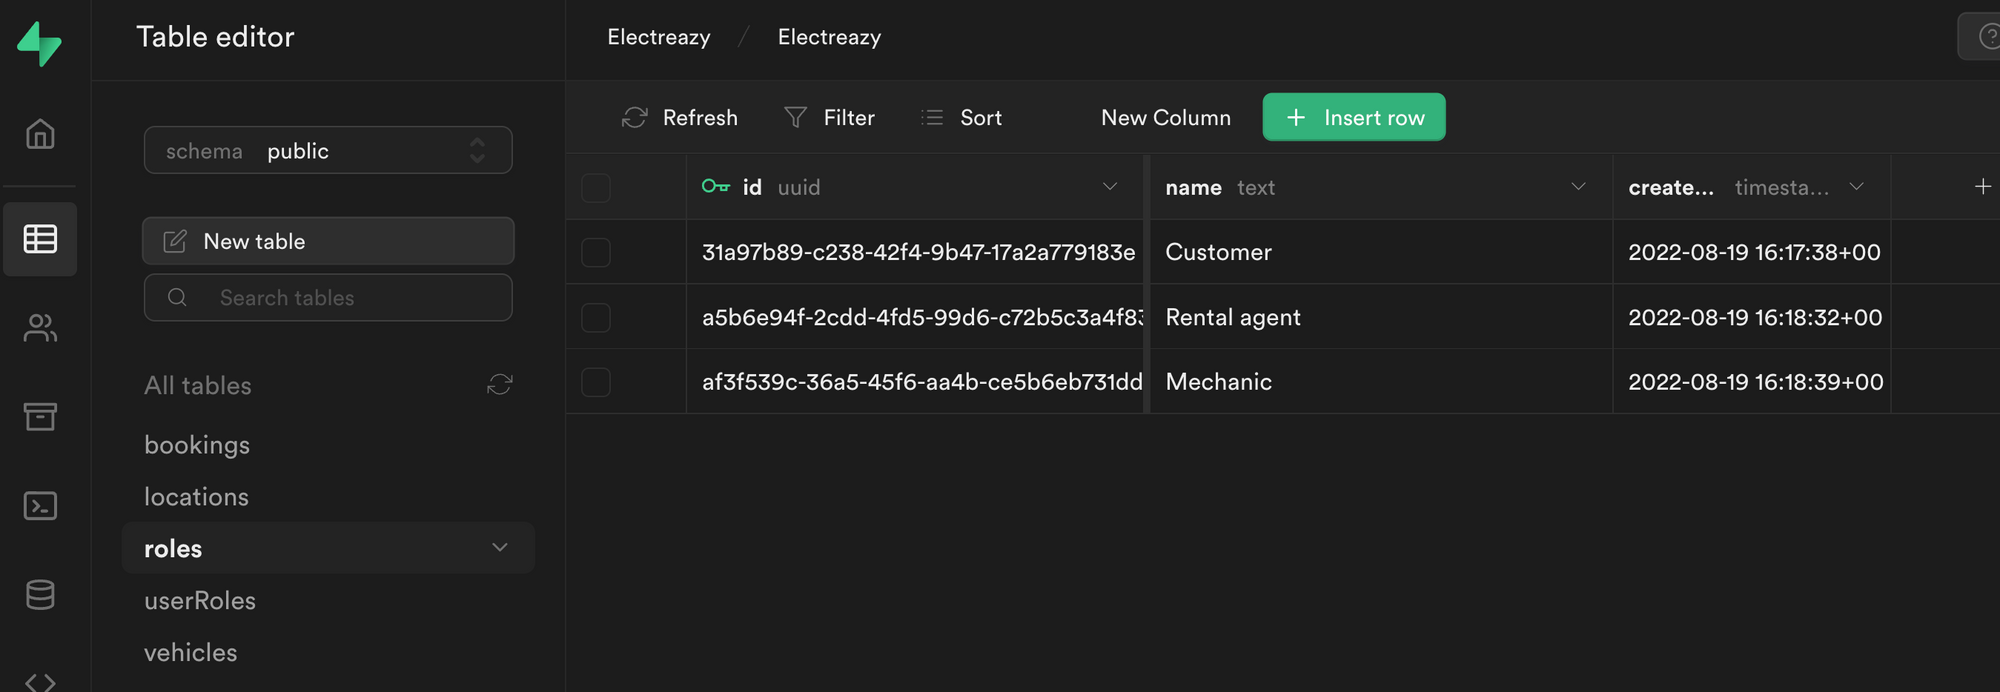
🚨 Warning 🚨
In order for the integration to work with the Users tab in WeWeb, it is crucial that the role title is a text field named "name".
Joining Roles and Users in Supabase
Second, let's create a "userRoles" join table:
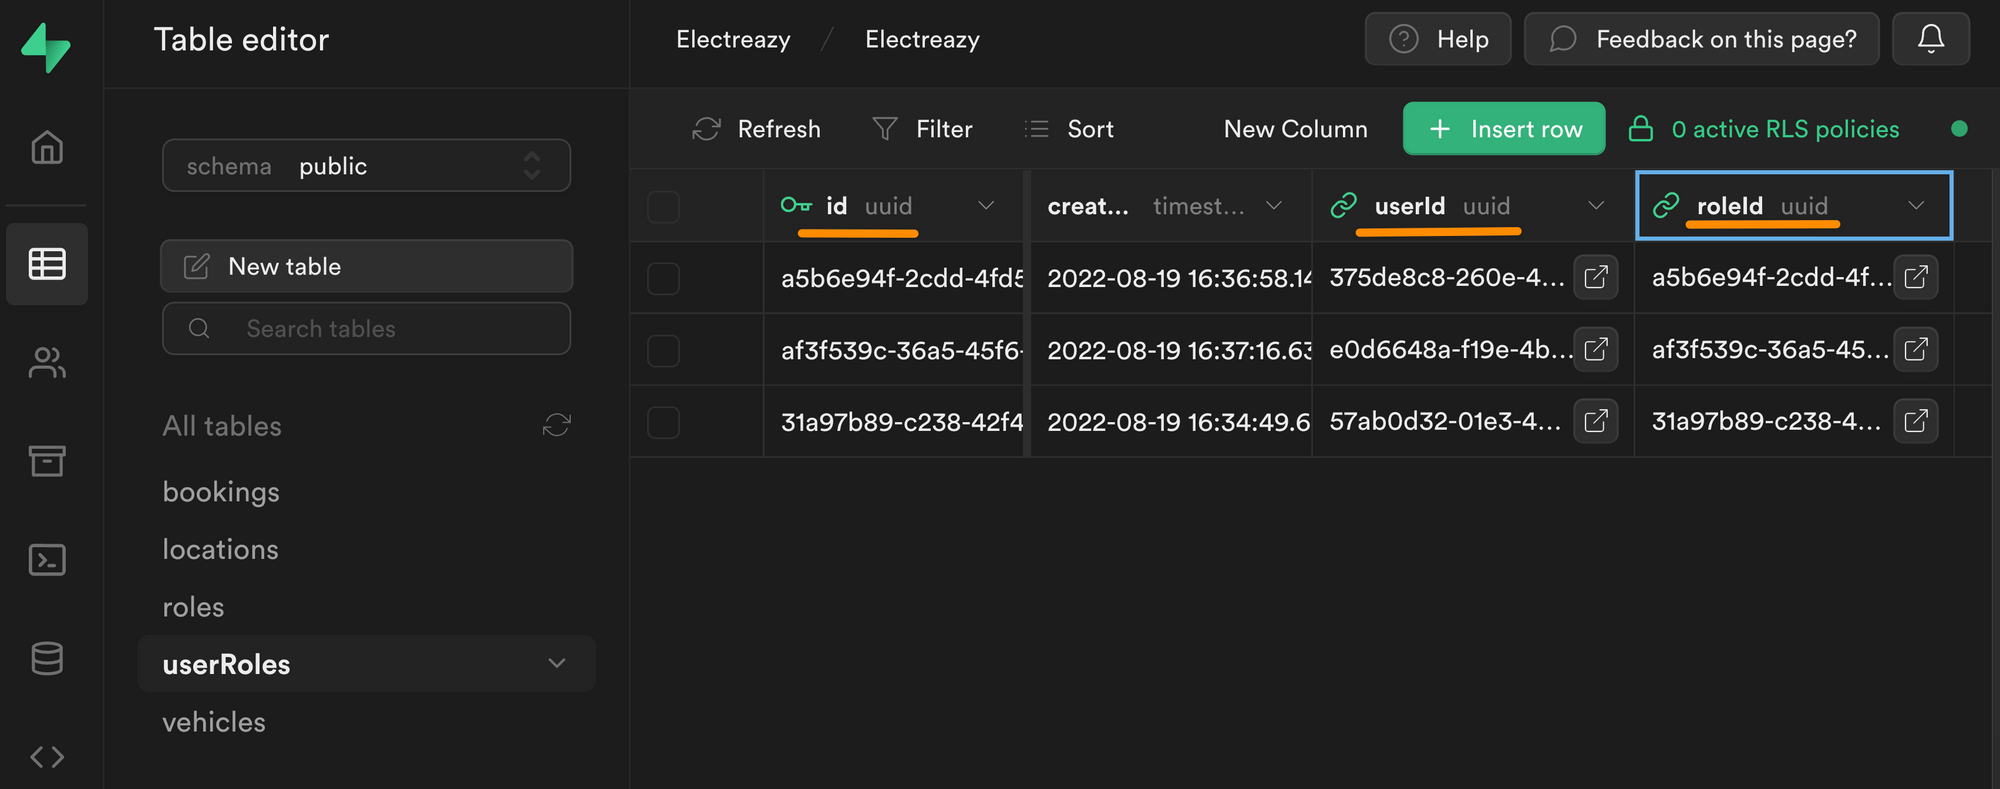
In the join table above, you can see we have an "id" field that is uniquely identifiable thanks to a UUID.
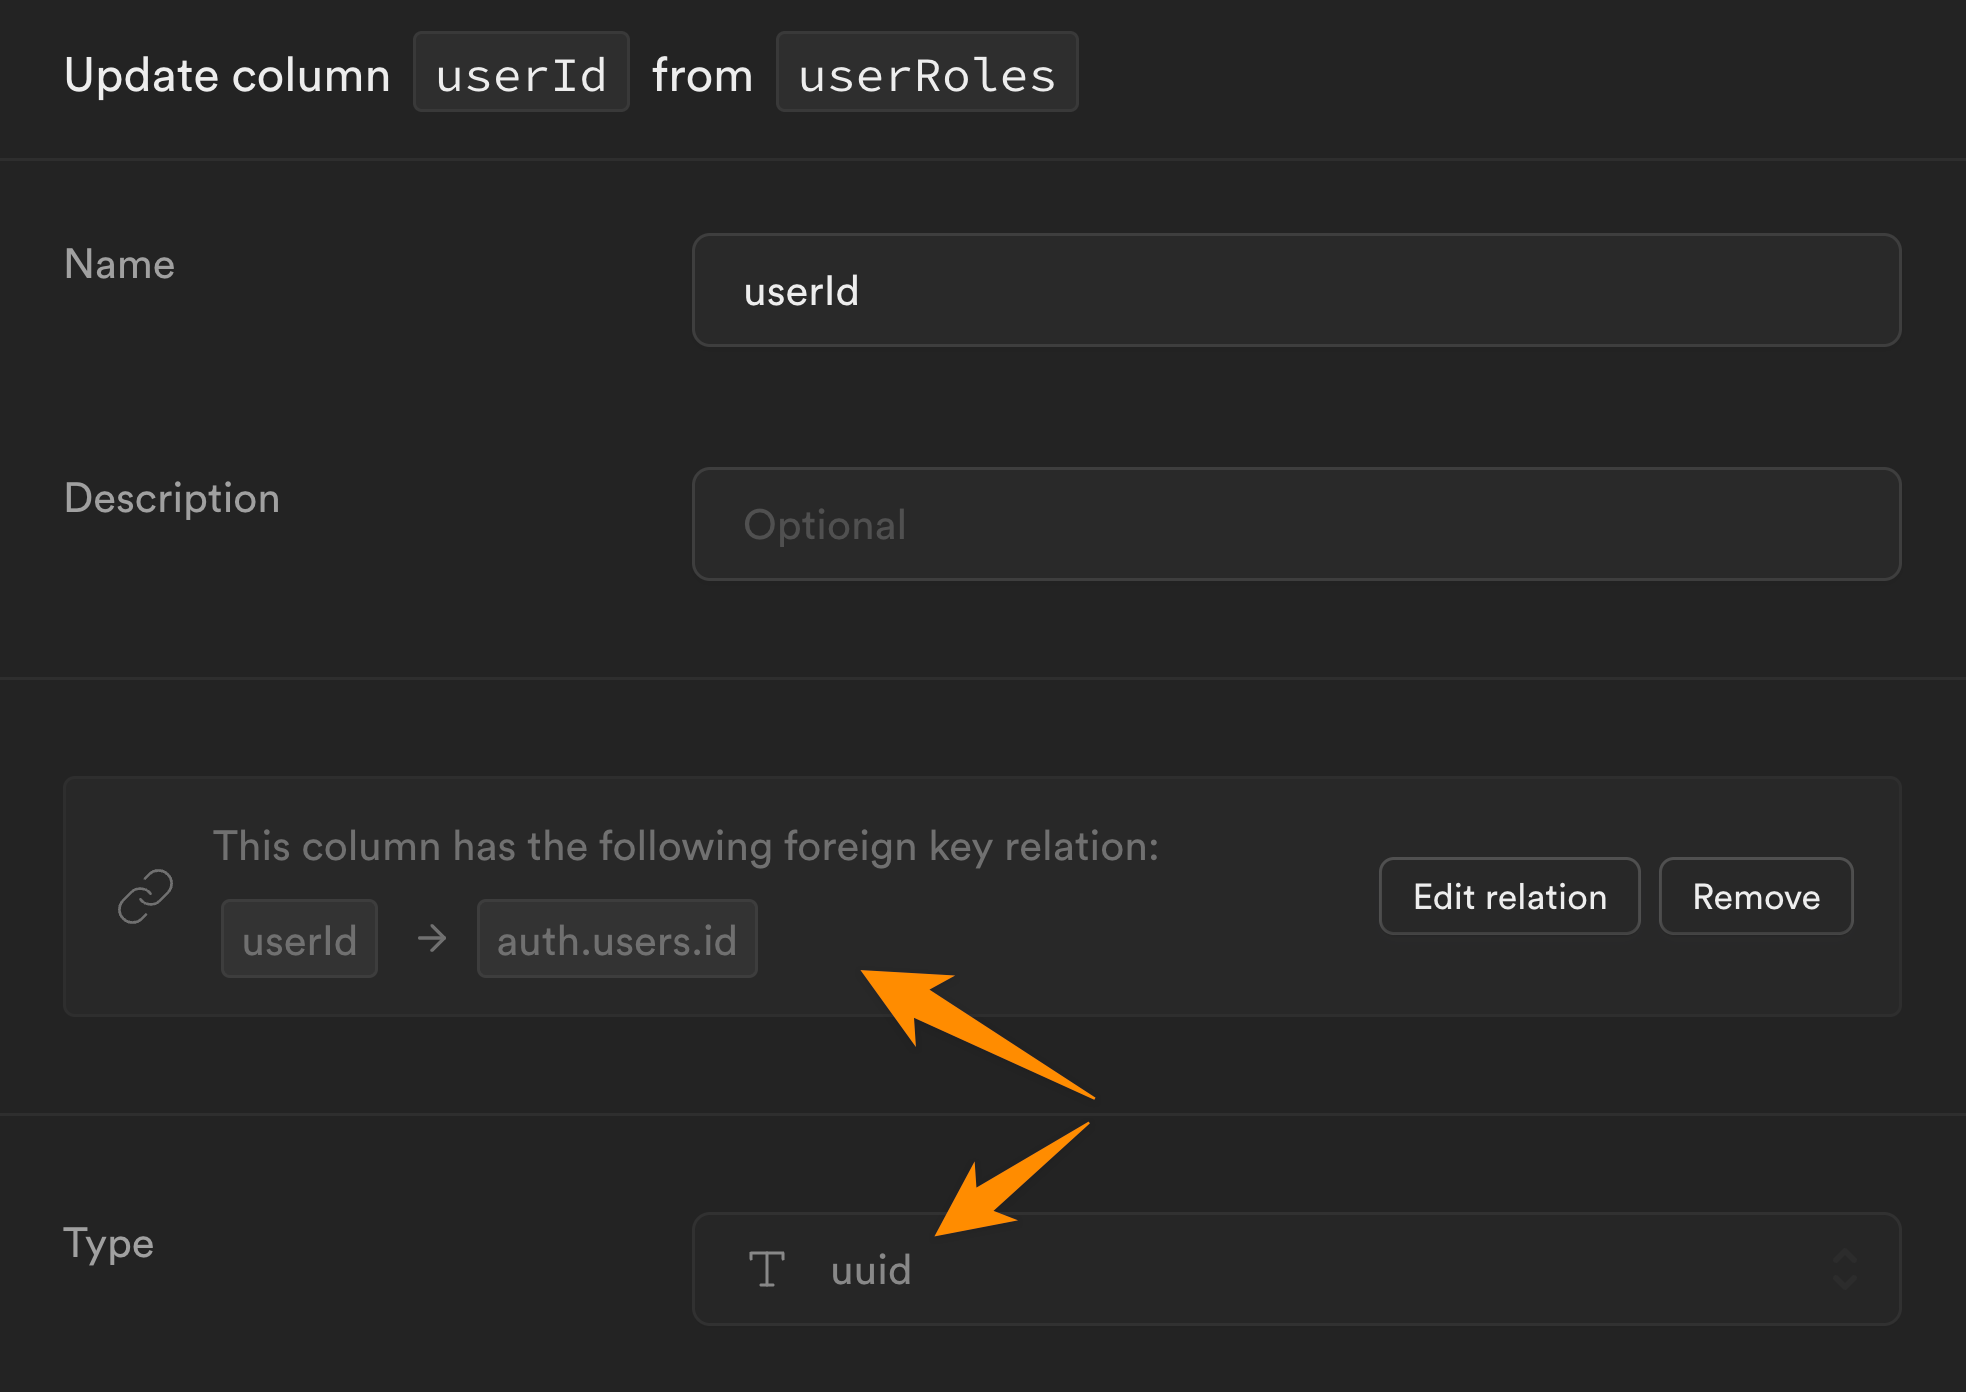
This unique "id" is linked to a "userId", which is also a UUID, more specifically, it is the UUID we find in the "id" field of the "users" table in the "auth" schema:
Each row in our "userRoles" table is also linked to a "roleId" which is the UUID we find in the "id" field of the "roles" table in the "public" schema:
Linking Users in WeWeb to Roles and Users in Supabase
Once we've added our list of roles in Supabase and created an empty join table to link our roles with users, it's time to go to WeWeb.
In "Plugins" > "Supabase Auth" > "3. Roles table", we'll click "refresh" and select the relevant Supabase tables we just created:
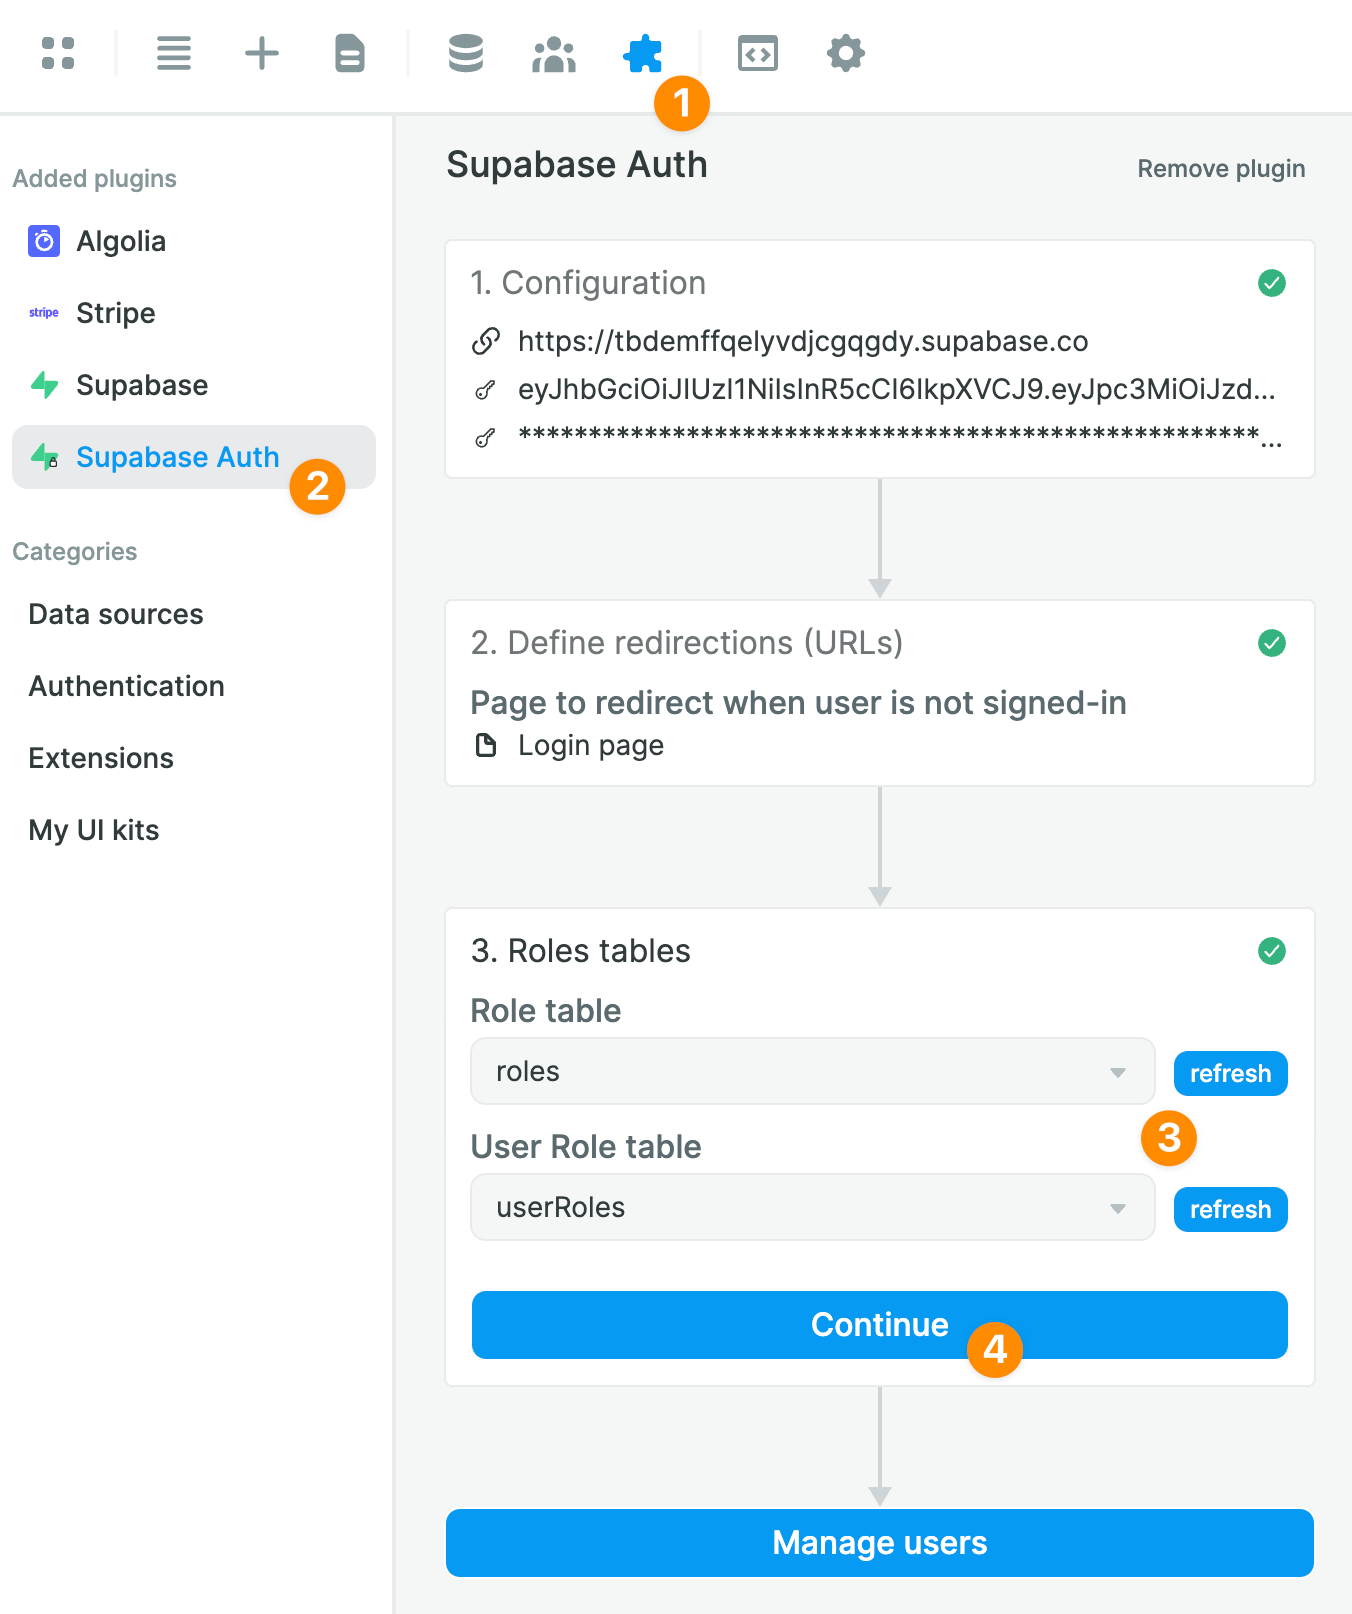
Once you've told WeWeb where to find the "roles" and the join table in Supabase, you'll be able to easily view and maintain user roles in the "Users" tab in WeWeb:
When you make a change to a User in WeWeb, it will automatically be updated in Supabase.
Users vs Profiles
So far, we've showed you how to work with the default "users" table that Supabase generates in the "auth" schema when you create a new project.
Note that, for security purposes, the information in that "users" table is not exposed on the auto-generated API.
How does this affect your project in WeWeb?
Let users update their information
Let's say you want to let authenticated users update their information, then you don't need to set up anything else in Supabase.
You could simply create a user profile page in WeWeb and display their information when they sign in, based on the data you have in the "user" Variable:

Display other users' information
In some use cases, you might want to display other users' information.
For example, in our use case, we might want rental agents to have access to a list of customer names.
We can't do that with the "users" table in the "auth" schema.
For that use case, Supabase recommends creating a "profiles" table in the "public" schema.
🔥 Pro Tip 🔥
User metadata is accessible when a user is authenticated. However, you may want to access some user data via the API. In that case, Supabase recommends creating a "profiles" table in the "public" schema to store user data that you want to access via the API. You can then add a trigger function to update the "public" table when there’s a change in the "auth" one. Learn more about managing user data in the Supabase documentation.
If you want to add a row to your public.profiles table every time a user signs up, you can use triggers. If the trigger fails however, it could block the user sign ups - so make sure that the code is well-tested.
User metadata: